|
|
| (64 intermediate revisions by 8 users not shown) |
| Line 22: |
Line 22: |
| *A large selection of heavy weapons can be found on the [[Firearms, Weapons, and Accessories]] page under the “Rebel Outpost Firearms” section. | | *A large selection of heavy weapons can be found on the [[Firearms, Weapons, and Accessories]] page under the “Rebel Outpost Firearms” section. |
| *A large selection of armed and unarmed vehicles can be found on the [[Civilian Vehicles]] page under the “Illegal Ground Vehicles” and “Illegal Aerial Vehicles” sections. | | *A large selection of armed and unarmed vehicles can be found on the [[Civilian Vehicles]] page under the “Illegal Ground Vehicles” and “Illegal Aerial Vehicles” sections. |
| *Rebels can buy even stronger gear such as pilot coveralls or an RPG from the [https://wiki.olympus-entertainment.com/wiki/Firearms,_Weapons,_and_Accessories#Warpoint_Shop War Point Shop]. | | *Rebels can buy even stronger gear such as pilot coveralls or an RPG from the [[Firearms, Weapons, and Accessories#War_point_Shop | War Point Shop]]. |
| | |
| | =='''Combat Logger Confirmation Prompt'''== |
| | *When a player restrains or tases a combat logger, a prompt will appear asking whether you want to send them to jail. |
| | *You’ll have 60 seconds to confirm your choice. |
| | *The system functions the same way as sending bones. |
| | *Bones will no longer appear when someone combat logs. |
| | *Action keys can be rebound in the settings menu. |
| | |
| | =='''Bounty Perks'''== |
| | As a player's bounty grows they can unlock access to exclusive perks that can assist them on their endeavors |
| | |
| | {| class="wikitable sortable" style=text-align:center; |
| | ! Bounty || Perk |
| | |- |
| | | $500,000 || Lock pick 10% faster and lock pick success chance increased by 10% |
| | |- |
| | | $750,000 || Process 5% faster and gather 5% faster |
| | |- |
| | | $1,000,000 || Lock pick 20% faster and lock pick success chance increased by 20% |
| | |- |
| | | $1,250,000 || Lethal inject 10% faster and lethal injectors are 5% cheaper |
| | |- |
| | | $1,500,000 || Gas Station Robberies yield a max reward of $100,000 |
| | |- |
| | | $1,750,000 || Unrestrain 20% faster |
| | |- |
| | | $2,000,000 || Rob players 20% faster and rob gas stations 10% faster |
| | |- |
| | | $2,500,000 || Process 15% faster and steal kidneys 15% faster |
| | |- |
| | | $2,750,000 || Repair 10% faster |
| | |- |
| | | $3,500,000 || Unsealing actions are 10% faster |
| | |- |
| | | $4,000,000 ||25% chance to keep epi-pen or dope shot on use |
| | |} |
|
| |
|
| =='''What Are War Points?'''== | | =='''What Are War Points?'''== |
| War Points can be obtained by killing [https://wiki.olympus-entertainment.com/wiki/Gangs_%26_Groups#Gang_Wars enemy gang members], players within [https://wiki.olympus-entertainment.com/wiki/Cartels warzone/cartels] or [https://wiki.olympus-entertainment.com/wiki/Altis_Police_Department APD officers] that are raiding the warzone. The number of points per kill can vary depending on several bonuses. Unless the APD follows a person into a warzone,they must raid with three or more officer’s. Warpoints gained during [https://wiki.olympus-entertainment.com/wiki/Conquest conquest] are earned as follows: | | War Points can be obtained by killing [[Gangs & Groups#Gang_Wars | enemy gang members]], players within [[Cartels | warzone / cartels]] or [[Altis Police Department | APD officers]] that are raiding the warzone. The number of points per kill can vary depending on several bonuses. You gain an additional War Point for any kill within 95m of the flag and during the weekend all War Point gains are increased by 50%. Unless the APD follows a person into a warzone, they must raid with three or more officer’s. War Points gained during [[Invasion]] are earned as follows: |
| *3 Points per kill | | *2 WP per kill |
| *1 Point per death | | *3 WP if kill is within 50m of flag |
| | *-1 WP on death |
|
| |
|
| {| style="border: 0px solid #aaa; border-radius: 0px; width: 50%; padding: 0px 150px;" | | {| style="border: 0px solid #aaa; border-radius: 0px; width: 50%; padding: 0px 150px;" |
| Line 111: |
Line 148: |
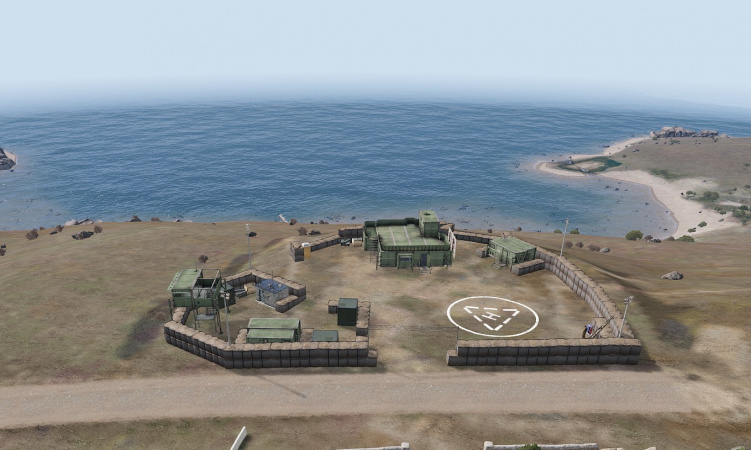
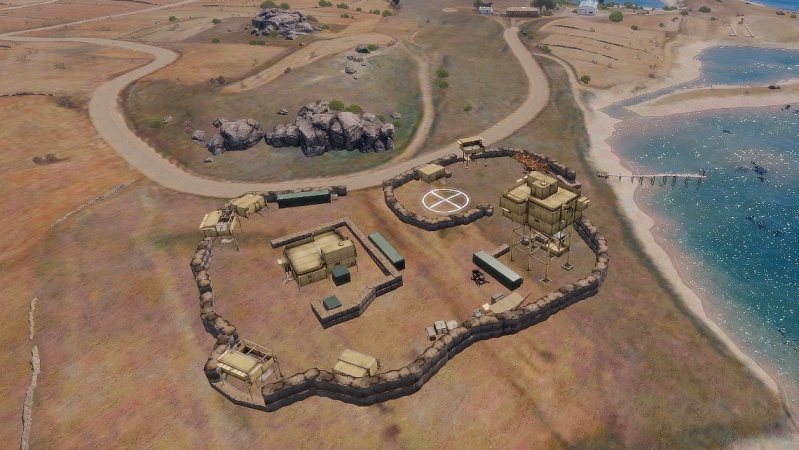
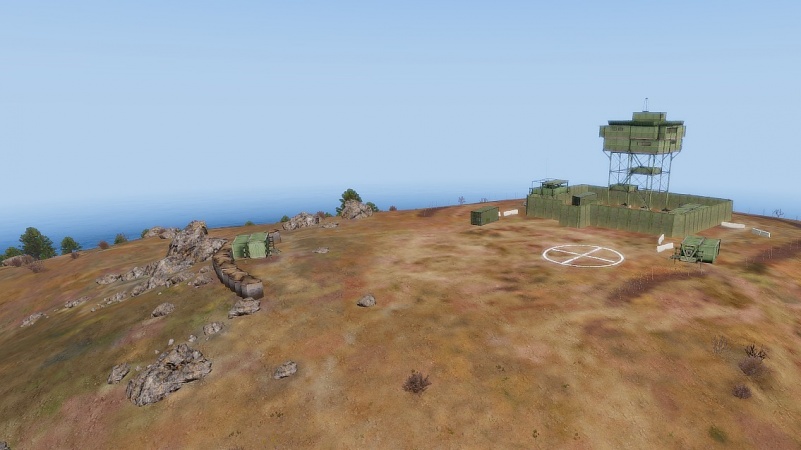
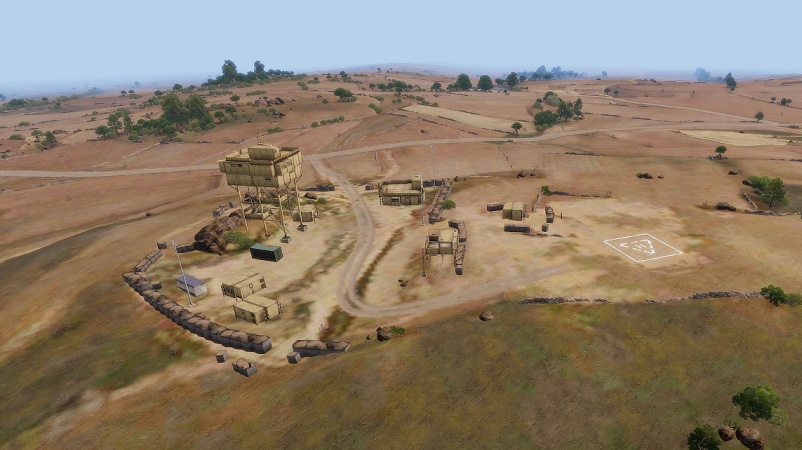
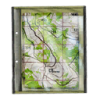
| =='''Rebel Outpost Locations'''== | | =='''Rebel Outpost Locations'''== |
|
| |
|
| <gallery mode=packed heights=200px> | | <gallery mode=packed heights=300px> |
| File:NewKavRebel.jpg|<span style="color:#c1c1b8">Kavala Rebel | | File:NewKavRebel.jpg|<span style="color:#c1c1b8">Kavala Rebel |
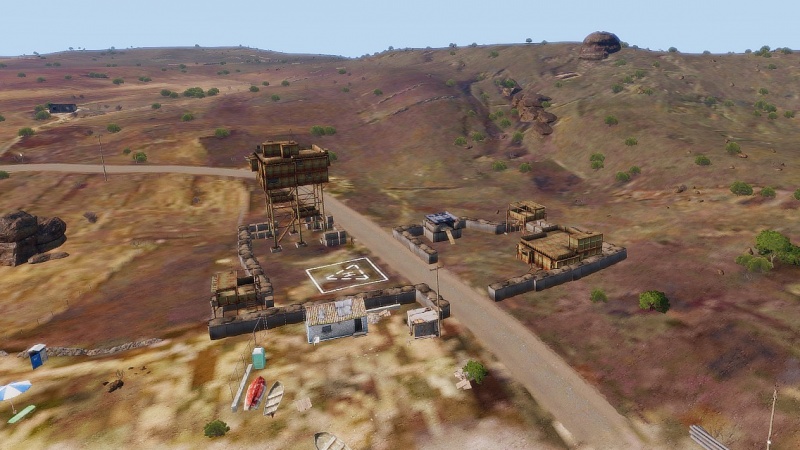
| File:bottleneckrebel.jpg|<span style="color:#c1c1b8">The warzone rebel near the bottleneck of warzone island. | | File:bottleneckrebel.jpg|<span style="color:#c1c1b8">The warzone rebel near the bottleneck of warzone island. |
| Line 118: |
Line 155: |
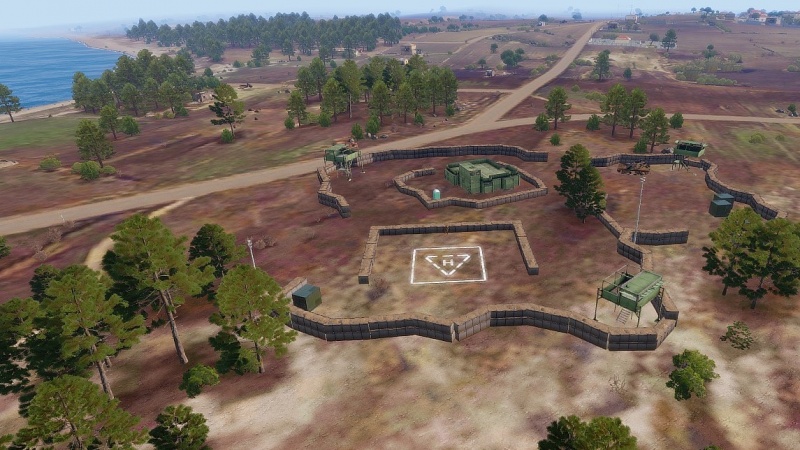
| File:pyrgosrebel.jpg|<span style="color:#c1c1b8">Pyrgos rebel. | | File:pyrgosrebel.jpg|<span style="color:#c1c1b8">Pyrgos rebel. |
| File:sofiarebel.jpg|<span style="color:#c1c1b8">Sofia rebel. | | File:sofiarebel.jpg|<span style="color:#c1c1b8">Sofia rebel. |
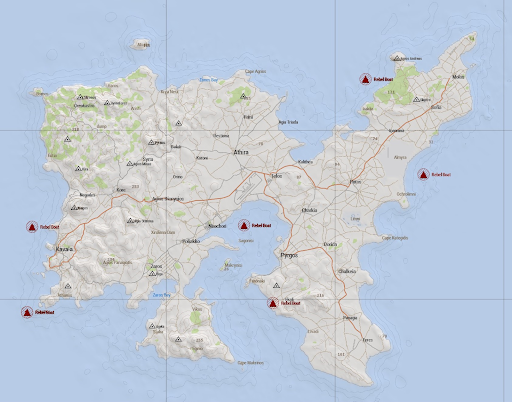
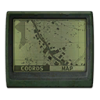
| File:KavalaRebelBoat.jpg|<span style="color:#c1c1b8">Neochori Rebel Boat. This boat occasionally moves around the map when the tides change. | | File:REBELBOATROTATIONS.png|<span style="color:#c1c1b8">The Rebel Boat. Included above are all the possible locations the rebel boat can be at depending on where it decides to anchor down. |
| </gallery> | | </gallery> |
|
| |
|
| =='''Creating Loadouts'''== | | =='''Creating Loadouts'''== |
| To make a loadout for yourself you first want to buy and equip the clothing/items/weapons you want. Once you have done so you can go to the weapon shop and at the very top it should give you an option to go to save or load a loadout. Hit the save option and click on a slot you want, you can re-name it if you want to. You then can save the loadout you have currently equipped. To load that loadout you saved just follow the same steps except hit the “load” option instead of “save” and you can access your loadouts to load on your person. Weapons/clothing from the warpoint shop can be saved if you want but you want be charged warpoints for mags that can be normally bought with cash. Mind you these types of loadouts will prefer to pay fully in warpoints. | | To make a loadout for yourself you first want to buy and equip the clothing/items/weapons you want. Once you have done so you can go to the weapon shop and at the very top it should give you an option to go to save or load a loadout. Hit the save option and click on a slot you want, you can re-name it if you want to. You then can save the loadout you have currently equipped. To load that loadout you saved just follow the same steps except hit the “load” option instead of “save” and you can access your loadouts to load on your person. Weapons/clothing from the warpoint shop can be saved if you want but you won't be charged warpoints for mags that can be normally bought with cash. Mind you these types of loadouts will prefer to pay fully in warpoints. In addition to being able to load your loadouts you also have the option to “Refill” your current loadout if you have it saved in a loadout slot. You can do this by reloading a loadout. This will refill any missing items (mags, Y inventory, medkits, etc) from your current loadout to match what you would normally have when first loading it. |
| | |
| | {{WeaponsRebelOutpost}} |
| | |
| | {{WeaponsExplosive}} |
|
| |
|
| | {{GearAttachments}} |
|
| |
|
| =='''Weapons'''==
| | {{GearGeneral}} |
|
| |
|
| | {{ArmorRebelOutpost}} |
| | |
| | {{ClothingWarPoint}} |
| | |
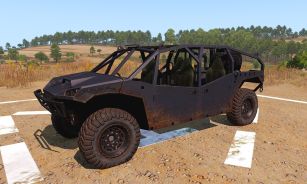
| | =='''Vehicles'''== |
| | |
| | ==='''Ground Vehicles'''=== |
| | *Illegal Vehicles are displayed in Red in the Garage to display their status. |
| <center> | | <center> |
| <div><ul> | | <div><ul> |
| <li style="display: inline-table;"> | | <li style="display: inline-table;"> |
| {| style="border: 1px solid black; border-spacing: 0; margin-right: 5px; color: black;" | | {| style="border: 1px solid black; border-spacing: 0; margin-right: 5px; color: black;" |
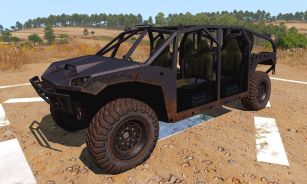
| |+ style="color: #c1c1b8;" | '''SDAR''' | | |+ style="color: #c1c1b8;" | '''Qilin''' |
| |+ [[File:SDAR.png|border|center|250px|caption]] | | |+ [[File:Quilin2023.jpg|center|307px|caption]] |
| |- | | |- |
| | style="text-align: center; width: 100px; background: #efefef;" | '''Price:''' | | | style="text-align: center; width: 150px; background: #808080;" | '''Vendor(s):''' |
| | style="text-align: center; width: 100px; background: #efefef;" | $25,000 | | | style="font-size:75%; text-align: center; width: 150px; background: #808080;" | Rebel Outpost, War point Shop |
| |- | | |- |
| | style="text-align: center; width: 100px; background: #efefef;" | '''Caliber:''' | | | style="text-align: center; width: 150px; background: #808080;" | '''Base Price:''' |
| | style="text-align: center; width: 100px; background: #efefef;" | 5.56x45mm NATO | | | style="text-align: center; width: 150px; background: #808080;" | $200,000 / 12wps |
| |- | | |- |
| | style="text-align: center; width: 100px; background: #efefef;" | '''Magazine Capacity:''' | | | style="text-align: center; width: 150px; background: #808080;" | '''Base Virtual Storage:''' |
| | style="text-align: center; width: 100px; background: #efefef;" | 20 | | | style="text-align: center; width: 150px; background: #808080;" | 80 |
| |- | | |- |
| | style="text-align: center; width: 100px; background: #efefef;" | '''Magazine Price:''' | | | style="text-align: center; width: 150px; background: #808080;" | '''Max Virtual Storage:''' |
| | style="text-align: center; width: 100px; background: #efefef;" | $500 | | | style="text-align: center; width: 150px; background: #808080;" | 96 |
| |- | | |- |
| | style="text-align: center; width: 100px; background: #efefef;" | '''DLC:''' | | | style="text-align: center; width: 150px; background: #808080;" | '''Vehicle Weight:''' |
| | style="text-align: center; width: 100px; background: #efefef;" | None | | | style="text-align: center; width: 150px; background: #808080;" | 3,924kg |
| |- | | |- |
| |} </li> | | | style="text-align: center; width: 150px; background: #808080;" | '''$ per Insurance Tier:''' |
| | | | style="text-align: center; width: 150px; background: #808080;" | $80,000 |
| <li style="display: inline-table;">
| |
| {| style="border: 1px solid black; border-spacing: 0; margin-right: 5px; color: black;"
| |
| |+ style="color: #c1c1b8;" | '''Vermin'''
| |
| |+ [[File:vermin.png|border|center|250px|caption]] | |
| |- | | |- |
| | style="text-align: center; width: 100px; background: #efefef;" | '''Price:''' | | | style="text-align: center; width: 150px; background: #808080;" | '''$ per Turbo Tier:''' |
| | style="text-align: center; width: 100px; background: #efefef;" | $40,000 | | | style="text-align: center; width: 150px; background: #808080;" | $10,000 |
| |- | | |- |
| | style="text-align: center; width: 100px; background: #efefef;" | '''Caliber:''' | | | style="text-align: center; width: 150px; background: #808080;" | '''$ per Security Tier:''' |
| | style="text-align: center; width: 100px; background: #efefef;" | .45 ACP
| | | style="text-align: center; width: 150px; background: #808080;" | $20,000 |
| |-
| |
| | style="text-align: center; width: 100px; background: #efefef;" | '''Magazine Capacity:'''
| |
| | style="text-align: center; width: 100px; background: #efefef;" | 30
| |
| |-
| |
| | style="text-align: center; width: 100px; background: #efefef;" | '''Magazine Price:''' | |
| | style="text-align: center; width: 100px; background: #efefef;" | $500
| |
| |-
| |
| | style="text-align: center; width: 100px; background: #efefef;" | '''DLC:'''
| |
| | style="text-align: center; width: 100px; background: #efefef;" | None
| |
| |- | | |- |
| | | style="text-align: center; width: 150px; background: #808080;" | '''$ per Storage Tier:''' |
| | | style="text-align: center; width: 150px; background: #808080;" | $30,000 per 4 units |
| |} </li> | | |} </li> |
|
| |
|
| <li style="display: inline-table;"> | | <li style="display: inline-table;"> |
| {| style="border: 1px solid black; border-spacing: 0; margin-right: 5px; color: black;" | | {| style="border: 1px solid black; border-spacing: 0; margin-right: 5px; color: black;" |
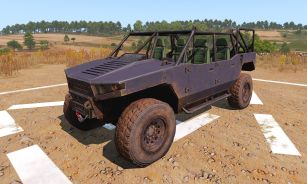
| |+ style="color: #c1c1b8;" | '''Mk20C''' | | |+ style="color: #c1c1b8;" | '''Quilin (Light)''' |
| |+ [[File:mk20c.png|border|center|250px|caption]] | | |+ [[File:Quilinnodoodoor12023.jpg|center|307px|caption]] |
| |- | | |- |
| | style="text-align: center; width: 100px; background: #efefef;" | '''Price:''' | | | style="text-align: center; width: 150px; background: #808080;" | '''Vendor(s):''' |
| | style="text-align: center; width: 100px; background: #efefef;" | $40,000 | | | style="font-size:75%; text-align: center; width: 150px; background: #808080;" | Rebel Outpost, War point Shop |
| |- | | |- |
| | style="text-align: center; width: 100px; background: #efefef;" | '''Caliber:''' | | | style="text-align: center; width: 150px; background: #808080;" | '''Base Price:''' |
| | style="text-align: center; width: 100px; background: #efefef;" | 5.56x45mm NATO | | | style="text-align: center; width: 150px; background: #808080;" | $155,000 / 11WPs |
| |- | | |- |
| | style="text-align: center; width: 100px; background: #efefef;" | '''Magazine Capacity:''' | | | style="text-align: center; width: 150px; background: #808080;" | '''Base Virtual Storage:''' |
| | style="text-align: center; width: 100px; background: #efefef;" | 30 | | | style="text-align: center; width: 150px; background: #808080;" | 80 |
| |- | | |- |
| | style="text-align: center; width: 100px; background: #efefef;" | '''Magazine Price:''' | | | style="text-align: center; width: 150px; background: #808080;" | '''Max Virtual Storage:''' |
| | style="text-align: center; width: 100px; background: #efefef;" | $500 | | | style="text-align: center; width: 150px; background: #808080;" | 96 |
| |- | | |- |
| | style="text-align: center; width: 100px; background: #efefef;" | '''DLC:''' | | | style="text-align: center; width: 150px; background: #808080;" | '''Vehicle Weight:''' |
| | style="text-align: center; width: 100px; background: #efefef;" | None | | | style="text-align: center; width: 150px; background: #808080;" | 3,924kg |
| |- | | |- |
| |} </li> | | | style="text-align: center; width: 150px; background: #808080;" | '''$ per Insurance Tier:''' |
| | | | style="text-align: center; width: 150px; background: #808080;" | $80,000 |
| <li style="display: inline-table;">
| |
| {| style="border: 1px solid black; border-spacing: 0; margin-right: 5px; color: black;"
| |
| |+ style="color: #c1c1b8;" | '''Mk20'''
| |
| |+ [[File:mk20c.png|border|center|250px|caption]] | |
| |- | | |- |
| | style="text-align: center; width: 100px; background: #efefef;" | '''Price:''' | | | style="text-align: center; width: 150px; background: #808080;" | '''$ per Turbo Tier:''' |
| | style="text-align: center; width: 100px; background: #efefef;" | $45,000 | | | style="text-align: center; width: 150px; background: #808080;" | $10,000 |
| |- | | |- |
| | style="text-align: center; width: 100px; background: #efefef;" | '''Caliber:''' | | | style="text-align: center; width: 150px; background: #808080;" | '''$ per Security Tier:''' |
| | style="text-align: center; width: 100px; background: #efefef;" | 5.56x45mm NATO
| | | style="text-align: center; width: 150px; background: #808080;" | $20,000 |
| |-
| |
| | style="text-align: center; width: 100px; background: #efefef;" | '''Magazine Capacity:'''
| |
| | style="text-align: center; width: 100px; background: #efefef;" | 30
| |
| |-
| |
| | style="text-align: center; width: 100px; background: #efefef;" | '''Magazine Price:''' | |
| | style="text-align: center; width: 100px; background: #efefef;" | $400
| |
| |-
| |
| | style="text-align: center; width: 100px; background: #efefef;" | '''DLC:'''
| |
| | style="text-align: center; width: 100px; background: #efefef;" | None
| |
| |- | | |- |
| | | style="text-align: center; width: 150px; background: #808080;" | '''$ per Storage Tier:''' |
| | | style="text-align: center; width: 150px; background: #808080;" | $30,000 per 4 units |
| |} </li> | | |} </li> |
|
| |
|
| <li style="display: inline-table;"> | | <li style="display: inline-table;"> |
| {| style="border: 1px solid black; border-spacing: 0; margin-right: 5px; color: black;" | | {| style="border: 1px solid black; border-spacing: 0; margin-right: 5px; color: black;" |
| |+ style="color: #c1c1b8;" | '''TRG-21''' | | |+ style="color: #c1c1b8;" | '''Prowler''' |
| |+ [[File:TRGGreen.png|border|center|250px|caption]] | | |+ [[File:Prowler2023.jpg|center|307px|caption]] |
| |- | | |- |
| | style="text-align: center; width: 100px; background: #efefef;" | '''Price:''' | | | style="text-align: center; width: 150px; background: #808080;" | '''Vendor(s):''' |
| | style="text-align: center; width: 100px; background: #efefef;" | $40,000 | | | style="font-size:75%; text-align: center; width: 150px; background: #808080;" | Rebel Outpost, War point Shop |
| |- | | |- |
| | style="text-align: center; width: 100px; background: #efefef;" | '''Caliber:''' | | | style="text-align: center; width: 150px; background: #808080;" | '''Base Price:''' |
| | style="text-align: center; width: 100px; background: #efefef;" | 5.56x45mm NATO | | | style="text-align: center; width: 150px; background: #808080;" | $200,000 / 12 wp |
| |- | | |- |
| | style="text-align: center; width: 100px; background: #efefef;" | '''Magazine Capacity:''' | | | style="text-align: center; width: 150px; background: #808080;" | '''Base Virtual Storage:''' |
| | style="text-align: center; width: 100px; background: #efefef;" | 30 | | | style="text-align: center; width: 150px; background: #808080;" | 80 |
| |- | | |- |
| | style="text-align: center; width: 100px; background: #efefef;" | '''Magazine Price:''' | | | style="text-align: center; width: 150px; background: #808080;" | '''Max Virtual Storage:''' |
| | style="text-align: center; width: 100px; background: #efefef;" | $500 | | | style="text-align: center; width: 150px; background: #808080;" | 96 |
| |- | | |- |
| | style="text-align: center; width: 100px; background: #efefef;" | '''DLC:''' | | | style="text-align: center; width: 150px; background: #808080;" | '''Vehicle Weight:''' |
| | style="text-align: center; width: 100px; background: #efefef;" | None | | | style="text-align: center; width: 150px; background: #808080;" | 3,413kg |
| |- | | |- |
| |} </li>
| | | style="text-align: center; width: 150px; background: #808080;" | '''$ per Insurance Tier:''' |
| | | | style="text-align: center; width: 150px; background: #808080;" | $80,000 |
| <li style="display: inline-table;">
| |
| {| style="border: 1px solid black; border-spacing: 0; margin-right: 5px; color: black;"
| |
| |+ style="color: #c1c1b8;" | '''AKS-74U'''
| |
| |+ [[File:aks74u.png|border|center|250px|caption]] | |
| |- | | |- |
| | style="text-align: center; width: 100px; background: #efefef;" | '''Price:''' | | | style="text-align: center; width: 150px; background: #808080;" | '''$ per Turbo Tier:''' |
| | style="text-align: center; width: 100px; background: #efefef;" | $50,000 | | | style="text-align: center; width: 150px; background: #808080;" | $10,000 |
| |- | | |- |
| | style="text-align: center; width: 100px; background: #efefef;" | '''Caliber:''' | | | style="text-align: center; width: 150px; background: #808080;" | '''$ per Security Tier:''' |
| | style="text-align: center; width: 100px; background: #efefef;" | 5.45x39mm
| | | style="text-align: center; width: 150px; background: #808080;" | $20,000 |
| |-
| |
| | style="text-align: center; width: 100px; background: #efefef;" | '''Magazine Capacity:'''
| |
| | style="text-align: center; width: 100px; background: #efefef;" | 30
| |
| |-
| |
| | style="text-align: center; width: 100px; background: #efefef;" | '''Magazine Price:''' | |
| | style="text-align: center; width: 100px; background: #efefef;" | $500
| |
| |-
| |
| | style="text-align: center; width: 100px; background: #efefef;" | '''DLC:'''
| |
| | style="text-align: center; width: 100px; background: #efefef;" | Apex
| |
| |- | | |- |
| | | style="text-align: center; width: 150px; background: #808080;" | '''$ per Storage Tier:''' |
| | | style="text-align: center; width: 150px; background: #808080;" | $30,000 per 3 units |
| |} </li> | | |} </li> |
|
| |
|
| <li style="display: inline-table;"> | | <li style="display: inline-table;"> |
| {| style="border: 1px solid black; border-spacing: 0; margin-right: 5px; color: black;" | | {| style="border: 1px solid black; border-spacing: 0; margin-right: 5px; color: black;" |
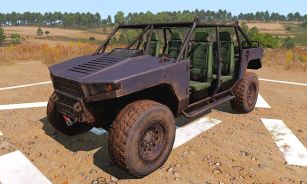
| |+ style="color: #c1c1b8;" | '''CAR-95 (Black)''' | | |+ style="color: #c1c1b8;" | '''Prowler (Light)''' |
| |+ [[File:car95.png|border|center|250px|caption]] | | |+ [[File:Quilinnodoor2023.jpg|center|307px|caption]] |
| |- | | |- |
| | style="text-align: center; width: 100px; background: #efefef;" | '''Price:''' | | | style="text-align: center; width: 150px; background: #808080;" | '''Vendor(s):''' |
| | style="text-align: center; width: 100px; background: #efefef;" | $55,000 | | | style="font-size:75%; text-align: center; width: 150px; background: #808080;" | Rebel Outpost, War point Shop |
| |- | | |- |
| | style="text-align: center; width: 100px; background: #efefef;" | '''Caliber:''' | | | style="text-align: center; width: 150px; background: #808080;" | '''Base Price:''' |
| | style="text-align: center; width: 100px; background: #efefef;" | 5.8x42mm | | | style="text-align: center; width: 150px; background: #808080;" | $145,000 / 10WPs |
| |- | | |- |
| | style="text-align: center; width: 100px; background: #efefef;" | '''Magazine Capacity:''' | | | style="text-align: center; width: 150px; background: #808080;" | '''Base Virtual Storage:''' |
| | style="text-align: center; width: 100px; background: #efefef;" | 30/100 | | | style="text-align: center; width: 150px; background: #808080;" | 80 |
| |- | | |- |
| | style="text-align: center; width: 100px; background: #efefef;" | '''Magazine Price:''' | | | style="text-align: center; width: 150px; background: #808080;" | '''Max Virtual Storage:''' |
| | style="text-align: center; width: 100px; background: #efefef;" | $500/$6,500 | | | style="text-align: center; width: 150px; background: #808080;" | 96 |
| |- | | |- |
| | style="text-align: center; width: 100px; background: #efefef;" | '''DLC:''' | | | style="text-align: center; width: 150px; background: #808080;" | '''Vehicle Weight:''' |
| | style="text-align: center; width: 100px; background: #efefef;" | Apex | | | style="text-align: center; width: 150px; background: #808080;" | 3,413kg |
| |- | | |- |
| |} </li>
| | | style="text-align: center; width: 150px; background: #808080;" | '''$ per Insurance Tier:''' |
| | | | style="text-align: center; width: 150px; background: #808080;" | $80,000 |
| <li style="display: inline-table;">
| |
| {| style="border: 1px solid black; border-spacing: 0; margin-right: 5px; color: black;"
| |
| |+ style="color: #c1c1b8;" | '''CAR-95-1 (Black)'''
| |
| |+ [[File:car951.png|border|center|250px|caption]] | |
| |- | | |- |
| | style="text-align: center; width: 100px; background: #efefef;" | '''Price:''' | | | style="text-align: center; width: 150px; background: #808080;" | '''$ per Turbo Tier:''' |
| | style="text-align: center; width: 100px; background: #efefef;" | $75,000 | | | style="text-align: center; width: 150px; background: #808080;" | $10,000 |
| |- | | |- |
| | style="text-align: center; width: 100px; background: #efefef;" | '''Caliber:''' | | | style="text-align: center; width: 150px; background: #808080;" | '''$ per Security Tier:''' |
| | style="text-align: center; width: 100px; background: #efefef;" | 5.8x42mm
| | | style="text-align: center; width: 150px; background: #808080;" | $20,000 |
| |-
| |
| | style="text-align: center; width: 100px; background: #efefef;" | '''Magazine Capacity:'''
| |
| | style="text-align: center; width: 100px; background: #efefef;" | 30/100
| |
| |-
| |
| | style="text-align: center; width: 100px; background: #efefef;" | '''Magazine Price:'''
| |
| | style="text-align: center; width: 100px; background: #efefef;" | $500/$6,500 | |
| |-
| |
| | style="text-align: center; width: 100px; background: #efefef;" | '''DLC:'''
| |
| | style="text-align: center; width: 100px; background: #efefef;" | Apex
| |
| |- | | |- |
| | | style="text-align: center; width: 150px; background: #808080;" | '''$ per Storage Tier:''' |
| | | style="text-align: center; width: 150px; background: #808080;" | $30,000 per 3 units |
| |} </li> | | |} </li> |
|
| |
|
| <li style="display: inline-table;"> | | <li style="display: inline-table;"> |
| {| style="border: 1px solid black; border-spacing: 0; margin-right: 5px; color: black;" | | {| style="border: 1px solid black; border-spacing: 0; margin-right: 5px; color: black;" |
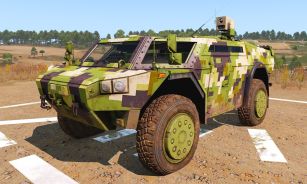
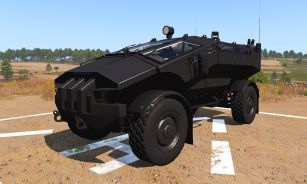
| |+ style="color: #c1c1b8;" | '''ADR-97C TR''' | | |+ style="color: #c1c1b8;" | '''Strider''' |
| |+ [[File:adr97c.png|border|center|250px|caption]] | | |+ [[File:Strider2023.jpg|center|307px|caption]] |
| |- | | |- |
| | style="text-align: center; width: 100px; background: #efefef;" | '''Price:''' | | | style="text-align: center; width: 150px; background: #808080;" | '''Vendor(s):''' |
| | style="text-align: center; width: 100px; background: #efefef;" | $70,000 | | | style="font-size:75%; text-align: center; width: 150px; background: #808080;" | Rebel Outpost, War point Shop |
| |- | | |- |
| | style="text-align: center; width: 100px; background: #efefef;" | '''Caliber:''' | | | style="text-align: center; width: 150px; background: #808080;" | '''Base Price:''' |
| | style="text-align: center; width: 100px; background: #efefef;" | 5.7x28mm | | | style="text-align: center; width: 150px; background: #808080;" | $550,000 / 40wps |
| |- | | |- |
| | style="text-align: center; width: 100px; background: #efefef;" | '''Magazine Capacity:''' | | | style="text-align: center; width: 150px; background: #808080;" | '''Base Virtual Storage:''' |
| | style="text-align: center; width: 100px; background: #efefef;" | 50 | | | style="text-align: center; width: 150px; background: #808080;" | 60 |
| |- | | |- |
| | style="text-align: center; width: 100px; background: #efefef;" | '''Magazine Price:''' | | | style="text-align: center; width: 150px; background: #808080;" | '''Max Virtual Storage:''' |
| | style="text-align: center; width: 100px; background: #efefef;" | $500 | | | style="text-align: center; width: 150px; background: #808080;" | 72 |
| |- | | |- |
| | style="text-align: center; width: 100px; background: #efefef;" | '''DLC:''' | | | style="text-align: center; width: 150px; background: #808080;" | '''Vehicle Weight:''' |
| | style="text-align: center; width: 100px; background: #efefef;" | None | | | style="text-align: center; width: 150px; background: #808080;" | 9,700kg |
| |- | | |- |
| |} </li>
| | | style="text-align: center; width: 150px; background: #808080;" | '''$ per Insurance Tier:''' |
| | | | style="text-align: center; width: 150px; background: #808080;" | $220,000 |
| <li style="display: inline-table;">
| |
| {| style="border: 1px solid black; border-spacing: 0; margin-right: 5px; color: black;"
| |
| |+ style="color: #c1c1b8;" | '''Kozlice 12G Sawed-Off'''
| |
| |+ [[File:KozliceSawedOff.png|border|center|250px|caption]] | |
| |- | | |- |
| | style="text-align: center; width: 100px; background: #efefef;" | '''Price:''' | | | style="text-align: center; width: 150px; background: #808080;" | '''$ per Turbo Tier:''' |
| | style="text-align: center; width: 100px; background: #efefef;" | $45,000 | | | style="text-align: center; width: 150px; background: #808080;" | $27,500 |
| |- | | |- |
| | style="text-align: center; width: 100px; background: #efefef;" | '''Caliber:''' | | | style="text-align: center; width: 150px; background: #808080;" | '''$ per Security Tier:''' |
| | style="text-align: center; width: 100px; background: #efefef;" | 12 Gauge Pellets | | | style="text-align: center; width: 150px; background: #808080;" | $55,000 |
| |- | | |- |
| | style="text-align: center; width: 100px; background: #efefef;" | '''Magazine Capacity:''' | | | style="text-align: center; width: 150px; background: #808080;" | '''$ per Storage Tier:''' |
| | style="text-align: center; width: 100px; background: #efefef;" | 2 | | | style="text-align: center; width: 150px; background: #808080;" | $68,750 per 3 units |
| |-
| |
| | style="text-align: center; width: 100px; background: #efefef;" | '''Magazine Price:'''
| |
| | style="text-align: center; width: 100px; background: #efefef;" | $500
| |
| |-
| |
| | style="text-align: center; width: 100px; background: #efefef;" | '''DLC:'''
| |
| | style="text-align: center; width: 100px; background: #efefef;" | Contact
| |
| |} </li> | | |} </li> |
|
| |
|
| <li style="display: inline-table;"> | | <li style="display: inline-table;"> |
| {| style="border: 1px solid black; border-spacing: 0; margin-right: 5px; color: black;" | | {| style="border: 1px solid black; border-spacing: 0; margin-right: 5px; color: black;" |
| |+ style="color: #c1c1b8;" | '''Kozlice''' | | |+ style="color: #c1c1b8;" | '''Hunter''' |
| |+ [[File:kozlice.png|border|center|250px|caption]] | | |+ [[File:Hunter2023.jpg|center|307px|caption]] |
| |- | | |- |
| | style="text-align: center; width: 100px; background: #efefef;" | '''Price:''' | | | style="text-align: center; width: 150px; background: #808080;" | '''Vendor(s):''' |
| | style="text-align: center; width: 100px; background: #efefef;" | $55,000 | | | style="font-size:75%; text-align: center; width: 150px; background: #808080;" | Rebel Outpost, War point Shop |
| |- | | |- |
| | style="text-align: center; width: 100px; background: #efefef;" | '''Caliber:''' | | | style="text-align: center; width: 150px; background: #808080;" | '''Base Price:''' |
| | style="text-align: center; width: 100px; background: #efefef;" | 12 Gauge Pellets | | | style="text-align: center; width: 150px; background: #808080;" | $400,000 / 20wps |
| |- | | |- |
| | style="text-align: center; width: 100px; background: #efefef;" | '''Magazine Capacity:''' | | | style="text-align: center; width: 150px; background: #808080;" | '''Base Virtual Storage:''' |
| | style="text-align: center; width: 100px; background: #efefef;" | 2 | | | style="text-align: center; width: 150px; background: #808080;" | 50 |
| |- | | |- |
| | style="text-align: center; width: 100px; background: #efefef;" | '''Magazine Price:''' | | | style="text-align: center; width: 150px; background: #808080;" | '''Max Virtual Storage:''' |
| | style="text-align: center; width: 100px; background: #efefef;" | $500 | | | style="text-align: center; width: 150px; background: #808080;" | 62 |
| |- | | |- |
| | style="text-align: center; width: 100px; background: #efefef;" | '''DLC:''' | | | style="text-align: center; width: 150px; background: #808080;" | '''Vehicle Weight:''' |
| | style="text-align: center; width: 100px; background: #efefef;" | Contact | | | style="text-align: center; width: 150px; background: #808080;" | 8,306kg |
| |} </li>
| |
| | |
| <li style="display: inline-table;">
| |
| {| style="border: 1px solid black; border-spacing: 0; margin-right: 5px; color: black;"
| |
| |+ style="color: #c1c1b8;" | '''AKM'''
| |
| |+ [[File:akm.png|border|center|250px|caption]]
| |
| |- | | |- |
| | style="text-align: center; width: 100px; background: #efefef;" | '''Price:''' | | | style="text-align: center; width: 150px; background: #808080;" | '''$ per Insurance Tier:''' |
| | style="text-align: center; width: 100px; background: #efefef;" | $60,000 | | | style="text-align: center; width: 150px; background: #808080;" | $160,000 |
| |- | | |- |
| | style="text-align: center; width: 100px; background: #efefef;" | '''Caliber:''' | | | style="text-align: center; width: 150px; background: #808080;" | '''$ per Turbo Tier:''' |
| | style="text-align: center; width: 100px; background: #efefef;" | 7.62x39mm | | | style="text-align: center; width: 150px; background: #808080;" | $20,000 |
| |- | | |- |
| | style="text-align: center; width: 100px; background: #efefef;" | '''Magazine Capacity:''' | | | style="text-align: center; width: 150px; background: #808080;" | '''$ per Security Tier:''' |
| | style="text-align: center; width: 100px; background: #efefef;" | 30/75 | | | style="text-align: center; width: 150px; background: #808080;" | $40,000 |
| |- | | |- |
| | style="text-align: center; width: 100px; background: #efefef;" | '''Magazine Price:''' | | | style="text-align: center; width: 150px; background: #808080;" | '''$ per Storage Tier:''' |
| | style="text-align: center; width: 100px; background: #efefef;" | $500/$15,000 | | | style="text-align: center; width: 150px; background: #808080;" | $50,000 per 3 units |
| |-
| |
| | style="text-align: center; width: 100px; background: #efefef;" | '''DLC:'''
| |
| | style="text-align: center; width: 100px; background: #efefef;" | Apex
| |
| |} </li> | | |} </li> |
|
| |
|
| <li style="display: inline-table;"> | | <li style="display: inline-table;"> |
| {| style="border: 1px solid black; border-spacing: 0; margin-right: 5px; color: black;" | | {| style="border: 1px solid black; border-spacing: 0; margin-right: 5px; color: black;" |
| |+ style="color: #c1c1b8;" | '''AKM (Flashlight)''' | | |+ style="color: #c1c1b8;" | '''Ifrit''' |
| |+ [[File:akm.png|border|center|250px|caption]] | | |+ [[File:Ifrit2023.jpg|center|307px|caption]] |
| |- | | |- |
| | style="text-align: center; width: 100px; background: #efefef;" | '''Price:''' | | | style="text-align: center; width: 150px; background: #808080;" | '''Vendor(s):''' |
| | style="text-align: center; width: 100px; background: #efefef;" | $60,000 | | | style="font-size:75%; text-align: center; width: 150px; background: #808080;" | Rebel Outpost, War point Shop |
| |- | | |- |
| | style="text-align: center; width: 100px; background: #efefef;" | '''Caliber:''' | | | style="text-align: center; width: 150px; background: #808080;" | '''Base Price:''' |
| | style="text-align: center; width: 100px; background: #efefef;" | 7.62x39mm | | | style="text-align: center; width: 150px; background: #808080;" | $650,000 / 45wps |
| |- | | |- |
| | style="text-align: center; width: 100px; background: #efefef;" | '''Magazine Capacity:''' | | | style="text-align: center; width: 150px; background: #808080;" | '''Base Virtual Storage:''' |
| | style="text-align: center; width: 100px; background: #efefef;" | 30/75 | | | style="text-align: center; width: 150px; background: #808080;" | 60 |
| |- | | |- |
| | style="text-align: center; width: 100px; background: #efefef;" | '''Magazine Price:''' | | | style="text-align: center; width: 150px; background: #808080;" | '''Max Virtual Storage:''' |
| | style="text-align: center; width: 100px; background: #efefef;" | $500/$15,000 | | | style="text-align: center; width: 150px; background: #808080;" | 72 |
| | |- |
| | | style="text-align: center; width: 150px; background: #808080;" | '''Vehicle Weight:''' |
| | | style="text-align: center; width: 150px; background: #808080;" | 8,392kg |
| |- | | |- |
| | style="text-align: center; width: 100px; background: #efefef;" | '''DLC:''' | | | style="text-align: center; width: 150px; background: #808080;" | '''$ per Insurance Tier:''' |
| | style="text-align: center; width: 100px; background: #efefef;" | Apex | | | style="text-align: center; width: 150px; background: #808080;" | $260,000 |
| |} </li>
| |
| | |
| <li style="display: inline-table;">
| |
| {| style="border: 1px solid black; border-spacing: 0; margin-right: 5px; color: black;"
| |
| |+ style="color: #c1c1b8;" | '''SPAR-16'''
| |
| |+ [[File:spar16khaki.png|border|center|250px|caption]]
| |
| |- | | |- |
| | style="text-align: center; width: 100px; background: #efefef;" | '''Price:''' | | | style="text-align: center; width: 150px; background: #808080;" | '''$ per Turbo Tier:''' |
| | style="text-align: center; width: 100px; background: #efefef;" | $70,000 | | | style="text-align: center; width: 150px; background: #808080;" | $32,500 |
| |- | | |- |
| | style="text-align: center; width: 100px; background: #efefef;" | '''Caliber:''' | | | style="text-align: center; width: 150px; background: #808080;" | '''$ per Security Tier:''' |
| | style="text-align: center; width: 100px; background: #efefef;" | 5.56x45mm NATO | | | style="text-align: center; width: 150px; background: #808080;" | $65,000 |
| |- | | |- |
| | style="text-align: center; width: 100px; background: #efefef;" | '''Magazine Capacity:''' | | | style="text-align: center; width: 150px; background: #808080;" | '''$ per Storage Tier:''' |
| | style="text-align: center; width: 100px; background: #efefef;" | 30/150
| | | style="text-align: center; width: 150px; background: #808080;" | $81,250 per 3 units |
| |-
| |
| | style="text-align: center; width: 100px; background: #efefef;" | '''Magazine Price:'''
| |
| | style="text-align: center; width: 100px; background: #efefef;" | $500/$10,000 | |
| |-
| |
| | style="text-align: center; width: 100px; background: #efefef;" | '''DLC:'''
| |
| | style="text-align: center; width: 100px; background: #efefef;" | Apex
| |
| |} </li> | | |} </li> |
|
| |
|
| <li style="display: inline-table;"> | | <li style="display: inline-table;"> |
| {| style="border: 1px solid black; border-spacing: 0; margin-right: 5px; color: black;" | | {| style="border: 1px solid black; border-spacing: 0; margin-right: 5px; color: black;" |
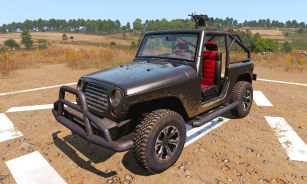
| |+ style="color: #c1c1b8;" | '''SPAR-16S''' | | |+ style="color: #c1c1b8;" | '''Armed Jeep''' |
| |+ [[File:spar16s.png|border|center|250px|caption]] | | |+ [[File:Armedjeep2023.jpg|center|307px|caption]] |
| |- | | |- |
| | style="text-align: center; width: 100px; background: #efefef;" | '''Price:''' | | | style="text-align: center; width: 150px; background: #808080;" | '''Vendor(s):''' |
| | style="text-align: center; width: 100px; background: #efefef;" | $150,000 | | | style="font-size:75%; text-align: center; width: 150px; background: #808080;" | Rebel Outpost, War point Shop |
| |- | | |- |
| | style="text-align: center; width: 100px; background: #efefef;" | '''Caliber:''' | | | style="text-align: center; width: 150px; background: #808080;" | '''Base Price:''' |
| | style="text-align: center; width: 100px; background: #efefef;" | 5.56x45mm | | | style="text-align: center; width: 150px; background: #808080;" | $200,000 / 15wps |
| |- | | |- |
| | style="text-align: center; width: 100px; background: #efefef;" | '''Magazine Capacity:''' | | | style="text-align: center; width: 150px; background: #808080;" | '''Base Virtual Storage:''' |
| | style="text-align: center; width: 100px; background: #efefef;" | 30/150 | | | style="text-align: center; width: 150px; background: #808080;" | 80 |
| |- | | |- |
| | style="text-align: center; width: 100px; background: #efefef;" | '''Magazine Price:''' | | | style="text-align: center; width: 150px; background: #808080;" | '''Max Virtual Storage:''' |
| | style="text-align: center; width: 100px; background: #efefef;" | $500/$10,000 | | | style="text-align: center; width: 150px; background: #808080;" | 96 |
| |- | | |- |
| | style="text-align: center; width: 100px; background: #efefef;" | '''DLC:''' | | | style="text-align: center; width: 150px; background: #808080;" | '''Vehicle Weight:''' |
| | style="text-align: center; width: 100px; background: #efefef;" | Apex | | | style="text-align: center; width: 150px; background: #808080;" | 3,997kg |
| |} </li>
| |
| | |
| <li style="display: inline-table;">
| |
| {| style="border: 1px solid black; border-spacing: 0; margin-right: 5px; color: black;"
| |
| |+ style="color: #c1c1b8;" | '''Katiba'''
| |
| |+ [[File:katiba.png|border|center|250px|caption]]
| |
| |- | | |- |
| | style="text-align: center; width: 100px; background: #efefef;" | '''Price:''' | | | style="text-align: center; width: 150px; background: #808080;" | '''$ per Insurance Tier:''' |
| | style="text-align: center; width: 100px; background: #efefef;" | $65,000 | | | style="text-align: center; width: 150px; background: #808080;" | $80,000 |
| |- | | |- |
| | style="text-align: center; width: 100px; background: #efefef;" | '''Caliber:''' | | | style="text-align: center; width: 150px; background: #808080;" | '''$ per Turbo Tier:''' |
| | style="text-align: center; width: 100px; background: #efefef;" | 6.5x39mm Caseless | | | style="text-align: center; width: 150px; background: #808080;" | $10,000 |
| |- | | |- |
| | style="text-align: center; width: 100px; background: #efefef;" | '''Magazine Capacity:''' | | | style="text-align: center; width: 150px; background: #808080;" | '''$ per Security Tier:''' |
| | style="text-align: center; width: 100px; background: #efefef;" | 30 | | | style="text-align: center; width: 150px; background: #808080;" | $20,000 |
| |- | | |- |
| | style="text-align: center; width: 100px; background: #efefef;" | '''Magazine Price:''' | | | style="text-align: center; width: 150px; background: #808080;" | '''$ per Storage Tier:''' |
| | style="text-align: center; width: 100px; background: #efefef;" | $500 | | | style="text-align: center; width: 150px; background: #808080;" | $25,000 per 4 units |
| |-
| |
| | style="text-align: center; width: 100px; background: #efefef;" | '''DLC:'''
| |
| | style="text-align: center; width: 100px; background: #efefef;" | None
| |
| |} </li> | | |} </li> |
|
| |
|
| <li style="display: inline-table;"> | | <li style="display: inline-table;"> |
| {| style="border: 1px solid black; border-spacing: 0; margin-right: 5px; color: black;" | | {| style="border: 1px solid black; border-spacing: 0; margin-right: 5px; color: black;" |
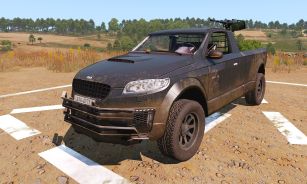
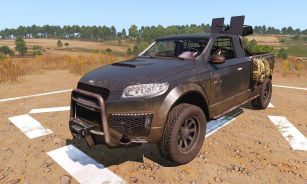
| |+ style="color: #c1c1b8;" | '''MXC''' | | |+ style="color: #c1c1b8;" | '''.50 cal Offroad''' |
| |+ [[File:mxc.png|border|center|250px|caption]] | | |+ [[File:Offroad50cal2023.jpg|center|307px|caption]] |
| |- | | |- |
| | style="text-align: center; width: 100px; background: #efefef;" | '''Price:''' | | | style="text-align: center; width: 150px; background: #808080;" | '''Vendor(s):''' |
| | style="text-align: center; width: 100px; background: #efefef;" | $50,000 | | | style="font-size:75%; text-align: center; width: 150px; background: #808080;" | Rebel Outpost, War point Shop |
| |- | | |- |
| | style="text-align: center; width: 100px; background: #efefef;" | '''Caliber:''' | | | style="text-align: center; width: 150px; background: #808080;" | '''Base Price:''' |
| | style="text-align: center; width: 100px; background: #efefef;" | 6.5x39mm NATO | | | style="text-align: center; width: 150px; background: #808080;" | $750,000 / 50wps |
| |- | | |- |
| | style="text-align: center; width: 100px; background: #efefef;" | '''Magazine Capacity:''' | | | style="text-align: center; width: 150px; background: #808080;" | '''Base Virtual Storage:''' |
| | style="text-align: center; width: 100px; background: #efefef;" | 30/100 | | | style="text-align: center; width: 150px; background: #808080;" | 80 |
| |- | | |- |
| | style="text-align: center; width: 100px; background: #efefef;" | '''Magazine Price:''' | | | style="text-align: center; width: 150px; background: #808080;" | '''Max Virtual Storage:''' |
| | style="text-align: center; width: 100px; background: #efefef;" | $500/$15,000 | | | style="text-align: center; width: 150px; background: #808080;" | 96 |
| |- | | |- |
| | style="text-align: center; width: 100px; background: #efefef;" | '''DLC:''' | | | style="text-align: center; width: 150px; background: #808080;" | '''Vehicle Weight:''' |
| | style="text-align: center; width: 100px; background: #efefef;" | None | | | style="text-align: center; width: 150px; background: #808080;" | 1,805kg |
| |} </li>
| |
| | |
| <li style="display: inline-table;">
| |
| {| style="border: 1px solid black; border-spacing: 0; margin-right: 5px; color: black;"
| |
| |+ style="color: #c1c1b8;" | '''MX'''
| |
| |+ [[File:MX.png|border|center|250px|caption]]
| |
| |- | | |- |
| | style="text-align: center; width: 100px; background: #efefef;" | '''Price:''' | | | style="text-align: center; width: 150px; background: #808080;" | '''$ per Insurance Tier:''' |
| | style="text-align: center; width: 100px; background: #efefef;" | $60,000 | | | style="text-align: center; width: 150px; background: #808080;" | $300,000 |
| |- | | |- |
| | style="text-align: center; width: 100px; background: #efefef;" | '''Caliber:''' | | | style="text-align: center; width: 150px; background: #808080;" | '''$ per Turbo Tier:''' |
| | style="text-align: center; width: 100px; background: #efefef;" | 6.5x39mm NATO | | | style="text-align: center; width: 150px; background: #808080;" | $37,500 |
| |- | | |- |
| | style="text-align: center; width: 100px; background: #efefef;" | '''Magazine Capacity:''' | | | style="text-align: center; width: 150px; background: #808080;" | '''$ per Security Tier:''' |
| | style="text-align: center; width: 100px; background: #efefef;" | 30/100 | | | style="text-align: center; width: 150px; background: #808080;" | $75,000 |
| |- | | |- |
| | style="text-align: center; width: 100px; background: #efefef;" | '''Magazine Price:''' | | | style="text-align: center; width: 150px; background: #808080;" | '''$ per Storage Tier:''' |
| | style="text-align: center; width: 100px; background: #efefef;" | $500/$15,000 | | | style="text-align: center; width: 150px; background: #808080;" | $93,750 per 4 units |
| |-
| |
| | style="text-align: center; width: 100px; background: #efefef;" | '''DLC:'''
| |
| | style="text-align: center; width: 100px; background: #efefef;" | None
| |
| |} </li> | | |} </li> |
|
| |
|
| <li style="display: inline-table;"> | | <li style="display: inline-table;"> |
| {| style="border: 1px solid black; border-spacing: 0; margin-right: 5px; color: black;" | | {| style="border: 1px solid black; border-spacing: 0; margin-right: 5px; color: black;" |
| |+ style="color: #c1c1b8;" | '''MXM''' | | |+ style="color: #c1c1b8;" | '''.50 cal Offroad (Plus)''' |
| |+ [[File:mxm.png|border|center|250px|caption]] | | |+ [[File:Offroad50calplus2023.jpg|center|307px|caption]] |
| |- | | |- |
| | style="text-align: center; width: 100px; background: #efefef;" | '''Price:''' | | | style="text-align: center; width: 150px; background: #808080;" | '''Vendor(s):''' |
| | style="text-align: center; width: 100px; background: #efefef;" | $70,000 | | | style="font-size:75%; text-align: center; width: 150px; background: #808080;" | Rebel Outpost, War point Shop |
| |- | | |- |
| | style="text-align: center; width: 100px; background: #efefef;" | '''Caliber:''' | | | style="text-align: center; width: 150px; background: #808080;" | '''Base Price:''' |
| | style="text-align: center; width: 100px; background: #efefef;" | 6.5x39mm NATO | | | style="text-align: center; width: 150px; background: #808080;" | $850,000 / 60wps |
| |- | | |- |
| | style="text-align: center; width: 100px; background: #efefef;" | '''Magazine Capacity:''' | | | style="text-align: center; width: 150px; background: #808080;" | '''Base Virtual Storage:''' |
| | style="text-align: center; width: 100px; background: #efefef;" | 30/100 | | | style="text-align: center; width: 150px; background: #808080;" | 80 |
| |- | | |- |
| | style="text-align: center; width: 100px; background: #efefef;" | '''Magazine Price:''' | | | style="text-align: center; width: 150px; background: #808080;" | '''Max Virtual Storage:''' |
| | style="text-align: center; width: 100px; background: #efefef;" | $500/$15,000 | | | style="text-align: center; width: 150px; background: #808080;" | 96 |
| |- | | |- |
| | style="text-align: center; width: 100px; background: #efefef;" | '''DLC:''' | | | style="text-align: center; width: 150px; background: #808080;" | '''Vehicle Weight:''' |
| | style="text-align: center; width: 100px; background: #efefef;" | None | | | style="text-align: center; width: 150px; background: #808080;" | 1,805kg |
| |} </li>
| |
| | |
| <li style="display: inline-table;">
| |
| {| style="border: 1px solid black; border-spacing: 0; margin-right: 5px; color: black;"
| |
| |+ style="color: #c1c1b8;" | '''MX-SW'''
| |
| |+ [[File:mxsw.png|border|center|250px|caption]]
| |
| |- | | |- |
| | style="text-align: center; width: 100px; background: #efefef;" | '''Price:''' | | | style="text-align: center; width: 150px; background: #808080;" | '''$ per Insurance Tier:''' |
| | style="text-align: center; width: 100px; background: #efefef;" | $150,000 | | | style="text-align: center; width: 150px; background: #808080;" | $340,000 |
| |- | | |- |
| | style="text-align: center; width: 100px; background: #efefef;" | '''Caliber:''' | | | style="text-align: center; width: 150px; background: #808080;" | '''$ per Turbo Tier:''' |
| | style="text-align: center; width: 100px; background: #efefef;" | 6.5x39mm NATO | | | style="text-align: center; width: 150px; background: #808080;" | $42,500 |
| |- | | |- |
| | style="text-align: center; width: 100px; background: #efefef;" | '''Magazine Capacity:''' | | | style="text-align: center; width: 150px; background: #808080;" | '''$ per Security Tier:''' |
| | style="text-align: center; width: 100px; background: #efefef;" | 30/100 | | | style="text-align: center; width: 150px; background: #808080;" | $85,000 |
| |- | | |- |
| | style="text-align: center; width: 100px; background: #efefef;" | '''Magazine Price:''' | | | style="text-align: center; width: 150px; background: #808080;" | '''$ per Storage Tier:''' |
| | style="text-align: center; width: 100px; background: #efefef;" | $500/$15,000 | | | style="text-align: center; width: 150px; background: #808080;" | $106,250 per 4 units |
| |-
| |
| | style="text-align: center; width: 100px; background: #efefef;" | '''DLC:'''
| |
| | style="text-align: center; width: 100px; background: #efefef;" | None
| |
| |} </li> | | |} </li> |
|
| |
|
| <li style="display: inline-table;"> | | <li style="display: inline-table;"> |
| {| style="border: 1px solid black; border-spacing: 0; margin-right: 5px; color: black;" | | {| style="border: 1px solid black; border-spacing: 0; margin-right: 5px; color: black;" |
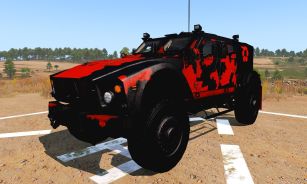
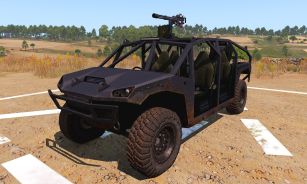
| |+ style="color: #c1c1b8;" | '''Type 115 (Green)''' | | |+ style="color: #c1c1b8;" | '''Armed Qilin''' |
| |+ [[File:type115.png|border|center|250px|caption]] | | |+ [[File:Minigunquilin2023.jpg|center|307px|caption]] |
| |- | | |- |
| | style="text-align: center; width: 100px; background: #efefef;" | '''Price:''' | | | style="text-align: center; width: 150px; background: #808080;" | '''Vendor(s):''' |
| | style="text-align: center; width: 100px; background: #efefef;" | $90,000 | | | style="font-size:75%; text-align: center; width: 150px; background: #808080;" | Rebel Outpost, War point Shop |
| |- | | |- |
| | style="text-align: center; width: 100px; background: #efefef;" | '''Caliber:''' | | | style="text-align: center; width: 150px; background: #808080;" | '''Base Price:''' |
| | style="text-align: center; width: 100px; background: #efefef;" | 6.5x39mm/.50 BW | | | style="text-align: center; width: 150px; background: #808080;" | $1,250,000 / 80wps |
| |- | | |- |
| | style="text-align: center; width: 100px; background: #efefef;" | '''Magazine Capacity:''' | | | style="text-align: center; width: 150px; background: #808080;" | '''Base Virtual Storage:''' |
| | style="text-align: center; width: 100px; background: #efefef;" | 30 | | | style="text-align: center; width: 150px; background: #808080;" | 80 |
| |- | | |- |
| | style="text-align: center; width: 100px; background: #efefef;" | '''Magazine Price:''' | | | style="text-align: center; width: 150px; background: #808080;" | '''Max Virtual Storage:''' |
| | style="text-align: center; width: 100px; background: #efefef;" | $500 | | | style="text-align: center; width: 150px; background: #808080;" | 96 |
| |- | | |- |
| | style="text-align: center; width: 100px; background: #efefef;" | '''DLC:''' | | | style="text-align: center; width: 150px; background: #808080;" | '''Vehicle Weight:''' |
| | style="text-align: center; width: 100px; background: #efefef;" | Apex | | | style="text-align: center; width: 150px; background: #808080;" | 3,924kg |
| |} </li>
| |
| | |
| <li style="display: inline-table;">
| |
| {| style="border: 1px solid black; border-spacing: 0; margin-right: 5px; color: black;"
| |
| |+ style="color: #c1c1b8;" | '''Promet'''
| |
| |+ [[File:Promet65.png|border|center|250px|caption]]
| |
| |- | | |- |
| | style="text-align: center; width: 100px; background: #efefef;" | '''Price:''' | | | style="text-align: center; width: 150px; background: #808080;" | '''$ per Insurance Tier:''' |
| | style="text-align: center; width: 100px; background: #efefef;" | $80,000 | | | style="text-align: center; width: 150px; background: #808080;" | $500,000 |
| |- | | |- |
| | style="text-align: center; width: 100px; background: #efefef;" | '''Caliber:''' | | | style="text-align: center; width: 150px; background: #808080;" | '''$ per Turbo Tier:''' |
| | style="text-align: center; width: 100px; background: #efefef;" | 6.5x39mm NATO | | | style="text-align: center; width: 150px; background: #808080;" | $62,500 |
| |- | | |- |
| | style="text-align: center; width: 100px; background: #efefef;" | '''Magazine Capacity:''' | | | style="text-align: center; width: 150px; background: #808080;" | '''$ per Security Tier:''' |
| | style="text-align: center; width: 100px; background: #efefef;" | 30 | | | style="text-align: center; width: 150px; background: #808080;" | $125,000 |
| |- | | |- |
| | style="text-align: center; width: 100px; background: #efefef;" | '''Magazine Price:''' | | | style="text-align: center; width: 150px; background: #808080;" | '''$ per Storage Tier:''' |
| | style="text-align: center; width: 100px; background: #efefef;" | $500 | | | style="text-align: center; width: 150px; background: #808080;" | $156,250 per 4 units |
| |-
| |
| | style="text-align: center; width: 100px; background: #efefef;" | '''DLC:'''
| |
| | style="text-align: center; width: 100px; background: #efefef;" | Contact
| |
| |} </li> | | |} </li> |
|
| |
|
| | </ul></div> |
| | </center> |
| | |
| | ==='''Air Vehicles'''=== |
| | ---- |
| | *Illegal Vehicles are now displayed in Red in the Garage to display their status. |
| | <center> |
| | <div><ul> |
| <li style="display: inline-table;"> | | <li style="display: inline-table;"> |
| {| style="border: 1px solid black; border-spacing: 0; margin-right: 5px; color: black;" | | {| style="border: 1px solid black; border-spacing: 0; margin-right: 5px; color: black;" |
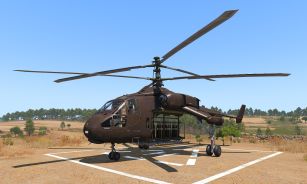
| |+ style="color: #c1c1b8;" | '''Promet MR''' | | |+ style="color: #c1c1b8;" | '''Taru Bench''' |
| |+ [[File:prometmr65.png|border|center|250px|caption]] | | |+ [[File:Tarubench2023.jpg|center|307px|caption]] |
| |- | | |- |
| | style="text-align: center; width: 100px; background: #efefef;" | '''Price:''' | | | style="text-align: center; width: 150px; background: #808080;" | '''Vendor(s):''' |
| | style="text-align: center; width: 100px; background: #efefef;" | $90,000 | | | style="font-size:85%; text-align: center; width: 150px; background: #808080;" | Rebel Outpost |
| |- | | |- |
| | style="text-align: center; width: 100px; background: #efefef;" | '''Caliber:''' | | | style="text-align: center; width: 150px; background: #808080;" | '''Base Price:''' |
| | style="text-align: center; width: 100px; background: #efefef;" | 6.5x39mm NATO | | | style="text-align: center; width: 150px; background: #808080;" | $700,000 |
| |- | | |- |
| | style="text-align: center; width: 100px; background: #efefef;" | '''Magazine Capacity:''' | | | style="text-align: center; width: 150px; background: #808080;" | '''Base Virtual Storage:''' |
| | style="text-align: center; width: 100px; background: #efefef;" | 30 | | | style="text-align: center; width: 150px; background: #808080;" | 100 |
| |- | | |- |
| | style="text-align: center; width: 100px; background: #efefef;" | '''Magazine Price:''' | | | style="text-align: center; width: 150px; background: #808080;" | '''Max Virtual Storage:''' |
| | style="text-align: center; width: 100px; background: #efefef;" | $500 | | | style="text-align: center; width: 150px; background: #808080;" | 120 |
| |- | | |- |
| | style="text-align: center; width: 100px; background: #efefef;" | '''DLC:''' | | | style="text-align: center; width: 150px; background: #808080;" | '''Max towing weight:''' |
| | style="text-align: center; width: 100px; background: #efefef;" | Contact | | | style="text-align: center; width: 150px; background: #808080;" | 13,500kg |
| |} </li>
| |
| | |
| <li style="display: inline-table;">
| |
| {| style="border: 1px solid black; border-spacing: 0; margin-right: 5px; color: black;"
| |
| |+ style="color: #c1c1b8;" | '''Rahim'''
| |
| |+ [[File:rahim.png|border|center|250px|caption]]
| |
| |- | | |- |
| | style="text-align: center; width: 100px; background: #efefef;" | '''Price:''' | | | style="text-align: center; width: 150px; background: #808080;" | '''$ per Insurance Tier:''' |
| | style="text-align: center; width: 100px; background: #efefef;" | $90,000 | | | style="text-align: center; width: 150px; background: #808080;" | $340,000 |
| |- | | |- |
| | style="text-align: center; width: 100px; background: #efefef;" | '''Caliber:''' | | | style="text-align: center; width: 150px; background: #808080;" | '''$ per Turbo Tier:''' |
| | style="text-align: center; width: 100px; background: #efefef;" | 7.62x54mm | | | style="text-align: center; width: 150px; background: #808080;" | $42,500 |
| |- | | |- |
| | style="text-align: center; width: 100px; background: #efefef;" | '''Magazine Capacity:''' | | | style="text-align: center; width: 150px; background: #808080;" | '''$ per Security Tier:''' |
| | style="text-align: center; width: 100px; background: #efefef;" | 10 | | | style="text-align: center; width: 150px; background: #808080;" | $85,000 |
| |- | | |- |
| | style="text-align: center; width: 100px; background: #efefef;" | '''Magazine Price:''' | | | style="text-align: center; width: 150px; background: #808080;" | '''$ per Storage Tier:''' |
| | style="text-align: center; width: 100px; background: #efefef;" | $500 | | | style="text-align: center; width: 150px; background: #808080;" | $106,250 per 5 units |
| |-
| |
| | style="text-align: center; width: 100px; background: #efefef;" | '''DLC:'''
| |
| | style="text-align: center; width: 100px; background: #efefef;" | None
| |
| |} </li> | | |} </li> |
|
| |
|
| <li style="display: inline-table;"> | | <li style="display: inline-table;"> |
| {| style="border: 1px solid black; border-spacing: 0; margin-right: 5px; color: black;" | | {| style="border: 1px solid black; border-spacing: 0; margin-right: 5px; color: black;" |
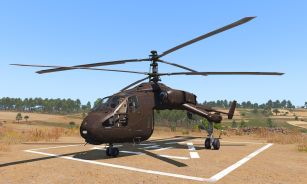
| |+ style="color: #c1c1b8;" | '''Mk18 ABR''' | | |+ style="color: #c1c1b8;" | '''Taru''' |
| |+ [[File:mk18.png|border|center|250px|caption]] | | |+ [[File:Taru2023.jpg|center|307px|caption]] |
| |- | | |- |
| | style="text-align: center; width: 100px; background: #efefef;" | '''Price:''' | | | style="text-align: center; width: 150px; background: #808080;" | '''Vendor(s):''' |
| | style="text-align: center; width: 100px; background: #efefef;" | $100,000 | | | style="font-size:85%; text-align: center; width: 150px; background: #808080;" | Rebel Outpost |
| |- | | |- |
| | style="text-align: center; width: 100px; background: #efefef;" | '''Caliber:''' | | | style="text-align: center; width: 150px; background: #808080;" | '''Base Price:''' |
| | style="text-align: center; width: 100px; background: #efefef;" | 7.62x51mm NATO | | | style="text-align: center; width: 150px; background: #808080;" | $850,000 |
| |- | | |- |
| | style="text-align: center; width: 100px; background: #efefef;" | '''Magazine Capacity:''' | | | style="text-align: center; width: 150px; background: #808080;" | '''Base Virtual Storage:''' |
| | style="text-align: center; width: 100px; background: #efefef;" | 10/20 | | | style="text-align: center; width: 150px; background: #808080;" | 140 |
| |- | | |- |
| | style="text-align: center; width: 100px; background: #efefef;" | '''Magazine Price:''' | | | style="text-align: center; width: 150px; background: #808080;" | '''Max Virtual Storage:''' |
| | style="text-align: center; width: 100px; background: #efefef;" | $762 | | | style="text-align: center; width: 150px; background: #808080;" | 168 |
| |- | | |- |
| | style="text-align: center; width: 100px; background: #efefef;" | '''DLC:''' | | | style="text-align: center; width: 150px; background: #808080;" | '''Max towing weight:''' |
| | style="text-align: center; width: 100px; background: #efefef;" | None | | | style="text-align: center; width: 150px; background: #808080;" | 13,500kg |
| |} </li>
| |
| | |
| <li style="display: inline-table;">
| |
| {| style="border: 1px solid black; border-spacing: 0; margin-right: 5px; color: black;"
| |
| |+ style="color: #c1c1b8;" | '''Mk14 (Camo)'''
| |
| |+ [[File:mk14.png|border|center|250px|caption]]
| |
| |- | | |- |
| | style="text-align: center; width: 100px; background: #efefef;" | '''Price:''' | | | style="text-align: center; width: 150px; background: #808080;" | '''$ per Insurance Tier:''' |
| | style="text-align: center; width: 100px; background: #efefef;" | $100,000 | | | style="text-align: center; width: 150px; background: #808080;" | $280,000 |
| |- | | |- |
| | style="text-align: center; width: 100px; background: #efefef;" | '''Caliber:''' | | | style="text-align: center; width: 150px; background: #808080;" | '''$ per Turbo Tier:''' |
| | style="text-align: center; width: 100px; background: #efefef;" | 7.62x51mm NATO | | | style="text-align: center; width: 150px; background: #808080;" | $35,000 |
| |- | | |- |
| | style="text-align: center; width: 100px; background: #efefef;" | '''Magazine Capacity:''' | | | style="text-align: center; width: 150px; background: #808080;" | '''$ per Security Tier:''' |
| | style="text-align: center; width: 100px; background: #efefef;" | 10/20 | | | style="text-align: center; width: 150px; background: #808080;" | $70,000 |
| |- | | |- |
| | style="text-align: center; width: 100px; background: #efefef;" | '''Magazine Price:''' | | | style="text-align: center; width: 150px; background: #808080;" | '''$ per Storage Tier:''' |
| | style="text-align: center; width: 100px; background: #efefef;" | $250/$762 | | | style="text-align: center; width: 150px; background: #808080;" | $87,500 per 7 units |
| |-
| |
| | style="text-align: center; width: 100px; background: #efefef;" | '''DLC:'''
| |
| | style="text-align: center; width: 100px; background: #efefef;" | Marksmen
| |
| |} </li> | | |} </li> |
| | </ul></div> |
| | </center> |
| | |
| | =='''Advanced Rebel'''== |
| | *$5,000,000 to purchase. |
| | *Gear will be Advanced Rebel exclusive and will require the license to equip. |
| | *Grants an enhanced weapon shop for Advanced Rebels. |
| | *Removes ability to do legal runs. |
| | |
| | ==='''Weapons'''=== |
|
| |
|
| <li style="display: inline-table;"> | | <li style="display: inline-table;"> |
| {| style="border: 1px solid black; border-spacing: 0; margin-right: 5px; color: black;" | | {| style="border: 1px solid black; border-spacing: 0; margin-right: 5px; color: black;" |
| |+ style="color: #c1c1b8;" | '''Mk14 (Olive)''' | | |+ style="color: #c1c1b8;" | '''ASP-Kir-1 (Black)''' |
| |+ [[File:mk14.png|border|center|250px|caption]] | | |+ [[File:asp1kir127.png|border|center|307px|caption]] |
| |- | | |- |
| | style="text-align: center; width: 100px; background: #efefef;" | '''Price:''' | | | style="text-align: center; width: 150px; background: #efefef;" | '''Price:''' |
| | style="text-align: center; width: 100px; background: #efefef;" | $100,000 | | | style="text-align: center; width: 150px; background: #efefef;" | $775,000 |
| |- | | |- |
| | style="text-align: center; width: 100px; background: #efefef;" | '''Caliber:''' | | | style="text-align: center; width: 150px; background: #efefef;" | '''Caliber:''' |
| | style="text-align: center; width: 100px; background: #efefef;" | 7.62x51mm NATO | | | style="text-align: center; width: 150px; background: #efefef;" | 12.7x54mm |
| |- | | |- |
| | style="text-align: center; width: 100px; background: #efefef;" | '''Magazine Capacity:''' | | | style="text-align: center; width: 150px; background: #efefef;" | '''Magazine Capacity:''' |
| | style="text-align: center; width: 100px; background: #efefef;" | 10/20 | | | style="text-align: center; width: 150px; background: #efefef;" | 10 |
| |- | | |- |
| | style="text-align: center; width: 100px; background: #efefef;" | '''Magazine Price:''' | | | style="text-align: center; width: 150px; background: #efefef;" | '''Magazine Price:''' |
| | style="text-align: center; width: 100px; background: #efefef;" | $250/$762 | | | style="text-align: center; width: 150px; background: #efefef;" | $15,000 |
| |- | | |- |
| | style="text-align: center; width: 100px; background: #efefef;" | '''DLC:''' | | | style="text-align: center; width: 150px; background: #efefef;" | '''DLC:''' |
| | style="text-align: center; width: 100px; background: #efefef;" | Marksmen | | | style="text-align: center; width: 150px; background: #efefef;" | Marksmen |
| |} </li> | | |} </li> |
|
| |
|
| <li style="display: inline-table;"> | | <li style="display: inline-table;"> |
| {| style="border: 1px solid black; border-spacing: 0; margin-right: 5px; color: black;" | | {| style="border: 1px solid black; border-spacing: 0; margin-right: 5px; color: black;" |
| |+ style="color: #c1c1b8;" | '''Mk14 (Classic)''' | | |+ style="color: #c1c1b8;" | '''Mar-10 (Sand)''' |
| |+ [[File:mk14.png|border|center|250px|caption]] | | |+ [[File:Mar10000sand.png|border|center|307px|caption]] |
| |- | | |- |
| | style="text-align: center; width: 100px; background: #efefef;" | '''Price:''' | | | style="text-align: center; width: 150px; background: #efefef;" | '''Price:''' |
| | style="text-align: center; width: 100px; background: #efefef;" | $100,000 | | | style="text-align: center; width: 150px; background: #efefef;" | $4,850,000 |
| |- | | |- |
| | style="text-align: center; width: 100px; background: #efefef;" | '''Caliber:''' | | | style="text-align: center; width: 150px; background: #efefef;" | '''Caliber:''' |
| | style="text-align: center; width: 100px; background: #efefef;" | 7.62x51mm NATO | | | style="text-align: center; width: 150px; background: #efefef;" | .338 Lapua Magnum |
| |- | | |- |
| | style="text-align: center; width: 100px; background: #efefef;" | '''Magazine Capacity:''' | | | style="text-align: center; width: 150px; background: #efefef;" | '''Magazine Capacity:''' |
| | style="text-align: center; width: 100px; background: #efefef;" | 10/20 | | | style="text-align: center; width: 150px; background: #efefef;" | 10 |
| |- | | |- |
| | style="text-align: center; width: 100px; background: #efefef;" | '''Magazine Price:''' | | | style="text-align: center; width: 150px; background: #efefef;" | '''Magazine Price:''' |
| | style="text-align: center; width: 100px; background: #efefef;" | $250/$762 | | | style="text-align: center; width: 150px; background: #efefef;" | $37,500 |
| |- | | |- |
| | style="text-align: center; width: 100px; background: #efefef;" | '''DLC:''' | | | style="text-align: center; width: 150px; background: #efefef;" | '''DLC:''' |
| | style="text-align: center; width: 100px; background: #efefef;" | Marksmen | | | style="text-align: center; width: 150px; background: #efefef;" | Marksmen |
| |} </li> | | |} </li> |
|
| |
|
| <li style="display: inline-table;"> | | <li style="display: inline-table;"> |
| {| style="border: 1px solid black; border-spacing: 0; margin-right: 5px; color: black;" | | {| style="border: 1px solid black; border-spacing: 0; margin-right: 5px; color: black;" |
| |+ style="color: #c1c1b8;" | '''SPAR-17''' | | |+ style="color: #c1c1b8;" | '''Promet SG''' |
| |+ [[File:spar17.png|border|center|250px|caption]] | | |+ [[File:Prometsg65.png|border|center|307px|caption]] |
| |- | | |- |
| | style="text-align: center; width: 100px; background: #efefef;" | '''Price:''' | | | style="text-align: center; width: 150px; background: #efefef;" | '''Price:''' |
| | style="text-align: center; width: 100px; background: #efefef;" | $110,000 | | | style="text-align: center; width: 150px; background: #efefef;" | $350,000 |
| |- | | |- |
| | style="text-align: center; width: 100px; background: #efefef;" | '''Caliber:''' | | | style="text-align: center; width: 150px; background: #efefef;" | '''Caliber:''' |
| | style="text-align: center; width: 100px; background: #efefef;" | 7.62x51mm NATO | | | style="text-align: center; width: 150px; background: #efefef;" | 6.5x39mm NATO/12G Pellets/12G Slug |
| |- | | |- |
| | style="text-align: center; width: 100px; background: #efefef;" | '''Magazine Capacity:''' | | | style="text-align: center; width: 150px; background: #efefef;" | '''Magazine Capacity:''' |
| | style="text-align: center; width: 100px; background: #efefef;" | 20 | | | style="text-align: center; width: 150px; background: #efefef;" | 30/6 |
| |- | | |- |
| | style="text-align: center; width: 100px; background: #efefef;" | '''Magazine Price:''' | | | style="text-align: center; width: 150px; background: #efefef;" | '''Magazine Price:''' |
| | style="text-align: center; width: 100px; background: #efefef;" | $500 | | | style="text-align: center; width: 150px; background: #efefef;" | $500 / Pellets: $12,500 / Slugs: $35,000 |
| |- | | |- |
| | style="text-align: center; width: 100px; background: #efefef;" | '''DLC:''' | | | style="text-align: center; width: 150px; background: #efefef;" | '''DLC:''' |
| | style="text-align: center; width: 100px; background: #efefef;" | Apex | | | style="text-align: center; width: 150px; background: #efefef;" | Contact |
| |} </li> | | |} </li> |
|
| |
|
| <li style="display: inline-table;"> | | <li style="display: inline-table;"> |
| {| style="border: 1px solid black; border-spacing: 0; margin-right: 5px; color: black;" | | {| style="border: 1px solid black; border-spacing: 0; margin-right: 5px; color: black;" |
| |+ style="color: #c1c1b8;" | '''Mk-1 EMR''' | | |+ style="color: #c1c1b8;" | '''Scar-H 7.62 (MK1 Client Mod Reskin)''' |
| |+ [[File:mk1.png|border|center|250px|caption]] | | |+ [[File:Icon_arifle_SCAR_grip_black_F_X_CA.png|border|center|307px|caption]] |
| |- | | |- |
| | style="text-align: center; width: 100px; background: #efefef;" | '''Price:''' | | | style="text-align: center; width: 150px; background: #efefef;" | '''Price:''' |
| | style="text-align: center; width: 100px; background: #efefef;" | $125,000 | | | style="text-align: center; width: 150px; background: #efefef;" | $137,500 |
| |- | | |- |
| | style="text-align: center; width: 100px; background: #efefef;" | '''Caliber:''' | | | style="text-align: center; width: 150px; background: #efefef;" | '''Caliber:''' |
| | style="text-align: center; width: 100px; background: #efefef;" | 7.62x51mm NATO | | | style="text-align: center; width: 150px; background: #efefef;" | 7.62x51mm NATO |
| |- | | |- |
| | style="text-align: center; width: 100px; background: #efefef;" | '''Magazine Capacity:''' | | | style="text-align: center; width: 150px; background: #efefef;" | '''Magazine Capacity:''' |
| | style="text-align: center; width: 100px; background: #efefef;" | 20 | | | style="text-align: center; width: 150px; background: #efefef;" | 20 |
| |- | | |- |
| | style="text-align: center; width: 100px; background: #efefef;" | '''Magazine Price:''' | | | style="text-align: center; width: 150px; background: #efefef;" | '''Magazine Price:''' |
| | style="text-align: center; width: 100px; background: #efefef;" | $500 | | | style="text-align: center; width: 150px; background: #efefef;" | $762 |
| |- | | |- |
| | style="text-align: center; width: 100px; background: #efefef;" | '''DLC:''' | | | style="text-align: center; width: 150px; background: #efefef;" | '''DLC:''' |
| | style="text-align: center; width: 100px; background: #efefef;" | Marksmen | | | style="text-align: center; width: 150px; background: #efefef;" | Marksmen |
| |} </li> | | |} </li> |
|
| |
|
| <li style="display: inline-table;">
| | |
| {| style="border: 1px solid black; border-spacing: 0; margin-right: 5px; color: black;"
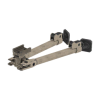
| | *'''Deployable M2 .50 cal turret Y-Inventory Item:''' |
| |+ style="color: #c1c1b8;" | '''LIM-85'''
| |
| |+ [[File:lim.png|border|center|250px|caption]]
| |
| |-
| |
| | style="text-align: center; width: 100px; background: #efefef;" | '''Price:'''
| |
| | style="text-align: center; width: 100px; background: #efefef;" | $160,000
| |
| |-
| |
| | style="text-align: center; width: 100px; background: #efefef;" | '''Caliber:'''
| |
| | style="text-align: center; width: 100px; background: #efefef;" | 5.56x45mm NATO
| |
| |-
| |
| | style="text-align: center; width: 100px; background: #efefef;" | '''Magazine Capacity:'''
| |
| | style="text-align: center; width: 100px; background: #efefef;" | 200
| |
| |-
| |
| | style="text-align: center; width: 100px; background: #efefef;" | '''Magazine Price:'''
| |
| | style="text-align: center; width: 100px; background: #efefef;" | $12,500
| |
| |-
| |
| | style="text-align: center; width: 100px; background: #efefef;" | '''DLC:'''
| |
| | style="text-align: center; width: 100px; background: #efefef;" | Apex
| |
| |} </li>
| |
|
| |
|
| <li style="display: inline-table;"> | | <li style="display: inline-table;"> |
| {| style="border: 1px solid black; border-spacing: 0; margin-right: 5px; color: black;" | | {| style="border: 1px solid black; border-spacing: 0; margin-right: 5px; color: black;" |
| |+ style="color: #c1c1b8;" | '''Mk200''' | | |+ style="color: #c1c1b8;" | '''M2 HMG .50''' |
| |+ [[File:mk200.png|border|center|250px|caption]] | | |+ [[File:50caldeployed.png|border|center|307px|caption]] |
| |- | | |- |
| | style="text-align: center; width: 100px; background: #efefef;" | '''Price:''' | | | style="text-align: center; width: 150px; background: #efefef;" | '''Price:''' |
| | style="text-align: center; width: 100px; background: #efefef;" | $215,000 | | | style="text-align: center; width: 150px; background: #efefef;" | $1,200,000 |
| |- | | |- |
| | style="text-align: center; width: 100px; background: #efefef;" | '''Caliber:''' | | | style="text-align: center; width: 150px; background: #efefef;" | '''Caliber:''' |
| | style="text-align: center; width: 100px; background: #efefef;" | 6.5x39mm Caseless | | | style="text-align: center; width: 150px; background: #efefef;" | .50 BMG |
| |- | | |- |
| | style="text-align: center; width: 100px; background: #efefef;" | '''Magazine Capacity:''' | | | style="text-align: center; width: 150px; background: #efefef;" | '''Magazine Capacity:''' |
| | style="text-align: center; width: 100px; background: #efefef;" | 200 | | | style="text-align: center; width: 150px; background: #efefef;" | 100 |
| |- | | |- |
| | style="text-align: center; width: 100px; background: #efefef;" | '''Magazine Price:''' | | | style="text-align: center; width: 150px; background: #efefef;" | '''Refilled with:''' |
| | style="text-align: center; width: 100px; background: #efefef;" | $15,000 | | | style="text-align: center; width: 150px; background: #efefef;" | Vehicle Ammo |
| |- | | |- |
| | style="text-align: center; width: 100px; background: #efefef;" | '''DLC:''' | | | style="text-align: center; width: 150px; background: #efefef;" | '''DLC:''' |
| | style="text-align: center; width: 100px; background: #efefef;" | None | | | style="text-align: center; width: 150px; background: #efefef;" | Apex |
| |} </li> | | |} </li> |
|
| |
|
| <li style="display: inline-table;">
| | *GUI confirmation for setup variant: |
| {| style="border: 1px solid black; border-spacing: 0; margin-right: 5px; color: black;"
| | [https://i.gyazo.com/eca86263f5aab0a8c6562412740731c9.jpg Raised] |
| |+ style="color: #c1c1b8;" | '''Mk200 (Black)'''
| | |
| |+ [[File:mk200.png|border|center|250px|caption]]
| | [https://i.gyazo.com/d253f2d83f3690752c86a6d3e345d9ac.jpg Lowered] |
| |-
| | |
| | style="text-align: center; width: 100px; background: #efefef;" | '''Price:'''
| | *Turret is indestructible. |
| | style="text-align: center; width: 100px; background: #efefef;" | $215,000
| | |
| |-
| | *Does not save for restart. |
| | style="text-align: center; width: 100px; background: #efefef;" | '''Caliber:'''
| |
| | style="text-align: center; width: 100px; background: #efefef;" | 6.5x39mm Caseless
| |
| |-
| |
| | style="text-align: center; width: 100px; background: #efefef;" | '''Magazine Capacity:'''
| |
| | style="text-align: center; width: 100px; background: #efefef;" | 200
| |
| |-
| |
| | style="text-align: center; width: 100px; background: #efefef;" | '''Magazine Price:'''
| |
| | style="text-align: center; width: 100px; background: #efefef;" | $15,000
| |
| |-
| |
| | style="text-align: center; width: 100px; background: #efefef;" | '''DLC:'''
| |
| | style="text-align: center; width: 100px; background: #efefef;" | None
| |
| |} </li>
| |
|
| |
|
| <li style="display: inline-table;">
| | *Will be persistent and unaffected by de-spawn. |
| {| style="border: 1px solid black; border-spacing: 0; margin-right: 5px; color: black;"
| |
| |+ style="color: #c1c1b8;" | '''CMR-76'''
| |
| |+ [[File:cmr76.png|border|center|250px|caption]]
| |
| |-
| |
| | style="text-align: center; width: 100px; background: #efefef;" | '''Price:'''
| |
| | style="text-align: center; width: 100px; background: #efefef;" | $75,000
| |
| |-
| |
| | style="text-align: center; width: 100px; background: #efefef;" | '''Caliber:'''
| |
| | style="text-align: center; width: 100px; background: #efefef;" | 6.5x39mm
| |
| |-
| |
| | style="text-align: center; width: 100px; background: #efefef;" | '''Magazine Capacity:'''
| |
| | style="text-align: center; width: 100px; background: #efefef;" | 30
| |
| |-
| |
| | style="text-align: center; width: 100px; background: #efefef;" | '''Magazine Price:'''
| |
| | style="text-align: center; width: 100px; background: #efefef;" | $500
| |
| |-
| |
| | style="text-align: center; width: 100px; background: #efefef;" | '''DLC:'''
| |
| | style="text-align: center; width: 100px; background: #efefef;" | Apex
| |
| |} </li>
| |
|
| |
|
| <li style="display: inline-table;">
| | *Turret places .5M in front of the player deploying it. |
| {| style="border: 1px solid black; border-spacing: 0; margin-right: 5px; color: black;"
| |
| |+ style="color: #c1c1b8;" | '''AKU-12 (Arid)'''
| |
| |+ [[File:ak12usand.png|border|center|250px|caption]]
| |
| |-
| |
| | style="text-align: center; width: 100px; background: #efefef;" | '''Price:'''
| |
| | style="text-align: center; width: 100px; background: #efefef;" | $105,000
| |
| |-
| |
| | style="text-align: center; width: 100px; background: #efefef;" | '''Caliber:'''
| |
| | style="text-align: center; width: 100px; background: #efefef;" | 7.62x39mm
| |
| |-
| |
| | style="text-align: center; width: 100px; background: #efefef;" | '''Magazine Capacity:'''
| |
| | style="text-align: center; width: 100px; background: #efefef;" | 30/75
| |
| |-
| |
| | style="text-align: center; width: 100px; background: #efefef;" | '''Magazine Price:'''
| |
| | style="text-align: center; width: 100px; background: #efefef;" | $500/$15,000
| |
| |-
| |
| | style="text-align: center; width: 100px; background: #efefef;" | '''DLC:'''
| |
| | style="text-align: center; width: 100px; background: #efefef;" | Apex
| |
| |} </li>
| |
|
| |
|
| <li style="display: inline-table;">
| | *Turret places in the direction the player is facing. |
| {| style="border: 1px solid black; border-spacing: 0; margin-right: 5px; color: black;"
| | |
| |+ style="color: #c1c1b8;" | '''AK-12 (Arid)'''
| | *30 seconds to setup and breakdown. (Similar to a Pocket Go-Kart) |
| |+ [[File:ak12sand.png|border|center|250px|caption]]
| | |
| | *Can be refilled with a Vehicle ammo to restore it to 100%. |
| | |
| | *Anything below 100% cannot be listed to the [[Auction House | Auction House]]. |
| | |
| | *Once utilized it will have different ammo stages, weights and values when sold after repacking dependent on ammo count: |
| | |
| | |
| | {| class="wikitable sortable" |
| |- | | |- |
| | style="text-align: center; width: 100px; background: #efefef;" | '''Price:'''
| | ! Y-Weight |
| | style="text-align: center; width: 100px; background: #efefef;" | $120,000
| | ! Ammo Stage |
| | ! Value Sold |
| |- | | |- |
| | style="text-align: center; width: 100px; background: #efefef;" | '''Caliber:''' | | | 30 Y-Weight |
| | style="text-align: center; width: 100px; background: #efefef;" | 7.62x39mm | | | 100% |
| | | $500,000 |
| |- | | |- |
| | style="text-align: center; width: 100px; background: #efefef;" | '''Magazine Capacity:''' | | | 28 Y-Weight |
| | style="text-align: center; width: 100px; background: #efefef;" | 30/75 | | | 80% |
| | | $495,000 |
| |- | | |- |
| | style="text-align: center; width: 100px; background: #efefef;" | '''Magazine Price:''' | | | 26 Y-Weight |
| | style="text-align: center; width: 100px; background: #efefef;" | $500/$15,000 | | | 60% |
| | | $490,000 |
| |- | | |- |
| | style="text-align: center; width: 100px; background: #efefef;" | '''DLC:''' | | | 24 Y-Weight |
| | style="text-align: center; width: 100px; background: #efefef;" | Apex
| | | 40% |
| |} </li>
| | | $485,000 |
| | |
| <li style="display: inline-table;">
| |
| {| style="border: 1px solid black; border-spacing: 0; margin-right: 5px; color: black;"
| |
| |+ style="color: #c1c1b8;" | '''RPK-12 (Arid)'''
| |
| |+ [[File:rpksand.png|border|center|250px|caption]] | |
| |- | | |- |
| | style="text-align: center; width: 100px; background: #efefef;" | '''Price:''' | | | 22 Y-Weight |
| | style="text-align: center; width: 100px; background: #efefef;" | $160,000
| | | 20% |
| | | $480,000 |
| |- | | |- |
| | style="text-align: center; width: 100px; background: #efefef;" | '''Caliber:''' | | | 20 Y-Weight |
| | style="text-align: center; width: 100px; background: #efefef;" | 7.62x39mm | | | 0% |
| |-
| | | $475,000 |
| | style="text-align: center; width: 100px; background: #efefef;" | '''Magazine Capacity:'''
| | |} |
| | style="text-align: center; width: 100px; background: #efefef;" | 30/75
| | |
| |-
| | ==='''Gear'''=== |
| | style="text-align: center; width: 100px; background: #efefef;" | '''Magazine Price:'''
| | |
| | style="text-align: center; width: 100px; background: #efefef;" | $500/$15,000
| | *'''Non-Stackable T4 Vest Added:''' |
| |-
| |
| | style="text-align: center; width: 100px; background: #efefef;" | '''DLC:'''
| |
| | style="text-align: center; width: 100px; background: #efefef;" | Apex
| |
| |} </li>
| |
|
| |
|
| <li style="display: inline-table;"> | | <li style="display: inline-table;"> |
| {| style="border: 1px solid black; border-spacing: 0; margin-right: 5px; color: black;" | | {| style="border: 1px solid black; border-spacing: 0; margin-right: 5px; color: black;" |
| |+ style="color: #c1c1b8;" | '''Titan MPRL''' | | |+ style="color: #c1c1b8;" | '''CTRG Plate Carrier Rig''' |
| |+ [[File:titan.png|border|center|250px|caption]] | | |+ [[File:Ctrgv2.png|border|center|307px|caption]] |
| |- | | |- |
| | style="text-align: center; width: 100px; background: #efefef;" | '''Price:''' | | | style="text-align: center; width: 150px; background: #efefef;" | '''Price:''' |
| | style="text-align: center; width: 100px; background: #efefef;" | $400,000 | | | style="text-align: center; width: 150px; background: #efefef;" | $100,000 |
| |- | | |- |
| | style="text-align: center; width: 100px; background: #efefef;" | '''Caliber:''' | | | style="text-align: center; width: 150px; background: #efefef;" | '''Armor Rating:''' |
| | style="text-align: center; width: 100px; background: #efefef;" | 127mm HE-Frag Missile | | | style="text-align: center; width: 150px; background: #efefef;" | IV |
| |- | | |- |
| | style="text-align: center; width: 100px; background: #efefef;" | '''Magazine Capacity:''' | | | style="text-align: center; width: 150px; background: #efefef;" | '''Explosive Resistance:''' |
| | style="text-align: center; width: 100px; background: #efefef;" | 1 | | | style="text-align: center; width: 150px; background: #efefef;" | High |
| |- | | |- |
| | style="text-align: center; width: 100px; background: #efefef;" | '''Missile Price:''' | | | style="text-align: center; width: 150px; background: #efefef;" | '''Virtual Item Capacity:''' |
| | style="text-align: center; width: 100px; background: #efefef;" | $150,000 | | | style="text-align: center; width: 150px; background: #efefef;" | 18 |
| |- | | |- |
| | style="text-align: center; width: 100px; background: #efefef;" | '''DLC:''' | | | style="text-align: center; width: 150px; background: #efefef;" | '''DLC:''' |
| | style="text-align: center; width: 100px; background: #efefef;" | None | | | style="text-align: center; width: 150px; background: #efefef;" | None |
| |} </li> | | |} </li> |
| </ul></div>
| |
| </center>
| |
|
| |
|
| | *Vests are still maintained as “Illegal” and will be able to be seized. |
| | *Vests come in <span style="color:#72685E;>Snakeskin</span>, <span style="color:#00d5a0;>Green</span> and <span style="color:#8e7d50;>Tropic</span> color palettes. |
|
| |
|
|
| |
|
| ==='''War point Weapons'''===
| |
| ----
| |
|
| |
| <center>
| |
| <div><ul>
| |
| <li style="display: inline-table;">
| |
| {| style="border: 1px solid black; border-spacing: 0; margin-right: 5px; color: black;"
| |
| |+ style="color: #c1c1b8;" | '''MX'''
| |
| |+ [[File:mx65.png|border|center|250px|caption]]
| |
| |-
| |
| | style="text-align: center; width: 100px; background: #efefef;" | '''Price:'''
| |
| | style="text-align: center; width: 100px; background: #efefef;" | 5 WPs
| |
| |-
| |
| | style="text-align: center; width: 100px; background: #efefef;" | '''Caliber:'''
| |
| | style="text-align: center; width: 100px; background: #efefef;" | 6.5x39mm NATO
| |
| |-
| |
| | style="text-align: center; width: 100px; background: #efefef;" | '''Magazine Capacity:'''
| |
| | style="text-align: center; width: 100px; background: #efefef;" | 30/100
| |
| |-
| |
| | style="text-align: center; width: 100px; background: #efefef;" | '''Magazine Price:'''
| |
| | style="text-align: center; width: 100px; background: #efefef;" | 1 WP/2 WP
| |
| |-
| |
| | style="text-align: center; width: 100px; background: #efefef;" | '''DLC:'''
| |
| | style="text-align: center; width: 100px; background: #efefef;" | None
| |
| |} </li>
| |
|
| |
| <li style="display: inline-table;">
| |
| {| style="border: 1px solid black; border-spacing: 0; margin-right: 5px; color: black;"
| |
| |+ style="color: #c1c1b8;" | '''MXM'''
| |
| |+ [[File:mxm65.png|border|center|250px|caption]]
| |
| |-
| |
| | style="text-align: center; width: 100px; background: #efefef;" | '''Price:'''
| |
| | style="text-align: center; width: 100px; background: #efefef;" | 6 WPs
| |
| |-
| |
| | style="text-align: center; width: 100px; background: #efefef;" | '''Caliber:'''
| |
| | style="text-align: center; width: 100px; background: #efefef;" | 6.5x39mm NATO
| |
| |-
| |
| | style="text-align: center; width: 100px; background: #efefef;" | '''Magazine Capacity:'''
| |
| | style="text-align: center; width: 100px; background: #efefef;" | 30/100
| |
| |-
| |
| | style="text-align: center; width: 100px; background: #efefef;" | '''Magazine Price:'''
| |
| | style="text-align: center; width: 100px; background: #efefef;" | 1 WP/2 WP
| |
| |-
| |
| | style="text-align: center; width: 100px; background: #efefef;" | '''DLC:'''
| |
| | style="text-align: center; width: 100px; background: #efefef;" | None
| |
| |} </li>
| |
|
| |
| <li style="display: inline-table;">
| |
| {| style="border: 1px solid black; border-spacing: 0; margin-right: 5px; color: black;"
| |
| |+ style="color: #c1c1b8;" | '''MX SW'''
| |
| |+ [[File:mxsw65.png|border|center|250px|caption]]
| |
| |-
| |
| | style="text-align: center; width: 100px; background: #efefef;" | '''Price:'''
| |
| | style="text-align: center; width: 100px; background: #efefef;" | 9 WPs
| |
| |-
| |
| | style="text-align: center; width: 100px; background: #efefef;" | '''Caliber:'''
| |
| | style="text-align: center; width: 100px; background: #efefef;" | 6.5x39mm NATO
| |
| |-
| |
| | style="text-align: center; width: 100px; background: #efefef;" | '''Magazine Capacity:'''
| |
| | style="text-align: center; width: 100px; background: #efefef;" | 30/100
| |
| |-
| |
| | style="text-align: center; width: 100px; background: #efefef;" | '''Magazine Price:'''
| |
| | style="text-align: center; width: 100px; background: #efefef;" | 1 WP/2 WP
| |
| |-
| |
| | style="text-align: center; width: 100px; background: #efefef;" | '''DLC:'''
| |
| | style="text-align: center; width: 100px; background: #efefef;" | None
| |
| |} </li>
| |
|
| |
| <li style="display: inline-table;">
| |
| {| style="border: 1px solid black; border-spacing: 0; margin-right: 5px; color: black;"
| |
| |+ style="color: #c1c1b8;" | '''ADR-97 TR'''
| |
| |+ [[File:adr97tr57.png|border|center|250px|caption]]
| |
| |-
| |
| | style="text-align: center; width: 100px; background: #efefef;" | '''Price:'''
| |
| | style="text-align: center; width: 100px; background: #efefef;" | 7 WPs
| |
| |-
| |
| | style="text-align: center; width: 100px; background: #efefef;" | '''Caliber:'''
| |
| | style="text-align: center; width: 100px; background: #efefef;" | 5.7x28mm
| |
| |-
| |
| | style="text-align: center; width: 100px; background: #efefef;" | '''Magazine Capacity:'''
| |
| | style="text-align: center; width: 100px; background: #efefef;" | 50
| |
| |-
| |
| | style="text-align: center; width: 100px; background: #efefef;" | '''Magazine Price:'''
| |
| | style="text-align: center; width: 100px; background: #efefef;" | 1 WP
| |
| |-
| |
| | style="text-align: center; width: 100px; background: #efefef;" | '''DLC:'''
| |
| | style="text-align: center; width: 100px; background: #efefef;" | None
| |
| |} </li>
| |
|
| |
| <li style="display: inline-table;">
| |
| {| style="border: 1px solid black; border-spacing: 0; margin-right: 5px; color: black;"
| |
| |+ style="color: #c1c1b8;" | '''CMR-76 (Green Hex)'''
| |
| |+ [[File:cmr7665.png|border|center|250px|caption]]
| |
| |-
| |
| | style="text-align: center; width: 100px; background: #efefef;" | '''Price:'''
| |
| | style="text-align: center; width: 100px; background: #efefef;" | 6 WPs
| |
| |-
| |
| | style="text-align: center; width: 100px; background: #efefef;" | '''Caliber:'''
| |
| | style="text-align: center; width: 100px; background: #efefef;" | 6.5x39mm
| |
| |-
| |
| | style="text-align: center; width: 100px; background: #efefef;" | '''Magazine Capacity:'''
| |
| | style="text-align: center; width: 100px; background: #efefef;" | 20
| |
| |-
| |
| | style="text-align: center; width: 100px; background: #efefef;" | '''Magazine Price:'''
| |
| | style="text-align: center; width: 100px; background: #efefef;" | 1 WP
| |
| |-
| |
| | style="text-align: center; width: 100px; background: #efefef;" | '''DLC:'''
| |
| | style="text-align: center; width: 100px; background: #efefef;" | Apex
| |
| |} </li>
| |
|
| |
| <li style="display: inline-table;">
| |
| {| style="border: 1px solid black; border-spacing: 0; margin-right: 5px; color: black;"
| |
| |+ style="color: #c1c1b8;" | '''SPAR-17'''
| |
| |+ [[File:spar17762.png|border|center|250px|caption]]
| |
| |-
| |
| | style="text-align: center; width: 100px; background: #efefef;" | '''Price:'''
| |
| | style="text-align: center; width: 100px; background: #efefef;" | 6 WPs
| |
| |-
| |
| | style="text-align: center; width: 100px; background: #efefef;" | '''Caliber:'''
| |
| | style="text-align: center; width: 100px; background: #efefef;" | 7.62x51mm NATO
| |
| |-
| |
| | style="text-align: center; width: 100px; background: #efefef;" | '''Magazine Capacity:'''
| |
| | style="text-align: center; width: 100px; background: #efefef;" | 20
| |
| |-
| |
| | style="text-align: center; width: 100px; background: #efefef;" | '''Magazine Price:'''
| |
| | style="text-align: center; width: 100px; background: #efefef;" | 1 WP
| |
| |-
| |
| | style="text-align: center; width: 100px; background: #efefef;" | '''DLC:'''
| |
| | style="text-align: center; width: 100px; background: #efefef;" | Apex
| |
| |} </li>
| |
|
| |
| <li style="display: inline-table;">
| |
| {| style="border: 1px solid black; border-spacing: 0; margin-right: 5px; color: black;"
| |
| |+ style="color: #c1c1b8;" | '''Mk18 ABR'''
| |
| |+ [[File:mk18abr762.png|border|center|250px|caption]]
| |
| |-
| |
| | style="text-align: center; width: 100px; background: #efefef;" | '''Price:'''
| |
| | style="text-align: center; width: 100px; background: #efefef;" | 7 WPs
| |
| |-
| |
| | style="text-align: center; width: 100px; background: #efefef;" | '''Caliber:'''
| |
| | style="text-align: center; width: 100px; background: #efefef;" | 7.62x51mm NATO
| |
| |-
| |
| | style="text-align: center; width: 100px; background: #efefef;" | '''Magazine Capacity:'''
| |
| | style="text-align: center; width: 100px; background: #efefef;" | 20
| |
| |-
| |
| | style="text-align: center; width: 100px; background: #efefef;" | '''Magazine Price:'''
| |
| | style="text-align: center; width: 100px; background: #efefef;" | 1 WP
| |
| |-
| |
| | style="text-align: center; width: 100px; background: #efefef;" | '''DLC:'''
| |
| | style="text-align: center; width: 100px; background: #efefef;" | None
| |
| |} </li>
| |
|
| |
| <li style="display: inline-table;">
| |
| {| style="border: 1px solid black; border-spacing: 0; margin-right: 5px; color: black;"
| |
| |+ style="color: #c1c1b8;" | '''Mk-1 EMR'''
| |
| |+ [[File:mk1emr762.png|border|center|250px|caption]]
| |
| |-
| |
| | style="text-align: center; width: 100px; background: #efefef;" | '''Price:'''
| |
| | style="text-align: center; width: 100px; background: #efefef;" | 9 WPs
| |
| |-
| |
| | style="text-align: center; width: 100px; background: #efefef;" | '''Caliber:'''
| |
| | style="text-align: center; width: 100px; background: #efefef;" | 7.62x51mm NATO
| |
| |-
| |
| | style="text-align: center; width: 100px; background: #efefef;" | '''Magazine Capacity:'''
| |
| | style="text-align: center; width: 100px; background: #efefef;" | 20
| |
| |-
| |
| | style="text-align: center; width: 100px; background: #efefef;" | '''Magazine Price:'''
| |
| | style="text-align: center; width: 100px; background: #efefef;" | 1 WP
| |
| |-
| |
| | style="text-align: center; width: 100px; background: #efefef;" | '''DLC:'''
| |
| | style="text-align: center; width: 100px; background: #efefef;" | Marksmen
| |
| |} </li>
| |
|
| |
| <li style="display: inline-table;">
| |
| {| style="border: 1px solid black; border-spacing: 0; margin-right: 5px; color: black;"
| |
| |+ style="color: #c1c1b8;" | '''ASP-1 Kir (Tan)'''
| |
| |+ [[File:asp1kir127.png|border|center|250px|caption]]
| |
| |-
| |
| | style="text-align: center; width: 100px; background: #efefef;" | '''Price:'''
| |
| | style="text-align: center; width: 100px; background: #efefef;" | 30 WPs
| |
| |-
| |
| | style="text-align: center; width: 100px; background: #efefef;" | '''Caliber:'''
| |
| | style="text-align: center; width: 100px; background: #efefef;" | 12.7x54mm
| |
| |-
| |
| | style="text-align: center; width: 100px; background: #efefef;" | '''Magazine Capacity:'''
| |
| | style="text-align: center; width: 100px; background: #efefef;" | 10
| |
| |-
| |
| | style="text-align: center; width: 100px; background: #efefef;" | '''Magazine Price:'''
| |
| | style="text-align: center; width: 100px; background: #efefef;" | 1 WP
| |
| |-
| |
| | style="text-align: center; width: 100px; background: #efefef;" | '''DLC:'''
| |
| | style="text-align: center; width: 100px; background: #efefef;" | Marksmen
| |
| |} </li>
| |
|
| |
| <li style="display: inline-table;">
| |
| {| style="border: 1px solid black; border-spacing: 0; margin-right: 5px; color: black;"
| |
| |+ style="color: #c1c1b8;" | '''Type 115 (Green Hex)'''
| |
| |+ [[File:type11565.png|border|center|250px|caption]]
| |
| |-
| |
| | style="text-align: center; width: 100px; background: #efefef;" | '''Price:'''
| |
| | style="text-align: center; width: 100px; background: #efefef;" | 6 WPs
| |
| |-
| |
| | style="text-align: center; width: 100px; background: #efefef;" | '''Caliber:'''
| |
| | style="text-align: center; width: 100px; background: #efefef;" | 6.5x39mm/.50 BW
| |
| |-
| |
| | style="text-align: center; width: 100px; background: #efefef;" | '''Magazine Capacity:'''
| |
| | style="text-align: center; width: 100px; background: #efefef;" | 10/30
| |
| |-
| |
| | style="text-align: center; width: 100px; background: #efefef;" | '''Magazine Price:'''
| |
| | style="text-align: center; width: 100px; background: #efefef;" | 1 WP
| |
| |-
| |
| | style="text-align: center; width: 100px; background: #efefef;" | '''DLC:'''
| |
| | style="text-align: center; width: 100px; background: #efefef;" | Apex
| |
| |} </li>
| |
|
| |
| <li style="display: inline-table;">
| |
| {| style="border: 1px solid black; border-spacing: 0; margin-right: 5px; color: black;"
| |
| |+ style="color: #c1c1b8;" | '''Mk200'''
| |
| |+ [[File:mk200.png|border|center|250px|caption]]
| |
| |-
| |
| | style="text-align: center; width: 100px; background: #efefef;" | '''Price:'''
| |
| | style="text-align: center; width: 100px; background: #efefef;" | 18WPs
| |
| |-
| |
| | style="text-align: center; width: 100px; background: #efefef;" | '''Caliber:'''
| |
| | style="text-align: center; width: 100px; background: #efefef;" | 6.5x39mm Caseless
| |
| |-
| |
| | style="text-align: center; width: 100px; background: #efefef;" | '''Magazine Capacity:'''
| |
| | style="text-align: center; width: 100px; background: #efefef;" | 200
| |
| |-
| |
| | style="text-align: center; width: 100px; background: #efefef;" | '''Magazine Price:'''
| |
| | style="text-align: center; width: 100px; background: #efefef;" | 2WPs
| |
| |-
| |
| | style="text-align: center; width: 100px; background: #efefef;" | '''DLC:'''
| |
| | style="text-align: center; width: 100px; background: #efefef;" | None
| |
| |} </li>
| |
|
| |
| <li style="display: inline-table;">
| |
| {| style="border: 1px solid black; border-spacing: 0; margin-right: 5px; color: black;"
| |
| |+ style="color: #c1c1b8;" | '''Mk200 (Black)'''
| |
| |+ [[File:mk20065black.png|border|center|250px|caption]]
| |
| |-
| |
| | style="text-align: center; width: 100px; background: #efefef;" | '''Price:'''
| |
| | style="text-align: center; width: 100px; background: #efefef;" | 18 WPs
| |
| |-
| |
| | style="text-align: center; width: 100px; background: #efefef;" | '''Caliber:'''
| |
| | style="text-align: center; width: 100px; background: #efefef;" | 6.5x39mm Caseless
| |
| |-
| |
| | style="text-align: center; width: 100px; background: #efefef;" | '''Magazine Capacity:'''
| |
| | style="text-align: center; width: 100px; background: #efefef;" | 200
| |
| |-
| |
| | style="text-align: center; width: 100px; background: #efefef;" | '''Magazine Price:'''
| |
| | style="text-align: center; width: 100px; background: #efefef;" | 2 WP
| |
| |-
| |
| | style="text-align: center; width: 100px; background: #efefef;" | '''DLC:'''
| |
| | style="text-align: center; width: 100px; background: #efefef;" | None
| |
| |} </li>
| |
|
| |
| <li style="display: inline-table;">
| |
| {| style="border: 1px solid black; border-spacing: 0; margin-right: 5px; color: black;"
| |
| |+ style="color: #c1c1b8;" | '''AK-12 (Arid)'''
| |
| |+ [[File:ak12762arid.png|border|center|250px|caption]]
| |
| |-
| |
| | style="text-align: center; width: 100px; background: #efefef;" | '''Price:'''
| |
| | style="text-align: center; width: 100px; background: #efefef;" | 7 WPs
| |
| |-
| |
| | style="text-align: center; width: 100px; background: #efefef;" | '''Caliber:'''
| |
| | style="text-align: center; width: 100px; background: #efefef;" | 7.62x39mm
| |
| |-
| |
| | style="text-align: center; width: 100px; background: #efefef;" | '''Magazine Capacity:'''
| |
| | style="text-align: center; width: 100px; background: #efefef;" | 30/75
| |
| |-
| |
| | style="text-align: center; width: 100px; background: #efefef;" | '''Magazine Price:'''
| |
| | style="text-align: center; width: 100px; background: #efefef;" | 1 WP/5 WP
| |
| |-
| |
| | style="text-align: center; width: 100px; background: #efefef;" | '''DLC:'''
| |
| | style="text-align: center; width: 100px; background: #efefef;" | Apex
| |
| |} </li>
| |
|
| |
| <li style="display: inline-table;">
| |
| {| style="border: 1px solid black; border-spacing: 0; margin-right: 5px; color: black;"
| |
| |+ style="color: #c1c1b8;" | '''AKU-12 (Arid)'''
| |
| |+ [[File:aku12762arid.png|border|center|250px|caption]]
| |
| |-
| |
| | style="text-align: center; width: 100px; background: #efefef;" | '''Price:'''
| |
| | style="text-align: center; width: 100px; background: #efefef;" | 7 WPs
| |
| |-
| |
| | style="text-align: center; width: 100px; background: #efefef;" | '''Caliber:'''
| |
| | style="text-align: center; width: 100px; background: #efefef;" | 7.62x39mm
| |
| |-
| |
| | style="text-align: center; width: 100px; background: #efefef;" | '''Magazine Capacity:'''
| |
| | style="text-align: center; width: 100px; background: #efefef;" | 30/75
| |
| |-
| |
| | style="text-align: center; width: 100px; background: #efefef;" | '''Magazine Price:'''
| |
| | style="text-align: center; width: 100px; background: #efefef;" | 1 WP/5 WP
| |
| |-
| |
| | style="text-align: center; width: 100px; background: #efefef;" | '''DLC:'''
| |
| | style="text-align: center; width: 100px; background: #efefef;" | Apex
| |
| |} </li>
| |
|
| |
| <li style="display: inline-table;">
| |
| {| style="border: 1px solid black; border-spacing: 0; margin-right: 5px; color: black;"
| |
| |+ style="color: #c1c1b8;" | '''RPK-12 (Arid)'''
| |
| |+ [[File:rpk12762arid.png|border|center|250px|caption]]
| |
| |-
| |
| | style="text-align: center; width: 100px; background: #efefef;" | '''Price:'''
| |
| | style="text-align: center; width: 100px; background: #efefef;" | 15 WPs
| |
| |-
| |
| | style="text-align: center; width: 100px; background: #efefef;" | '''Caliber:'''
| |
| | style="text-align: center; width: 100px; background: #efefef;" | 7.62x39mm
| |
| |-
| |
| | style="text-align: center; width: 100px; background: #efefef;" | '''Magazine Capacity:'''
| |
| | style="text-align: center; width: 100px; background: #efefef;" | 30/75
| |
| |-
| |
| | style="text-align: center; width: 100px; background: #efefef;" | '''Magazine Price:'''
| |
| | style="text-align: center; width: 100px; background: #efefef;" | 1 WP/5 WP
| |
| |-
| |
| | style="text-align: center; width: 100px; background: #efefef;" | '''DLC:'''
| |
| | style="text-align: center; width: 100px; background: #efefef;" | Apex
| |
| |} </li>
| |
|
| |
| <li style="display: inline-table;">
| |
| {| style="border: 1px solid black; border-spacing: 0; margin-right: 5px; color: black;"
| |
| |+ style="color: #c1c1b8;" | '''Promet'''
| |
| |+ [[File:promet65.png|border|center|250px|caption]]
| |
| |-
| |
| | style="text-align: center; width: 100px; background: #efefef;" | '''Price:'''
| |
| | style="text-align: center; width: 100px; background: #efefef;" | 5 WPs
| |
| |-
| |
| | style="text-align: center; width: 100px; background: #efefef;" | '''Caliber:'''
| |
| | style="text-align: center; width: 100px; background: #efefef;" | 6.5x39mm NATO
| |
| |-
| |
| | style="text-align: center; width: 100px; background: #efefef;" | '''Magazine Capacity:'''
| |
| | style="text-align: center; width: 100px; background: #efefef;" | 30
| |
| |-
| |
| | style="text-align: center; width: 100px; background: #efefef;" | '''Magazine Price:'''
| |
| | style="text-align: center; width: 100px; background: #efefef;" | 1 WP
| |
| |-
| |
| | style="text-align: center; width: 100px; background: #efefef;" | '''DLC:'''
| |
| | style="text-align: center; width: 100px; background: #efefef;" | Contact
| |
| |} </li>
| |
|
| |
| <li style="display: inline-table;">
| |
| {| style="border: 1px solid black; border-spacing: 0; margin-right: 5px; color: black;"
| |
| |+ style="color: #c1c1b8;" | '''Promet (Camo)'''
| |
| |+ [[File:promet65camo.png|border|center|250px|caption]]
| |
| |-
| |
| | style="text-align: center; width: 100px; background: #efefef;" | '''Price:'''
| |
| | style="text-align: center; width: 100px; background: #efefef;" | 5 WPs
| |
| |-
| |
| | style="text-align: center; width: 100px; background: #efefef;" | '''Caliber:'''
| |
| | style="text-align: center; width: 100px; background: #efefef;" | 6.5x39mm NATO
| |
| |-
| |
| | style="text-align: center; width: 100px; background: #efefef;" | '''Magazine Capacity:'''
| |
| | style="text-align: center; width: 100px; background: #efefef;" | 30
| |
| |-
| |
| | style="text-align: center; width: 100px; background: #efefef;" | '''Magazine Price:'''
| |
| | style="text-align: center; width: 100px; background: #efefef;" | 1 WP
| |
| |-
| |
| | style="text-align: center; width: 100px; background: #efefef;" | '''DLC:'''
| |
| | style="text-align: center; width: 100px; background: #efefef;" | Contact
| |
| |} </li>
| |
|
| |
| <li style="display: inline-table;">
| |
| {| style="border: 1px solid black; border-spacing: 0; margin-right: 5px; color: black;"
| |
| |+ style="color: #c1c1b8;" | '''Promet MR (Camo)'''
| |
| |+ [[File:prometmr65camo.png|border|center|250px|caption]]
| |
| |-
| |
| | style="text-align: center; width: 100px; background: #efefef;" | '''Price:'''
| |
| | style="text-align: center; width: 100px; background: #efefef;" | 6 WPs
| |
| |-
| |
| | style="text-align: center; width: 100px; background: #efefef;" | '''Caliber:'''
| |
| | style="text-align: center; width: 100px; background: #efefef;" | 6.5x39mm NATO
| |
| |-
| |
| | style="text-align: center; width: 100px; background: #efefef;" | '''Magazine Capacity:'''
| |
| | style="text-align: center; width: 100px; background: #efefef;" | 30
| |
| |-
| |
| | style="text-align: center; width: 100px; background: #efefef;" | '''Magazine Price:'''
| |
| | style="text-align: center; width: 100px; background: #efefef;" | 1 WP
| |
| |-
| |
| | style="text-align: center; width: 100px; background: #efefef;" | '''DLC:'''
| |
| | style="text-align: center; width: 100px; background: #efefef;" | Contact
| |
| |} </li>
| |
|
| |
| <li style="display: inline-table;">
| |
| {| style="border: 1px solid black; border-spacing: 0; margin-right: 5px; color: black;"
| |
| |+ style="color: #c1c1b8;" | '''Promet SG (Camo)'''
| |
| |+ [[File:Prometsg65.png|border|center|250px|caption]]
| |
| |-
| |
| | style="text-align: center; width: 100px; background: #efefef;" | '''Price:'''
| |
| | style="text-align: center; width: 100px; background: #efefef;" | 23 WPs
| |
| |-
| |
| | style="text-align: center; width: 100px; background: #efefef;" | '''Caliber:'''
| |
| | style="text-align: center; width: 100px; background: #efefef;" | 6.5x39mm NATO
| |
| |-
| |
| | style="text-align: center; width: 100px; background: #efefef;" | '''Magazine Capacity:'''
| |
| | style="text-align: center; width: 100px; background: #efefef;" | 30
| |
| |-
| |
| | style="text-align: center; width: 100px; background: #efefef;" | '''Magazine Price:'''
| |
| | style="text-align: center; width: 100px; background: #efefef;" | 1 WP
| |
| |-
| |
| | style="text-align: center; width: 100px; background: #efefef;" | '''DLC:'''
| |
| | style="text-align: center; width: 100px; background: #efefef;" | Contact
| |
| |} </li>
| |
|
| |
| <li style="display: inline-table;">
| |
| {| style="border: 1px solid black; border-spacing: 0; margin-right: 5px; color: black;"
| |
| |+ style="color: #c1c1b8;" | '''Kozlice 12G (Sawed-Off)'''
| |
| |+ [[File:KozliceSawedOff.png|border|center|250px|caption]]
| |
| |-
| |
| | style="text-align: center; width: 100px; background: #efefef;" | '''Price:'''
| |
| | style="text-align: center; width: 100px; background: #efefef;" | 4 WPs
| |
| |-
| |
| | style="text-align: center; width: 100px; background: #efefef;" | '''Caliber:'''
| |
| | style="text-align: center; width: 100px; background: #efefef;" | 12 Gauge Pellets/Slugs
| |
| |-
| |
| | style="text-align: center; width: 100px; background: #efefef;" | '''Magazine Capacity:'''
| |
| | style="text-align: center; width: 100px; background: #efefef;" | 2
| |
| |-
| |
| | style="text-align: center; width: 100px; background: #efefef;" | '''Magazine Price:'''
| |
| | style="text-align: center; width: 100px; background: #efefef;" | 1 WP/3 WP
| |
| |-
| |
| | style="text-align: center; width: 100px; background: #efefef;" | '''DLC:'''
| |
| | style="text-align: center; width: 100px; background: #efefef;" | Contact
| |
| |} </li>
| |
|
| |
| <li style="display: inline-table;">
| |
| {| style="border: 1px solid black; border-spacing: 0; margin-right: 5px; color: black;"
| |
| |+ style="color: #c1c1b8;" | '''MAR-10 (Sand)'''
| |
| |+ [[File:Mar10338.png|border|center|250px|caption]]
| |
| |-
| |
| | style="text-align: center; width: 100px; background: #efefef;" | '''Price:'''
| |
| | style="text-align: center; width: 100px; background: #efefef;" | 320 WPs
| |
| |-
| |
| | style="text-align: center; width: 100px; background: #efefef;" | '''Caliber:'''
| |
| | style="text-align: center; width: 100px; background: #efefef;" | .338 Lapua Magnum
| |
| |-
| |
| | style="text-align: center; width: 100px; background: #efefef;" | '''Magazine Capacity:'''
| |
| | style="text-align: center; width: 100px; background: #efefef;" | 10
| |
| |-
| |
| | style="text-align: center; width: 100px; background: #efefef;" | '''Magazine Price:'''
| |
| | style="text-align: center; width: 100px; background: #efefef;" | 5WPs
| |
| |-
| |
| | style="text-align: center; width: 100px; background: #efefef;" | '''DLC:'''
| |
| | style="text-align: center; width: 100px; background: #efefef;" | Marksmen
| |
| |} </li>
| |
|
| |
| <li style="display: inline-table;">
| |
| {| style="border: 1px solid black; border-spacing: 0; margin-right: 5px; color: black;"
| |
| |+ style="color: #c1c1b8;" | '''Titan MPRL (Olive)'''
| |
| |+ [[File:titanmprlolive.png|border|center|250px|caption]]
| |
| |-
| |
| | style="text-align: center; width: 100px; background: #efefef;" | '''Price:'''
| |
| | style="text-align: center; width: 100px; background: #efefef;" | 30 WPs
| |
| |-
| |
| | style="text-align: center; width: 100px; background: #efefef;" | '''Caliber:'''
| |
| | style="text-align: center; width: 100px; background: #efefef;" | 127mm HE-Frag Missile
| |
| |-
| |
| | style="text-align: center; width: 100px; background: #efefef;" | '''Magazine Capacity:'''
| |
| | style="text-align: center; width: 100px; background: #efefef;" | 1
| |
| |-
| |
| | style="text-align: center; width: 100px; background: #efefef;" | '''Missile Price:'''
| |
| | style="text-align: center; width: 100px; background: #efefef;" | 10 WP
| |
| |-
| |
| | style="text-align: center; width: 100px; background: #efefef;" | '''DLC:'''
| |
| | style="text-align: center; width: 100px; background: #efefef;" | None
| |
| |} </li>
| |
|
| |
| <li style="display: inline-table;">
| |
| {| style="border: 1px solid black; border-spacing: 0; margin-right: 5px; color: black;"
| |
| |+ style="color: #c1c1b8;" | '''RPG-7'''
| |
| |+ [[File:rpg7.png|border|center|250px|caption]]
| |
| |-
| |
| | style="text-align: center; width: 100px; background: #efefef;" | '''Price:'''
| |
| | style="text-align: center; width: 100px; background: #efefef;" | 75 WPs
| |
| |-
| |
| | style="text-align: center; width: 100px; background: #efefef;" | '''Caliber:'''
| |
| | style="text-align: center; width: 100px; background: #efefef;" | PG-7V Heat Grenade
| |
| |-
| |
| | style="text-align: center; width: 100px; background: #efefef;" | '''Magazine Capacity:'''
| |
| | style="text-align: center; width: 100px; background: #efefef;" | 1
| |
| |-
| |
| | style="text-align: center; width: 100px; background: #efefef;" | '''Missile Price:'''
| |
| | style="text-align: center; width: 100px; background: #efefef;" | 10 WP
| |
| |-
| |
| | style="text-align: center; width: 100px; background: #efefef;" | '''DLC:'''
| |
| | style="text-align: center; width: 100px; background: #efefef;" | Apex
| |
| |} </li>
| |
|
| |
| <li style="display: inline-table;">
| |
| {| style="border: 1px solid black; border-spacing: 0; margin-right: 5px; color: black;"
| |
| |+ style="color: #c1c1b8;" | '''M6 SLAM Mine'''
| |
| |+ [[File:m6slamine.png|border|center|250px|caption]]
| |
| |-
| |
| | style="text-align: center; width: 100px; background: #efefef;" | '''Price:'''
| |
| | style="text-align: center; width: 100px; background: #efefef;" | 10 WPs
| |
| |-
| |
| | style="text-align: center; width: 100px; background: #efefef;" | '''DLC:'''
| |
| | style="text-align: center; width: 100px; background: #efefef;" | None
| |
| |} </li>
| |
|
| |
| <li style="display: inline-table;">
| |
| {| style="border: 1px solid black; border-spacing: 0; margin-right: 5px; color: black;"
| |
| |+ style="color: #c1c1b8;" | '''9mm Suppressor'''
| |
| |+ [[File:9mmsuppressor.png|border|center|125px|caption]]
| |
| |-
| |
| | style="text-align: center; width: 50px; background: #efefef;" | '''Price:'''
| |
| | style="text-align: center; width: 50px; background: #efefef;" | 5 WPs
| |
| |-
| |
| | style="text-align: center; width: 50px; background: #efefef;" | '''DLC:'''
| |
| | style="text-align: center; width: 50px; background: #efefef;" | None
| |
| |} </li>
| |
|
| |
| <li style="display: inline-table;">
| |
| {| style="border: 1px solid black; border-spacing: 0; margin-right: 5px; color: black;"
| |
| |+ style="color: #c1c1b8;" | '''.45 ACP Suppressor'''
| |
| |+ [[File:45acpsuppressor.png|border|center|125px|caption]]
| |
| |-
| |
| | style="text-align: center; width: 50px; background: #efefef;" | '''Price:'''
| |
| | style="text-align: center; width: 50px; background: #efefef;" | 5 WPs
| |
| |-
| |
| | style="text-align: center; width: 50px; background: #efefef;" | '''DLC:'''
| |
| | style="text-align: center; width: 50px; background: #efefef;" | None
| |
| |} </li>
| |
|
| |
| <li style="display: inline-table;">
| |
| {| style="border: 1px solid black; border-spacing: 0; margin-right: 5px; color: black;"
| |
| |+ style="color: #c1c1b8;" | '''5.56mm Suppressor'''
| |
| |+ [[File:556mmsuppressor.png|border|center|125px|caption]]
| |
| |-
| |
| | style="text-align: center; width: 50px; background: #efefef;" | '''Price:'''
| |
| | style="text-align: center; width: 50px; background: #efefef;" | 30 WPs
| |
| |-
| |
| | style="text-align: center; width: 50px; background: #efefef;" | '''DLC:'''
| |
| | style="text-align: center; width: 50px; background: #efefef;" | None
| |
| |} </li>
| |
|
| |
| <li style="display: inline-table;">
| |
| {| style="border: 1px solid black; border-spacing: 0; margin-right: 5px; color: black;"
| |
| |+ style="color: #c1c1b8;" | '''5.7mm Suppressor'''
| |
| |+ [[File:57mmsuppressor.png|border|center|125px|caption]]
| |
| |-
| |
| | style="text-align: center; width: 50px; background: #efefef;" | '''Price:'''
| |
| | style="text-align: center; width: 50px; background: #efefef;" | 30 WPs
| |
| |-
| |
| | style="text-align: center; width: 50px; background: #efefef;" | '''DLC:'''
| |
| | style="text-align: center; width: 50px; background: #efefef;" | None
| |
| |} </li>
| |
|
| |
| <li style="display: inline-table;">
| |
| {| style="border: 1px solid black; border-spacing: 0; margin-right: 5px; color: black;"
| |
| |+ style="color: #c1c1b8;" | '''5.8mm Stealth Suppressor'''
| |
| |+ [[File:58mmstealthsuppressor.png|border|center|125px|caption]]
| |
| |-
| |
| | style="text-align: center; width: 50px; background: #efefef;" | '''Price:'''
| |
| | style="text-align: center; width: 50px; background: #efefef;" | 35 WPs
| |
| |-
| |
| | style="text-align: center; width: 50px; background: #efefef;" | '''DLC:'''
| |
| | style="text-align: center; width: 50px; background: #efefef;" | Apex
| |
| |} </li>
| |
|
| |
| <li style="display: inline-table;">
| |
| {| style="border: 1px solid black; border-spacing: 0; margin-right: 5px; color: black;"
| |
| |+ style="color: #c1c1b8;" | '''6.5mm Suppressor'''
| |
| |+ [[File:65mmsuppressorsand.png|border|center|125px|caption]]
| |
| |-
| |
| | style="text-align: center; width: 50px; background: #efefef;" | '''Price:'''
| |
| | style="text-align: center; width: 50px; background: #efefef;" | 50 WPs
| |
| |-
| |
| | style="text-align: center; width: 50px; background: #efefef;" | '''DLC:'''
| |
| | style="text-align: center; width: 50px; background: #efefef;" | None
| |
| |} </li>
| |
|
| |
| <li style="display: inline-table;">
| |
| {| style="border: 1px solid black; border-spacing: 0; margin-right: 5px; color: black;"
| |
| |+ style="color: #c1c1b8;" | '''6.5mm Stealth Suppressor'''
| |
| |+ [[File:65mmstealthsuppressorhex.png|border|center|125px|caption]]
| |
| |-
| |
| | style="text-align: center; width: 50px; background: #efefef;" | '''Price:'''
| |
| | style="text-align: center; width: 50px; background: #efefef;" | 50 WPs
| |
| |-
| |
| | style="text-align: center; width: 50px; background: #efefef;" | '''DLC:'''
| |
| | style="text-align: center; width: 50px; background: #efefef;" | Apex
| |
| |} </li>
| |
|
| |
| <li style="display: inline-table;">
| |
| {| style="border: 1px solid black; border-spacing: 0; margin-right: 5px; color: black;"
| |
| |+ style="color: #c1c1b8;" | '''5.56mm 150 Round Drum'''
| |
| |+ [[File:556150rdtracered.png|border|center|125px|caption]]
| |
| |-
| |
| | style="text-align: center; width: 50px; background: #efefef;" | '''Price:'''
| |
| | style="text-align: center; width: 50px; background: #efefef;" | 1 WPs
| |
| |-
| |
| | style="text-align: center; width: 50px; background: #efefef;" | '''DLC:'''
| |
| | style="text-align: center; width: 50px; background: #efefef;" | None
| |
| |} </li>
| |
|
| |
| <li style="display: inline-table;">
| |
| {| style="border: 1px solid black; border-spacing: 0; margin-right: 5px; color: black;"
| |
| |+ style="color: #c1c1b8;" | '''7.62mm 150 Round Box'''
| |
| |+ [[File:762150rdtracergreen.png|border|center|125px|caption]]
| |
| |-
| |
| | style="text-align: center; width: 50px; background: #efefef;" | '''Price:'''
| |
| | style="text-align: center; width: 50px; background: #efefef;" | 5 WPs
| |
| |-
| |
| | style="text-align: center; width: 75px; background: #efefef;" | '''DLC:'''
| |
| | style="text-align: center; width: 75px; background: #efefef;" | None
| |
| |} </li>
| |
|
| |
| <li style="display: inline-table;">
| |
| {| style="border: 1px solid black; border-spacing: 0; margin-right: 5px; color: black;"
| |
| |+ style="color: #c1c1b8;" | '''.338 LM 10 Round Magazine'''
| |
| |+ [[File:338lm10rd.png|border|center|125px|caption]]
| |
| |-
| |
| | style="text-align: center; width: 50px; background: #efefef;" | '''Price:'''
| |
| | style="text-align: center; width: 50px; background: #efefef;" | 5 WPs
| |
| |-
| |
| | style="text-align: center; width: 50px; background: #efefef;" | '''DLC:'''
| |
| | style="text-align: center; width: 50px; background: #efefef;" | Marksmen
| |
| |} </li>
| |
|
| |
| <li style="display: inline-table;">
| |
| {| style="border: 1px solid black; border-spacing: 0; margin-right: 5px; color: black;"
| |
| |+ style="color: #c1c1b8;" | '''.50 BW 10 Round Caseless Magazine'''
| |
| |+ [[File:50bw10rdcaseless.png|border|center|125px|caption]]
| |
| |-
| |
| | style="text-align: center; width: 50px; background: #efefef;" | '''Price:'''
| |
| | style="text-align: center; width: 50px; background: #efefef;" | 20 WPs
| |
| |-
| |
| | style="text-align: center; width: 50px; background: #efefef;" | '''DLC:'''
| |
| | style="text-align: center; width: 50px; background: #efefef;" | Apex
| |
| |} </li>
| |
|
| |
| <li style="display: inline-table;">
| |
| {| style="border: 1px solid black; border-spacing: 0; margin-right: 5px; color: black;"
| |
| |+ style="color: #c1c1b8;" | '''12 Gauge 2Rnd (Slugs)'''
| |
| |+ [[File:slugs.png|border|center|125px|caption]]
| |
| |-
| |
| | style="text-align: center; width: 50px; background: #efefef;" | '''Price:'''
| |
| | style="text-align: center; width: 50px; background: #efefef;" | 3 WPs
| |
| |-
| |
| | style="text-align: center; width: 50px; background: #efefef;" | '''DLC:'''
| |
| | style="text-align: center; width: 50px; background: #efefef;" | Contact
| |
| |} </li>
| |
|
| |
| <li style="display: inline-table;">
| |
| {| style="border: 1px solid black; border-spacing: 0; margin-right: 5px; color: black;"
| |
| |+ style="color: #c1c1b8;" | '''12 Gauge 6 Round (Slugs)'''
| |
| |+ [[File:12g6rdpellets.png|border|center|125px|caption]]
| |
| |-
| |
| | style="text-align: center; width: 50px; background: #efefef;" | '''Price:'''
| |
| | style="text-align: center; width: 50px; background: #efefef;" | 15 WPs
| |
| |-
| |
| | style="text-align: center; width: 50px; background: #efefef;" | '''DLC:'''
| |
| | style="text-align: center; width: 50px; background: #efefef;" | Contact
| |
| |} </li>
| |
|
| |
| <li style="display: inline-table;">
| |
| {| style="border: 1px solid black; border-spacing: 0; margin-right: 5px; color: black;"
| |
| |+ style="color: #c1c1b8;" | '''12 Gauge 6 Round (Pellets)'''
| |
| |+ [[File:12g6rdslugs.png|border|center|125px|caption]]
| |
| |-
| |
| | style="text-align: center; width: 50px; background: #efefef;" | '''Price:'''
| |
| | style="text-align: center; width: 50px; background: #efefef;" | 2 WPs
| |
| |-
| |
| | style="text-align: center; width: 50px; background: #efefef;" | '''DLC:'''
| |
| | style="text-align: center; width: 50px; background: #efefef;" | Contact
| |
| |} </li>
| |
|
| |
| <li style="display: inline-table;">
| |
| {| style="border: 1px solid black; border-spacing: 0; margin-right: 5px; color: black;"
| |
| |+ style="color: #c1c1b8;" | '''Non-Tracer Zafhir Belt'''
| |
| |+ [[File:Arma3-ammunition-150rndzafirball1.png|border|center|125px|caption]]
| |
| |-
| |
| | style="text-align: center; width: 50px; background: #efefef;" | '''Price:'''
| |
| | style="text-align: center; width: 50px; background: #efefef;" | 5 WPs
| |
| |-
| |
| | style="text-align: center; width: 50px; background: #efefef;" | '''DLC:'''
| |
| | style="text-align: center; width: 50px; background: #efefef;" | None
| |
| |} </li>
| |
|
| |
| <li style="display: inline-table;">
| |
| {| style="border: 1px solid black; border-spacing: 0; margin-right: 5px; color: black;"
| |
| |+ style="color: #c1c1b8;" | '''Explosive Charge'''
| |
| |+ [[File:explosivecharge.png|border|center|125px|caption]]
| |
| |-
| |
| | style="text-align: center; width: 50px; background: #efefef;" | '''Price:'''
| |
| | style="text-align: center; width: 50px; background: #efefef;" | 12 WPs
| |
| |-
| |
| | style="text-align: center; width: 50px; background: #efefef;" | '''DLC:'''
| |
| | style="text-align: center; width: 50px; background: #efefef;" | None
| |
| |} </li>
| |
|
| |
| <li style="display: inline-table;">
| |
| {| style="border: 1px solid black; border-spacing: 0; margin-right: 5px; color: black;"
| |
| |+ style="color: #c1c1b8;" | '''RGO Hand Grenade'''
| |
| |+ [[File:RGOhandgrenade.png|border|center|125px|caption]]
| |
| |-
| |
| | style="text-align: center; width: 50px; background: #efefef;" | '''Price:'''
| |
| | style="text-align: center; width: 50px; background: #efefef;" | 4 WPs
| |
| |-
| |
| | style="text-align: center; width: 50px; background: #efefef;" | '''DLC:'''
| |
| | style="text-align: center; width: 50px; background: #efefef;" | None
| |
| |} </li>
| |
|
| |
| <li style="display: inline-table;">
| |
| {| style="border: 1px solid black; border-spacing: 0; margin-right: 5px; color: black;"
| |
| |+ style="color: #c1c1b8;" | '''RPG-42 AT Rockets'''
| |
| |+ [[File:Rpg42at.png|border|center|125px|caption]]
| |
| |-
| |
| | style="text-align: center; width: 50px; background: #efefef;" | '''Price:'''
| |
| | style="text-align: center; width: 50px; background: #efefef;" | 25 WPs
| |
| |-
| |
| | style="text-align: center; width: 50px; background: #efefef;" | '''DLC:'''
| |
| | style="text-align: center; width: 50px; background: #efefef;" | None
| |
| |} </li>
| |
|
| |
| <li style="display: inline-table;">
| |
| {| style="border: 1px solid black; border-spacing: 0; margin-right: 5px; color: black;"
| |
| |+ style="color: #c1c1b8;" | '''RPG-42 HE Rockets'''
| |
| |+ [[File:Rpg42he.png|border|center|125px|caption]]
| |
| |-
| |
| | style="text-align: center; width: 50px; background: #efefef;" | '''Price:'''
| |
| | style="text-align: center; width: 50px; background: #efefef;" | 25 WPs
| |
| |-
| |
| | style="text-align: center; width: 50px; background: #efefef;" | '''DLC:'''
| |
| | style="text-align: center; width: 50px; background: #efefef;" | None
| |
| |} </li>
| |
| </ul></div>
| |
| </center>
| |
|
| |
| =='''Explosive Items'''==
| |
|
| |
| <center>
| |
| <div><ul>
| |
| <li style="display: inline-table;">
| |
| {| style="border: 1px solid black; border-spacing: 0; margin-right: 5px; color: black;"
| |
| |+ style="color: #c1c1b8;" | '''Small Urban Explosive'''
| |
| |+ [[File:smallurbandevice.png|border|center|300x100px|caption]]
| |
| |-
| |
| | style="text-align: center; width: 75px; background: #efefef;" | '''Price:'''
| |
| | style="text-align: center; width: 75px; background: #efefef;" | $250,000
| |
| |-
| |
| |} </li>
| |
|
| |
| <li style="display: inline-table;">
| |
| {| style="border: 1px solid black; border-spacing: 0; margin-right: 5px; color: black;"
| |
| |+ style="color: #c1c1b8;" | '''Large Urban Explosive'''
| |
| |+ [[File:largeurbandevice.png|border|center|300x100px|caption]]
| |
| |-
| |
| | style="text-align: center; width: 75px; background: #efefef;" | '''Price:'''
| |
| | style="text-align: center; width: 75px; background: #efefef;" | $350,000
| |
| |-
| |
| |} </li>
| |
|
| |
| <li style="display: inline-table;">
| |
| {| style="border: 1px solid black; border-spacing: 0; margin-right: 5px; color: black;"
| |
| |+ style="color: #c1c1b8;" | '''M6 Slam Mine'''
| |
| |+ [[File:m6slamine.png|border|center|300x100px|caption]]
| |
| |-
| |
| | style="text-align: center; width: 75px; background: #efefef;" | '''Price:'''
| |
| | style="font-size:75%; text-align: center; width: 75px; background: #efefef;" | $200,000 / 10 WP
| |
| |-
| |
| |} </li>
| |
|
| |
| <li style="display: inline-table;">
| |
| {| style="border: 1px solid black; border-spacing: 0; margin-right: 5px; color: black;"
| |
| |+ style="color: #c1c1b8;" | '''Explosive Charge'''
| |
| |+ [[File:explosivecharge.png|border|center|400x100px|caption]]
| |
| |-
| |
| | style="text-align: center; width: 50px; background: #efefef;" | '''Price:'''
| |
| | style="font-size:75%; text-align: center; width: 50px; background: #efefef;" | $190,000 / 12 WP
| |
| |-
| |
| |} </li>
| |
|
| |
| <li style="display: inline-table;">
| |
| {| style="border: 1px solid black; border-spacing: 0; margin-right: 5px; color: black;"
| |
| |+ style="color: #c1c1b8;" | '''RGO Hand Grenade'''
| |
| |+ [[File:RGOhandgrenade.png|border|center|300x100px|caption]]
| |
| |-
| |
| | style="text-align: center; width: 50px; background: #efefef;" | '''Price:'''
| |
| | style="font-size:75%; text-align: center; width: 50px; background: #efefef;" | $50,000 / 4 WP
| |
| |-
| |
| |} </li>
| |
| </ul></div>
| |
| </center>
| |
|
| |
| =='''Equipment'''==
| |
|
| |
| ==='''Attachments'''===
| |
|
| |
| <center>
| |
| <div><ul>
| |
| <li style="display: inline-table;">
| |
| {| style="border: 1px solid black; border-spacing: 0; margin-right: 5px; color: black;"
| |
| |+ style="color: #c1c1b8;" | '''Flashlight'''
| |
| |+ [[File:flashlight.png|border|center|300x100px|caption]]
| |
| |-
| |
| | style="text-align: center; width: 50px; background: #efefef;" | '''Price:'''
| |
| | style="text-align: center; width: 50px; background: #efefef;" | $500
| |
| |-
| |
| |} </li>
| |
|
| |
| <li style="display: inline-table;">
| |
| {| style="border: 1px solid black; border-spacing: 0; margin-right: 5px; color: black;"
| |
| |+ style="color: #c1c1b8;" | '''Pistol Flashlight'''
| |
| |+ [[File:pistolflashlight.png|border|center|300x100px|caption]]
| |
| |-
| |
| | style="text-align: center; width: 50px; background: #efefef;" | '''Price:'''
| |
| | style="text-align: center; width: 50px; background: #efefef;" | $500
| |
| |-
| |
| |} </li>
| |
|
| |
| <li style="display: inline-table;">
| |
| {| style="border: 1px solid black; border-spacing: 0; margin-right: 5px; color: black;"
| |
| |+ style="color: #c1c1b8;" | '''ACO'''
| |
| |+ [[File:acogreen.png|border|center|300x100px|caption]]
| |
| |-
| |
| | style="text-align: center; width: 50px; background: #efefef;" | '''Price:'''
| |
| | style="text-align: center; width: 50px; background: #efefef;" | $1,000
| |
| |-
| |
| |} </li>
| |
|
| |
| <li style="display: inline-table;">
| |
| {| style="border: 1px solid black; border-spacing: 0; margin-right: 5px; color: black;"
| |
| |+ style="color: #c1c1b8;" | '''MK17 Holosight'''
| |
| |+ [[File:mk17holosight.png|border|center|300x100px|caption]]
| |
| |-
| |
| | style="text-align: center; width: 50px; background: #efefef;" | '''Price:'''
| |
| | style="text-align: center; width: 50px; background: #efefef;" | $1,000
| |
| |-
| |
| |} </li>
| |
|
| |
| <li style="display: inline-table;">
| |
| {| style="border: 1px solid black; border-spacing: 0; margin-right: 5px; color: black;"
| |
| |+ style="color: #c1c1b8;" | '''MK17 SMG Holosight'''
| |
| |+ [[File:mk17smgholosightblack.png|border|center|300x100px|caption]]
| |
| |-
| |
| | style="text-align: center; width: 50px; background: #efefef;" | '''Price:'''
| |
| | style="text-align: center; width: 50px; background: #efefef;" | $500
| |
| |-
| |
| |} </li>
| |
|
| |
| <li style="display: inline-table;">
| |
| {| style="border: 1px solid black; border-spacing: 0; margin-right: 5px; color: black;"
| |
| |+ style="color: #c1c1b8;" | '''MRCO Scope'''
| |
| |+ [[File:mrco2x.png|border|center|300x100px|caption]]
| |
| |-
| |
| | style="text-align: center; width: 50px; background: #efefef;" | '''Price:'''
| |
| | style="text-align: center; width: 50px; background: #efefef;" | $1,000
| |
| |-
| |
| |} </li>
| |
|
| |
| <li style="display: inline-table;">
| |
| {| style="border: 1px solid black; border-spacing: 0; margin-right: 5px; color: black;"
| |
| |+ style="color: #c1c1b8;" | '''RCO Scope'''
| |
| |+ [[File:rco2x.png|border|center|300x100px|caption]]
| |
| |-
| |
| | style="text-align: center; width: 50px; background: #efefef;" | '''Price:'''
| |
| | style="text-align: center; width: 50px; background: #efefef;" | $1,000
| |
| |-
| |
| |} </li>
| |
|
| |
| <li style="display: inline-table;">
| |
| {| style="border: 1px solid black; border-spacing: 0; margin-right: 5px; color: black;"
| |
| |+ style="color: #c1c1b8;" | '''ARCO Scope'''
| |
| |+ [[File:arco2x.png|border|center|300x100px|caption]]
| |
| |-
| |
| | style="text-align: center; width: 50px; background: #efefef;" | '''Price:'''
| |
| | style="text-align: center; width: 50px; background: #efefef;" | $1,000
| |
| |-
| |
| |} </li>
| |
|
| |
| <li style="display: inline-table;">
| |
| {| style="border: 1px solid black; border-spacing: 0; margin-right: 5px; color: black;"
| |
| |+ style="color: #c1c1b8;" | '''ARCO Scope'''
| |
| |+ [[File:arco2xblack.png|border|center|300x100px|caption]]
| |
| |-
| |
| | style="text-align: center; width: 50px; background: #efefef;" | '''Price:'''
| |
| | style="text-align: center; width: 50px; background: #efefef;" | $1,000
| |
| |-
| |
| |} </li>
| |
|
| |
| <li style="display: inline-table;">
| |
| {| style="border: 1px solid black; border-spacing: 0; margin-right: 5px; color: black;"
| |
| |+ style="color: #c1c1b8;" | '''ARCO AK'''
| |
| |+ [[File:akarco2xarid.png|border|center|300x100px|caption]]
| |
| |-
| |
| | style="text-align: center; width: 50px; background: #efefef;" | '''Price:'''
| |
| | style="text-align: center; width: 50px; background: #efefef;" | $1,000
| |
| |-
| |
| |} </li>
| |
|
| |
| <li style="display: inline-table;">
| |
| {| style="border: 1px solid black; border-spacing: 0; margin-right: 5px; color: black;"
| |
| |+ style="color: #c1c1b8;" | '''Promet Modular Sight'''
| |
| |+ [[File:pms2x.png|border|center|300x100px|caption]]
| |
| |-
| |
| | style="text-align: center; width: 50px; background: #efefef;" | '''Price:'''
| |
| | style="text-align: center; width: 50px; background: #efefef;" | $1,000
| |
| |-
| |
| |} </li>
| |
|
| |
| <li style="display: inline-table;">
| |
| {| style="border: 1px solid black; border-spacing: 0; margin-right: 5px; color: black;"
| |
| |+ style="color: #c1c1b8;" | '''ERCO'''
| |
| |+ [[File:erco2xblack.png|border|center|300x100px|caption]]
| |
| |-
| |
| | style="text-align: center; width: 50px; background: #efefef;" | '''Price:'''
| |
| | style="text-align: center; width: 50px; background: #efefef;" | $1,000
| |
| |-
| |
| |} </li>
| |
|
| |
| <li style="display: inline-table;">
| |
| {| style="border: 1px solid black; border-spacing: 0; margin-right: 5px; color: black;"
| |
| |+ style="color: #c1c1b8;" | '''IR Laser Pointer'''
| |
| |+ [[File:irlaserpointer.png|border|center|300x100px|caption]]
| |
| |-
| |
| | style="text-align: center; width: 50px; background: #efefef;" | '''Price:'''
| |
| | style="text-align: center; width: 50px; background: #efefef;" | $1,000
| |
| |-
| |
| |} </li>
| |
|
| |
| <li style="display: inline-table;">
| |
| {| style="border: 1px solid black; border-spacing: 0; margin-right: 5px; color: black;"
| |
| |+ style="color: #c1c1b8;" | '''Bipod'''
| |
| |+ [[File:bipodsand.png|border|center|300x100px|caption]]
| |
| |-
| |
| | style="text-align: center; width: 50px; background: #efefef;" | '''Price:'''
| |
| | style="text-align: center; width: 50px; background: #efefef;" | $10,000
| |
| |-
| |
| |} </li>
| |
| </ul></div>
| |
| </center>
| |
|
| |
| ==='''Gear'''===
| |
|
| |
| <center>
| |
| <div><ul>
| |
| <li style="display: inline-table;">
| |
| {| style="border: 1px solid black; border-spacing: 0; margin-right: 5px; color: black;"
| |
| |+ style="color: #c1c1b8;" | '''Smoke Grenade (White)'''
| |
| |+ [[File:smokegrenadewhite.png|border|center|300x100px|caption]]
| |
| |-
| |
| | style="text-align: center; width: 50px; background: #efefef;" | '''Price:'''
| |
| | style="text-align: center; width: 50px; background: #efefef;" | $1,000
| |
| |-
| |
| |} </li>
| |
|
| |
| <li style="display: inline-table;">
| |
| {| style="border: 1px solid black; border-spacing: 0; margin-right: 5px; color: black;"
| |
| |+ style="color: #c1c1b8;" | '''Smoke Grenade (Red)'''
| |
| |+ [[File:smokegrenadered.png|border|center|300x100px|caption]]
| |
| |-
| |
| | style="text-align: center; width: 50px; background: #efefef;" | '''Price:'''
| |
| | style="text-align: center; width: 50px; background: #efefef;" | $1,000
| |
| |-
| |
| |} </li>
| |
|
| |
| <li style="display: inline-table;">
| |
| {| style="border: 1px solid black; border-spacing: 0; margin-right: 5px; color: black;"
| |
| |+ style="color: #c1c1b8;" | '''Smoke Grenade (Green)'''
| |
| |+ [[File:smokegrenadegreen.png|border|center|300x100px|caption]]
| |
| |-
| |
| | style="text-align: center; width: 50px; background: #efefef;" | '''Price:'''
| |
| | style="text-align: center; width: 50px; background: #efefef;" | $1,000
| |
| |-
| |
| |} </li>
| |
|
| |
| <li style="display: inline-table;">
| |
| {| style="border: 1px solid black; border-spacing: 0; margin-right: 5px; color: black;"
| |
| |+ style="color: #c1c1b8;" | '''Smoke Grenade (Purple)'''
| |
| |+ [[File:smokegrenadepurple.png|border|center|300x100px|caption]]
| |
| |-
| |
| | style="text-align: center; width: 50px; background: #efefef;" | '''Price:'''
| |
| | style="text-align: center; width: 50px; background: #efefef;" | $1,000
| |
| |-
| |
| |} </li>
| |
|
| |
| <li style="display: inline-table;">
| |
| {| style="border: 1px solid black; border-spacing: 0; margin-right: 5px; color: black;"
| |
| |+ style="color: #c1c1b8;" | '''First Aid Kit'''
| |
| |+ [[File:firstaidkit.png|border|center|300x100px|caption]]
| |
| |-
| |
| | style="text-align: center; width: 50px; background: #efefef;" | '''Price:'''
| |
| | style="text-align: center; width: 50px; background: #efefef;" | $500
| |
| |-
| |
| |} </li>
| |
|
| |
| <li style="display: inline-table;">
| |
| {| style="border: 1px solid black; border-spacing: 0; margin-right: 5px; color: black;"
| |
| |+ style="color: #c1c1b8;" | '''First Aid Kit +'''
| |
| |+ [[File:firstaidkit.png|border|center|300x100px|caption]]
| |
| |-
| |
| | style="text-align: center; width: 50px; background: #efefef;" | '''Price:'''
| |
| | style="text-align: center; width: 50px; background: #efefef;" | $500
| |
| |-
| |
| |} </li>
| |
|
| |
| <li style="display: inline-table;">
| |
| {| style="border: 1px solid black; border-spacing: 0; margin-right: 5px; color: black;"
| |
| |+ style="color: #c1c1b8;" | '''Tool Kit'''
| |
| |+ [[File:firstaidkit1.png|border|center|300x100px|caption]]
| |
| |-
| |
| | style="text-align: center; width: 50px; background: #efefef;" | '''Price:'''
| |
| | style="text-align: center; width: 50px; background: #efefef;" | $500
| |
| |-
| |
| |} </li>
| |
|
| |
| <li style="display: inline-table;">
| |
| {| style="border: 1px solid black; border-spacing: 0; margin-right: 5px; color: black;"
| |
| |+ style="color: #c1c1b8;" | '''GPS'''
| |
| |+ [[File:gps.png|border|center|300x100px|caption]]
| |
| |-
| |
| | style="text-align: center; width: 50px; background: #efefef;" | '''Price:'''
| |
| | style="text-align: center; width: 50px; background: #efefef;" | $50
| |
| |-
| |
| |} </li>
| |
|
| |
| <li style="display: inline-table;">
| |
| {| style="border: 1px solid black; border-spacing: 0; margin-right: 5px; color: black;"
| |
| |+ style="color: #c1c1b8;" | '''Map'''
| |
| |+ [[File:map.png|border|center|300x100px|caption]]
| |
| |-
| |
| | style="text-align: center; width: 50px; background: #efefef;" | '''Price:'''
| |
| | style="text-align: center; width: 50px; background: #efefef;" | $50
| |
| |-
| |
| |} </li>
| |
|
| |
| <li style="display: inline-table;">
| |
| {| style="border: 1px solid black; border-spacing: 0; margin-right: 5px; color: black;"
| |
| |+ style="color: #c1c1b8;" | '''Compass'''
| |
| |+ [[File:compass.png|border|center|300x100px|caption]]
| |
| |-
| |
| | style="text-align: center; width: 50px; background: #efefef;" | '''Price:'''
| |
| | style="text-align: center; width: 50px; background: #efefef;" | $50
| |
| |-
| |
| |} </li>
| |
|
| |
| <li style="display: inline-table;">
| |
| {| style="border: 1px solid black; border-spacing: 0; margin-right: 5px; color: black;"
| |
| |+ style="color: #c1c1b8;" | '''Watch'''
| |
| |+ [[File:watch.png|border|center|300x100px|caption]]
| |
| |-
| |
| | style="text-align: center; width: 50px; background: #efefef;" | '''Price:'''
| |
| | style="text-align: center; width: 50px; background: #efefef;" | $50
| |
| |-
| |
| |} </li>
| |
|
| |
| <li style="display: inline-table;">
| |
| {| style="border: 1px solid black; border-spacing: 0; margin-right: 5px; color: black;"
| |
| |+ style="color: #c1c1b8;" | '''Binocular'''
| |
| |+ [[File:binoculars.png|border|center|300x100px|caption]]
| |
| |-
| |
| | style="text-align: center; width: 50px; background: #efefef;" | '''Price:'''
| |
| | style="text-align: center; width: 50px; background: #efefef;" | $1,000
| |
| |-
| |
| |} </li>
| |
|
| |
| <li style="display: inline-table;">
| |
| {| style="border: 1px solid black; border-spacing: 0; margin-right: 5px; color: black;"
| |
| |+ style="color: #c1c1b8;" | '''Rangefinder'''
| |
| |+ [[File:rangefinders.png|border|center|300x100px|caption]]
| |
| |-
| |
| | style="text-align: center; width: 50px; background: #efefef;" | '''Price:'''
| |
| | style="text-align: center; width: 50px; background: #efefef;" | $2,000
| |
| |-
| |
| |} </li>
| |
|
| |
| <li style="display: inline-table;">
| |
| {| style="border: 1px solid black; border-spacing: 0; margin-right: 5px; color: black;"
| |
| |+ style="color: #c1c1b8;" | '''Night Vision'''
| |
| |+ [[File:nightvisionbrown.png|border|center|300x100px|caption]]
| |
| |-
| |
| | style="text-align: center; width: 50px; background: #efefef;" | '''Price:'''
| |
| | style="text-align: center; width: 50px; background: #efefef;" | $1000
| |
| |-
| |
| |} </li>
| |
|
| |
| <li style="display: inline-table;">
| |
| {| style="border: 1px solid black; border-spacing: 0; margin-right: 5px; color: black;"
| |
| |+ style="color: #c1c1b8;" | '''Fullscreen NVGs'''
| |
| |+ [[File:nightvisionbrown.png|border|center|300x100px|caption]]
| |
| |-
| |
| | style="text-align: center; width: 50px; background: #efefef;" | '''Price:'''
| |
| | style="text-align: center; width: 50px; background: #efefef;" | $5000
| |
| |-
| |
| |} </li>
| |
|
| |
| <li style="display: inline-table;">
| |
| {| style="border: 1px solid black; border-spacing: 0; margin-right: 5px; color: black;"
| |
| |+ style="color: #c1c1b8;" | '''Compact NVG (Green)'''
| |
| |+ [[File:compactnvggreen.png|border|center|300x100px|caption]]
| |
| |-
| |
| | style="text-align: center; width: 50px; background: #efefef;" | '''Price:'''
| |
| | style="text-align: center; width: 50px; background: #efefef;" | $1,000
| |
| |-
| |
| |} </li>
| |
| </ul></div>
| |
| </center>
| |
|
| |
| =='''Clothing'''==
| |
|
| |
| *Clothing that is restricted by Donation, Olympus+ or Gang is now shown in Orange but unpurchaseable
| |
| <center>
| |
| <div><ul>
| |
| <li style="display: inline-table;">
| |
| {| style="border: 1px solid black; border-spacing: 0; margin-right: 5px; color: black;"
| |
| |+ style="color: #c1c1b8;" | '''GA Carrier Lite'''
| |
| |+ [[File:gaclite.png|border|center|250px|caption]]
| |
| |-
| |
| | style="text-align: center; width: 100px; background: #efefef;" | '''Price:'''
| |
| | style="text-align: center; width: 100px; background: #efefef;" | $30,000 // 2 WP
| |
| |-
| |
| | style="text-align: center; width: 100px; background: #efefef;" | '''Armor Tier:'''
| |
| | style="text-align: center; width: 100px; background: #efefef;" | III
| |
| |-
| |
| | style="text-align: center; width: 100px; background: #efefef;" | '''Explosive Resistance:'''
| |
| | style="text-align: center; width: 100px; background: #efefef;" | High
| |
| |-
| |
| | style="text-align: center; width: 100px; background: #efefef;" | '''Virtual Item Capacity:'''
| |
| | style="text-align: center; width: 100px; background: #efefef;" | 15
| |
| |-
| |
| | style="text-align: center; width: 100px; background: #efefef;" | '''DLC:'''
| |
| | style="text-align: center; width: 100px; background: #efefef;" | None
| |
| |-
| |
| |} </li>
| |
|
| |
| <li style="display: inline-table;">
| |
| {| style="border: 1px solid black; border-spacing: 0; margin-right: 5px; color: black;"
| |
| |+ style="color: #c1c1b8;" | '''GA Carrier Rig'''
| |
| |+ [[File:gacrig.png|border|center|250px|caption]]
| |
| |-
| |
| | style="text-align: center; width: 100px; background: #efefef;" | '''Price:'''
| |
| | style="text-align: center; width: 100px; background: #efefef;" | $40,000 // 3WPs
| |
| |-
| |
| | style="text-align: center; width: 100px; background: #efefef;" | '''Armor Tier:'''
| |
| | style="text-align: center; width: 100px; background: #efefef;" | III
| |
| |-
| |
| | style="text-align: center; width: 100px; background: #efefef;" | '''Explosive Resistance:'''
| |
| | style="text-align: center; width: 100px; background: #efefef;" | High
| |
| |-
| |
| | style="text-align: center; width: 100px; background: #efefef;" | '''Virtual Item Capacity:'''
| |
| | style="text-align: center; width: 100px; background: #efefef;" | 15
| |
| |-
| |
| | style="text-align: center; width: 100px; background: #efefef;" | '''DLC:'''
| |
| | style="text-align: center; width: 100px; background: #efefef;" | None
| |
| |-
| |
| |} </li>
| |
|
| |
| <li style="display: inline-table;">
| |
| {| style="border: 1px solid black; border-spacing: 0; margin-right: 5px; color: black;"
| |
| |+ style="color: #c1c1b8;" | '''GA Carrier GL Rig'''
| |
| |+ [[File:gacriggl.png|border|center|250px|caption]]
| |
| |-
| |
| | style="text-align: center; width: 100px; background: #efefef;" | '''Price:'''
| |
| | style="text-align: center; width: 100px; background: #efefef;" | $55,000 // 4WPs
| |
| |-
| |
| | style="text-align: center; width: 100px; background: #efefef;" | '''Armor Tier:'''
| |
| | style="text-align: center; width: 100px; background: #efefef;" | III
| |
| |-
| |
| | style="text-align: center; width: 100px; background: #efefef;" | '''Explosive Resistance:'''
| |
| | style="text-align: center; width: 100px; background: #efefef;" | Maximum
| |
| |-
| |
| | style="text-align: center; width: 100px; background: #efefef;" | '''Virtual Item Capacity:'''
| |
| | style="text-align: center; width: 100px; background: #efefef;" | 18
| |
| |-
| |
| | style="text-align: center; width: 100px; background: #efefef;" | '''DLC:'''
| |
| | style="text-align: center; width: 100px; background: #efefef;" | None
| |
| |-
| |
| |} </li>
| |
|
| |
| <li style="display: inline-table;">
| |
| {| style="border: 1px solid black; border-spacing: 0; margin-right: 5px; color: black;"
| |
| |+ style="color: #c1c1b8;" | '''EOD Vest'''
| |
| |+ [[File:eodvest.png|border|center|250px|caption]]
| |
| |-
| |
| | style="text-align: center; width: 100px; background: #efefef;" | '''Price:'''
| |
| | style="text-align: center; width: 100px; background: #efefef;" | $45,000 // 3WPs
| |
| |-
| |
| | style="text-align: center; width: 100px; background: #efefef;" | '''Armor Tier:'''
| |
| | style="text-align: center; width: 100px; background: #efefef;" | III
| |
| |-
| |
| | style="text-align: center; width: 100px; background: #efefef;" | '''Explosive Resistance:'''
| |
| | style="text-align: center; width: 100px; background: #efefef;" | Maximum
| |
| |-
| |
| | style="text-align: center; width: 100px; background: #efefef;" | '''Virtual Item Capacity:'''
| |
| | style="text-align: center; width: 100px; background: #efefef;" | 4
| |
| |-
| |
| | style="text-align: center; width: 100px; background: #efefef;" | '''DLC:'''
| |
| | style="text-align: center; width: 100px; background: #efefef;" | Laws of War
| |
| |-
| |
| |} </li>
| |
|
| |
| <li style="display: inline-table;">
| |
| {| style="border: 1px solid black; border-spacing: 0; margin-right: 5px; color: black;"
| |
| |+ style="color: #c1c1b8;" | '''Modular Carrier Vest'''
| |
| |+ [[File:modcv.png|border|center|250px|caption]]
| |
| |-
| |
| | style="text-align: center; width: 100px; background: #efefef;" | '''Price:'''
| |
| | style="text-align: center; width: 100px; background: #efefef;" | $30,000 // 2WPs
| |
| |-
| |
| | style="text-align: center; width: 100px; background: #efefef;" | '''Armor Tier:'''
| |
| | style="text-align: center; width: 100px; background: #efefef;" | III
| |
| |-
| |
| | style="text-align: center; width: 100px; background: #efefef;" | '''Explosive Resistance:'''
| |
| | style="text-align: center; width: 100px; background: #efefef;" | High
| |
| |-
| |
| | style="text-align: center; width: 100px; background: #efefef;" | '''Virtual Item Capacity:'''
| |
| | style="text-align: center; width: 100px; background: #efefef;" | 8
| |
| |-
| |
| | style="text-align: center; width: 100px; background: #efefef;" | '''DLC:'''
| |
| | style="text-align: center; width: 100px; background: #efefef;" | First Contact
| |
| |-
| |
| |} </li>
| |
|
| |
| <li style="display: inline-table;">
| |
| {| style="border: 1px solid black; border-spacing: 0; margin-right: 5px; color: black;"
| |
| |+ style="color: #c1c1b8;" | '''Modular Carrier Lite'''
| |
| |+ [[File:modcl.png|border|center|250px|caption]]
| |
| |-
| |
| | style="text-align: center; width: 100px; background: #efefef;" | '''Price:'''
| |
| | style="text-align: center; width: 100px; background: #efefef;" | $30,000 // 2WPs
| |
| |-
| |
| | style="text-align: center; width: 100px; background: #efefef;" | '''Armor Tier:'''
| |
| | style="text-align: center; width: 100px; background: #efefef;" | III
| |
| |-
| |
| | style="text-align: center; width: 100px; background: #efefef;" | '''Explosive Resistance:'''
| |
| | style="text-align: center; width: 100px; background: #efefef;" | High
| |
| |-
| |
| | style="text-align: center; width: 100px; background: #efefef;" | '''Virtual Item Capacity:'''
| |
| | style="text-align: center; width: 100px; background: #efefef;" | 16
| |
| |-
| |
| | style="text-align: center; width: 100px; background: #efefef;" | '''DLC:'''
| |
| | style="text-align: center; width: 100px; background: #efefef;" | First Contact
| |
| |-
| |
| |} </li>
| |
|
| |
| <li style="display: inline-table;">
| |
| {| style="border: 1px solid black; border-spacing: 0; margin-right: 5px; color: black;"
| |
| |+ style="color: #c1c1b8;" | '''Modular Carrier GL Rig'''
| |
| |+ [[File:modcgl.png|border|center|250px|caption]]
| |
| |-
| |
| | style="text-align: center; width: 100px; background: #efefef;" | '''Price:'''
| |
| | style="text-align: center; width: 100px; background: #efefef;" | $55,000 // 4WPs
| |
| |-
| |
| | style="text-align: center; width: 100px; background: #efefef;" | '''Armor Tier:'''
| |
| | style="text-align: center; width: 100px; background: #efefef;" | III
| |
| |-
| |
| | style="text-align: center; width: 100px; background: #efefef;" | '''Explosive Resistance:'''
| |
| | style="text-align: center; width: 100px; background: #efefef;" | High
| |
| |-
| |
| | style="text-align: center; width: 100px; background: #efefef;" | '''Virtual Item Capacity:'''
| |
| | style="text-align: center; width: 100px; background: #efefef;" | 16
| |
| |-
| |
| | style="text-align: center; width: 100px; background: #efefef;" | '''DLC:'''
| |
| | style="text-align: center; width: 100px; background: #efefef;" | First Contact
| |
| |-
| |
| |} </li>
| |
|
| |
| <li style="display: inline-table;">
| |
| {| style="border: 1px solid black; border-spacing: 0; margin-right: 5px; color: black;"
| |
| |+ style="color: #c1c1b8;" | '''Carrier Lite'''
| |
| |+ [[File:CL.png|border|center|250px|caption]]
| |
| |-
| |
| | style="text-align: center; width: 100px; background: #efefef;" | '''Price:'''
| |
| | style="text-align: center; width: 100px; background: #efefef;" | $30,000 // 2 WP
| |
| |-
| |
| | style="text-align: center; width: 100px; background: #efefef;" | '''Armor Tier:'''
| |
| | style="text-align: center; width: 100px; background: #efefef;" | III
| |
| |-
| |
| | style="text-align: center; width: 100px; background: #efefef;" | '''Explosive Resistance:'''
| |
| | style="text-align: center; width: 100px; background: #efefef;" | High
| |
| |-
| |
| | style="text-align: center; width: 100px; background: #efefef;" | '''Virtual Item Capacity:'''
| |
| | style="text-align: center; width: 100px; background: #efefef;" | 18
| |
| |-
| |
| | style="text-align: center; width: 100px; background: #efefef;" | '''DLC:'''
| |
| | style="text-align: center; width: 100px; background: #efefef;" | None
| |
| |-
| |
| |} </li>
| |
|
| |
| <li style="display: inline-table;">
| |
| {| style="border: 1px solid black; border-spacing: 0; margin-right: 5px; color: black;"
| |
| |+ style="color: #c1c1b8;" | '''CTRG Plate Carrier Rig Mk.1'''
| |
| |+ [[File:ctrgv1.png|border|center|250px|caption]]
| |
| |-
| |
| | style="text-align: center; width: 100px; background: #efefef;" | '''Price:'''
| |
| | style="text-align: center; width: 100px; background: #efefef;" | $30,000 // 2WPs
| |
| |-
| |
| | style="text-align: center; width: 100px; background: #efefef;" | '''Armor Tier:'''
| |
| | style="text-align: center; width: 100px; background: #efefef;" | III
| |
| |-
| |
| | style="text-align: center; width: 100px; background: #efefef;" | '''Explosive Resistance:'''
| |
| | style="text-align: center; width: 100px; background: #efefef;" | High
| |
| |-
| |
| | style="text-align: center; width: 100px; background: #efefef;" | '''Virtual Item Capacity:'''
| |
| | style="text-align: center; width: 100px; background: #efefef;" | 18
| |
| |-
| |
| | style="text-align: center; width: 100px; background: #efefef;" | '''DLC:'''
| |
| | style="text-align: center; width: 100px; background: #efefef;" | None
| |
| |-
| |
| |} </li>
| |
|
| |
| <li style="display: inline-table;">
| |
| {| style="border: 1px solid black; border-spacing: 0; margin-right: 5px; color: black;"
| |
| |+ style="color: #c1c1b8;" | '''Carrier GL Rig'''
| |
| |+ [[File:cglr.png|border|center|250px|caption]]
| |
| |-
| |
| | style="text-align: center; width: 100px; background: #efefef;" | '''Price:'''
| |
| | style="text-align: center; width: 100px; background: #efefef;" | $55,000 // 4WPs
| |
| |-
| |
| | style="text-align: center; width: 100px; background: #efefef;" | '''Armor Tier:'''
| |
| | style="text-align: center; width: 100px; background: #efefef;" | III
| |
| |-
| |
| | style="text-align: center; width: 100px; background: #efefef;" | '''Explosive Resistance:'''
| |
| | style="text-align: center; width: 100px; background: #efefef;" | Maximum
| |
| |-
| |
| | style="text-align: center; width: 100px; background: #efefef;" | '''Virtual Item Capacity:'''
| |
| | style="text-align: center; width: 100px; background: #efefef;" | 18
| |
| |-
| |
| | style="text-align: center; width: 100px; background: #efefef;" | '''DLC:'''
| |
| | style="text-align: center; width: 100px; background: #efefef;" | None
| |
| |-
| |
| |} </li>
| |
| </ul></div>
| |
| </center>
| |
|
| |
| ==='''War point Clothing'''===
| |
| ----
| |
|
| |
| *Players cannot wear Granit/Tracksuits with Tier 3 or higher armor.
| |
| *Clothing that is restricted by [https://wiki.olympus-entertainment.com/wiki/Olympus_Donation_Rewards Donation], [https://wiki.olympus-entertainment.com/wiki/Olympus_Plus Olympus+] or [https://wiki.olympus-entertainment.com/wiki/Store_Information Gang] is now shown in Orange but unpurchaseable.
| |
|
| |
| <center>
| |
| <div><ul>
| |
| <li style="display: inline-table;">
| |
| {| style="border: 1px solid black; border-spacing: 0; margin-right: 5px; color: black;"
| |
| |+ style="color: #c1c1b8;" | '''CSAT Fatigues'''
| |
| |+ [[File:csatfatigues.png|border|center|250px|caption]]
| |
| |-
| |
| | style="text-align: center; width: 100px; background: #efefef;" | '''Price:'''
| |
| | style="text-align: center; width: 100px; background: #efefef;" | 5 WPs
| |
| |-
| |
| | style="text-align: center; width: 100px; background: #efefef;" | '''Armor Rating:'''
| |
| | style="text-align: center; width: 100px; background: #efefef;" | II
| |
| |-
| |
| | style="text-align: center; width: 100px; background: #efefef;" | '''DLC:'''
| |
| | style="text-align: center; width: 100px; background: #efefef;" | None
| |
| |} </li>
| |
|
| |
| <li style="display: inline-table;">
| |
| {| style="border: 1px solid black; border-spacing: 0; margin-right: 5px; color: black;"
| |
| |+ style="color: #c1c1b8;" | '''CSAT Ghillie'''
| |
| |+ [[File:castghillie.png|border|center|250px|caption]]
| |
| |-
| |
| | style="text-align: center; width: 100px; background: #efefef;" | '''Price:'''
| |
| | style="text-align: center; width: 100px; background: #efefef;" | 6 WPs
| |
| |-
| |
| | style="text-align: center; width: 100px; background: #efefef;" | '''Armor Rating:'''
| |
| | style="text-align: center; width: 100px; background: #efefef;" | II
| |
| |-
| |
| | style="text-align: center; width: 100px; background: #efefef;" | '''DLC:'''
| |
| | style="text-align: center; width: 100px; background: #efefef;" | None
| |
| |} </li>
| |
|
| |
| <li style="display: inline-table;">
| |
| {| style="border: 1px solid black; border-spacing: 0; margin-right: 5px; color: black;"
| |
| |+ style="color: #c1c1b8;" | '''CSAT Full Ghillie'''
| |
| |+ [[File:bushwookie1.png|border|center|250px|caption]]
| |
| |-
| |
| | style="text-align: center; width: 100px; background: #efefef;" | '''Price:'''
| |
| | style="text-align: center; width: 100px; background: #efefef;" | 7 WPs
| |
| |-
| |
| | style="text-align: center; width: 100px; background: #efefef;" | '''Armor Rating:'''
| |
| | style="text-align: center; width: 100px; background: #efefef;" | II
| |
| |-
| |
| | style="text-align: center; width: 100px; background: #efefef;" | '''DLC:'''
| |
| | style="text-align: center; width: 100px; background: #efefef;" | Marksmen
| |
| |} </li>
| |
|
| |
| <li style="display: inline-table;">
| |
| {| style="border: 1px solid black; border-spacing: 0; margin-right: 5px; color: black;"
| |
| |+ style="color: #c1c1b8;" | '''Granit'''
| |
| |+ [[File:granit.png|border|center|250px|caption]]
| |
| |-
| |
| | style="text-align: center; width: 100px; background: #efefef;" | '''Price:'''
| |
| | style="text-align: center; width: 100px; background: #efefef;" | 10 WPs
| |
| |-
| |
| | style="text-align: center; width: 100px; background: #efefef;" | '''Armor Rating:'''
| |
| | style="text-align: center; width: 100px; background: #efefef;" | II
| |
| |-
| |
| | style="text-align: center; width: 100px; background: #efefef;" | '''DLC:'''
| |
| | style="text-align: center; width: 100px; background: #efefef;" | Contact
| |
| |} </li>
| |
|
| |
| <li style="display: inline-table;">
| |
| {| style="border: 1px solid black; border-spacing: 0; margin-right: 5px; color: black;"
| |
| |+ style="color: #c1c1b8;" | '''Pilot Coveralls'''
| |
| |+ [[File:PilotCoveralls.png|border|center|250px|caption]]
| |
| |-
| |
| | style="text-align: center; width: 100px; background: #efefef;" | '''Price:'''
| |
| | style="text-align: center; width: 100px; background: #efefef;" | 10 WPs
| |
| |-
| |
| | style="text-align: center; width: 100px; background: #efefef;" | '''Armor Rating:'''
| |
| | style="text-align: center; width: 100px; background: #efefef;" | II
| |
| |-
| |
| | style="text-align: center; width: 100px; background: #efefef;" | '''DLC:'''
| |
| | style="text-align: center; width: 100px; background: #efefef;" | None
| |
| |} </li>
| |
| </ul></div>
| |
| </center>
| |
|
| |
| =='''Vehicles'''==
| |
|
| |
| ==='''Ground Vehicles'''===
| |
| *Illegal Vehicles are now displayed in Red in the Garage to display their status.
| |
| <center>
| |
| <div><ul>
| |
| <li style="display: inline-table;">
| |
| {| style="border: 1px solid black; border-spacing: 0; margin-right: 5px; color: black;"
| |
| |+ style="color: #c1c1b8;" | '''Qilin'''
| |
| |+ [[File:quilinunarmed.jpg|center|307px|caption]]
| |
| |-
| |
| | style="text-align: center; width: 150px; background: #808080;" | '''Vendor(s):'''
| |
| | style="font-size:75%; text-align: center; width: 150px; background: #808080;" | Rebel Outpost, War point Shop
| |
| |-
| |
| | style="text-align: center; width: 150px; background: #808080;" | '''Base Price:'''
| |
| | style="text-align: center; width: 150px; background: #808080;" | $200,000 / 12wps
| |
| |-
| |
| | style="text-align: center; width: 150px; background: #808080;" | '''Base Virtual Storage:'''
| |
| | style="text-align: center; width: 150px; background: #808080;" | 80
| |
| |-
| |
| | style="text-align: center; width: 150px; background: #808080;" | '''Max Virtual Storage:'''
| |
| | style="text-align: center; width: 150px; background: #808080;" | 96
| |
| |-
| |
| | style="text-align: center; width: 150px; background: #808080;" | '''Vehicle Weight:'''
| |
| | style="text-align: center; width: 150px; background: #808080;" | 3,924kg
| |
| |-
| |
| | style="text-align: center; width: 150px; background: #808080;" | '''$ per Insurance Tier:'''
| |
| | style="text-align: center; width: 150px; background: #808080;" | $80,000
| |
| |-
| |
| | style="text-align: center; width: 150px; background: #808080;" | '''$ per Turbo Tier:'''
| |
| | style="text-align: center; width: 150px; background: #808080;" | $10,000
| |
| |-
| |
| | style="text-align: center; width: 150px; background: #808080;" | '''$ per Security Tier:'''
| |
| | style="text-align: center; width: 150px; background: #808080;" | $20,000
| |
| |-
| |
| | style="text-align: center; width: 150px; background: #808080;" | '''$ per Storage Tier:'''
| |
| | style="text-align: center; width: 150px; background: #808080;" | $30,000 per 4 units
| |
| |} </li>
| |
|
| |
| <li style="display: inline-table;">
| |
| {| style="border: 1px solid black; border-spacing: 0; margin-right: 5px; color: black;"
| |
| |+ style="color: #c1c1b8;" | '''Quilin (Light)'''
| |
| |+ [[File:Qilinlightnodoor.jpeg|center|307px|caption]]
| |
| |-
| |
| | style="text-align: center; width: 150px; background: #808080;" | '''Vendor(s):'''
| |
| | style="font-size:75%; text-align: center; width: 150px; background: #808080;" | Rebel Outpost, War point Shop
| |
| |-
| |
| | style="text-align: center; width: 150px; background: #808080;" | '''Base Price:'''
| |
| | style="text-align: center; width: 150px; background: #808080;" | $155,000 / 11WPs
| |
| |-
| |
| | style="text-align: center; width: 150px; background: #808080;" | '''Base Virtual Storage:'''
| |
| | style="text-align: center; width: 150px; background: #808080;" | 80
| |
| |-
| |
| | style="text-align: center; width: 150px; background: #808080;" | '''Max Virtual Storage:'''
| |
| | style="text-align: center; width: 150px; background: #808080;" | 96
| |
| |-
| |
| | style="text-align: center; width: 150px; background: #808080;" | '''Vehicle Weight:'''
| |
| | style="text-align: center; width: 150px; background: #808080;" | 3,924kg
| |
| |-
| |
| | style="text-align: center; width: 150px; background: #808080;" | '''$ per Insurance Tier:'''
| |
| | style="text-align: center; width: 150px; background: #808080;" | $80,000
| |
| |-
| |
| | style="text-align: center; width: 150px; background: #808080;" | '''$ per Turbo Tier:'''
| |
| | style="text-align: center; width: 150px; background: #808080;" | $10,000
| |
| |-
| |
| | style="text-align: center; width: 150px; background: #808080;" | '''$ per Security Tier:'''
| |
| | style="text-align: center; width: 150px; background: #808080;" | $20,000
| |
| |-
| |
| | style="text-align: center; width: 150px; background: #808080;" | '''$ per Storage Tier:'''
| |
| | style="text-align: center; width: 150px; background: #808080;" | $30,000 per 4 units
| |
| |} </li>
| |
|
| |
| <li style="display: inline-table;">
| |
| {| style="border: 1px solid black; border-spacing: 0; margin-right: 5px; color: black;"
| |
| |+ style="color: #c1c1b8;" | '''Prowler'''
| |
| |+ [[File:prowler.jpg|center|307px|caption]]
| |
| |-
| |
| | style="text-align: center; width: 150px; background: #808080;" | '''Vendor(s):'''
| |
| | style="font-size:75%; text-align: center; width: 150px; background: #808080;" | Rebel Outpost, War point Shop
| |
| |-
| |
| | style="text-align: center; width: 150px; background: #808080;" | '''Base Price:'''
| |
| | style="text-align: center; width: 150px; background: #808080;" | $200,000 / 12 wp
| |
| |-
| |
| | style="text-align: center; width: 150px; background: #808080;" | '''Base Virtual Storage:'''
| |
| | style="text-align: center; width: 150px; background: #808080;" | 60
| |
| |-
| |
| | style="text-align: center; width: 150px; background: #808080;" | '''Max Virtual Storage:'''
| |
| | style="text-align: center; width: 150px; background: #808080;" | 72
| |
| |-
| |
| | style="text-align: center; width: 150px; background: #808080;" | '''Vehicle Weight:'''
| |
| | style="text-align: center; width: 150px; background: #808080;" | 3,413kg
| |
| |-
| |
| | style="text-align: center; width: 150px; background: #808080;" | '''$ per Insurance Tier:'''
| |
| | style="text-align: center; width: 150px; background: #808080;" | $80,000
| |
| |-
| |
| | style="text-align: center; width: 150px; background: #808080;" | '''$ per Turbo Tier:'''
| |
| | style="text-align: center; width: 150px; background: #808080;" | $10,000
| |
| |-
| |
| | style="text-align: center; width: 150px; background: #808080;" | '''$ per Security Tier:'''
| |
| | style="text-align: center; width: 150px; background: #808080;" | $20,000
| |
| |-
| |
| | style="text-align: center; width: 150px; background: #808080;" | '''$ per Storage Tier:'''
| |
| | style="text-align: center; width: 150px; background: #808080;" | $30,000 per 3 units
| |
| |} </li>
| |
|
| |
| <li style="display: inline-table;">
| |
| {| style="border: 1px solid black; border-spacing: 0; margin-right: 5px; color: black;"
| |
| |+ style="color: #c1c1b8;" | '''Prowler (Light)'''
| |
| |+ [[File:Prowlerlightnodoor.jpeg|center|307px|caption]]
| |
| |-
| |
| | style="text-align: center; width: 150px; background: #808080;" | '''Vendor(s):'''
| |
| | style="font-size:75%; text-align: center; width: 150px; background: #808080;" | Rebel Outpost, War point Shop
| |
| |-
| |
| | style="text-align: center; width: 150px; background: #808080;" | '''Base Price:'''
| |
| | style="text-align: center; width: 150px; background: #808080;" | $145,000 / 10WPs
| |
| |-
| |
| | style="text-align: center; width: 150px; background: #808080;" | '''Base Virtual Storage:'''
| |
| | style="text-align: center; width: 150px; background: #808080;" | 60
| |
| |-
| |
| | style="text-align: center; width: 150px; background: #808080;" | '''Max Virtual Storage:'''
| |
| | style="text-align: center; width: 150px; background: #808080;" | 72
| |
| |-
| |
| | style="text-align: center; width: 150px; background: #808080;" | '''Vehicle Weight:'''
| |
| | style="text-align: center; width: 150px; background: #808080;" | 3,413kg
| |
| |-
| |
| | style="text-align: center; width: 150px; background: #808080;" | '''$ per Insurance Tier:'''
| |
| | style="text-align: center; width: 150px; background: #808080;" | $80,000
| |
| |-
| |
| | style="text-align: center; width: 150px; background: #808080;" | '''$ per Turbo Tier:'''
| |
| | style="text-align: center; width: 150px; background: #808080;" | $10,000
| |
| |-
| |
| | style="text-align: center; width: 150px; background: #808080;" | '''$ per Security Tier:'''
| |
| | style="text-align: center; width: 150px; background: #808080;" | $20,000
| |
| |-
| |
| | style="text-align: center; width: 150px; background: #808080;" | '''$ per Storage Tier:'''
| |
| | style="text-align: center; width: 150px; background: #808080;" | $30,000 per 3 units
| |
| |} </li>
| |
|
| |
| <li style="display: inline-table;">
| |
| {| style="border: 1px solid black; border-spacing: 0; margin-right: 5px; color: black;"
| |
| |+ style="color: #c1c1b8;" | '''Strider'''
| |
| |+ [[File:strider.jpg|center|307px|caption]]
| |
| |-
| |
| | style="text-align: center; width: 150px; background: #808080;" | '''Vendor(s):'''
| |
| | style="font-size:75%; text-align: center; width: 150px; background: #808080;" | Rebel Outpost, War point Shop
| |
| |-
| |
| | style="text-align: center; width: 150px; background: #808080;" | '''Base Price:'''
| |
| | style="text-align: center; width: 150px; background: #808080;" | $550,000 / 40wps
| |
| |-
| |
| | style="text-align: center; width: 150px; background: #808080;" | '''Base Virtual Storage:'''
| |
| | style="text-align: center; width: 150px; background: #808080;" | 60
| |
| |-
| |
| | style="text-align: center; width: 150px; background: #808080;" | '''Max Virtual Storage:'''
| |
| | style="text-align: center; width: 150px; background: #808080;" | 72
| |
| |-
| |
| | style="text-align: center; width: 150px; background: #808080;" | '''Vehicle Weight:'''
| |
| | style="text-align: center; width: 150px; background: #808080;" | 9,700kg
| |
| |-
| |
| | style="text-align: center; width: 150px; background: #808080;" | '''$ per Insurance Tier:'''
| |
| | style="text-align: center; width: 150px; background: #808080;" | $220,000
| |
| |-
| |
| | style="text-align: center; width: 150px; background: #808080;" | '''$ per Turbo Tier:'''
| |
| | style="text-align: center; width: 150px; background: #808080;" | $27,500
| |
| |-
| |
| | style="text-align: center; width: 150px; background: #808080;" | '''$ per Security Tier:'''
| |
| | style="text-align: center; width: 150px; background: #808080;" | $55,000
| |
| |-
| |
| | style="text-align: center; width: 150px; background: #808080;" | '''$ per Storage Tier:'''
| |
| | style="text-align: center; width: 150px; background: #808080;" | $68,750 per 3 units
| |
| |} </li>
| |
|
| |
| <li style="display: inline-table;">
| |
| {| style="border: 1px solid black; border-spacing: 0; margin-right: 5px; color: black;"
| |
| |+ style="color: #c1c1b8;" | '''Hunter'''
| |
| |+ [[File:hunter.jpg|center|307px|caption]]
| |
| |-
| |
| | style="text-align: center; width: 150px; background: #808080;" | '''Vendor(s):'''
| |
| | style="font-size:75%; text-align: center; width: 150px; background: #808080;" | Rebel Outpost, War point Shop
| |
| |-
| |
| | style="text-align: center; width: 150px; background: #808080;" | '''Base Price:'''
| |
| | style="text-align: center; width: 150px; background: #808080;" | $400,000 / 20wps
| |
| |-
| |
| | style="text-align: center; width: 150px; background: #808080;" | '''Base Virtual Storage:'''
| |
| | style="text-align: center; width: 150px; background: #808080;" | 50
| |
| |-
| |
| | style="text-align: center; width: 150px; background: #808080;" | '''Max Virtual Storage:'''
| |
| | style="text-align: center; width: 150px; background: #808080;" | 62
| |
| |-
| |
| | style="text-align: center; width: 150px; background: #808080;" | '''Vehicle Weight:'''
| |
| | style="text-align: center; width: 150px; background: #808080;" | 8,306kg
| |
| |-
| |
| | style="text-align: center; width: 150px; background: #808080;" | '''$ per Insurance Tier:'''
| |
| | style="text-align: center; width: 150px; background: #808080;" | $160,000
| |
| |-
| |
| | style="text-align: center; width: 150px; background: #808080;" | '''$ per Turbo Tier:'''
| |
| | style="text-align: center; width: 150px; background: #808080;" | $20,000
| |
| |-
| |
| | style="text-align: center; width: 150px; background: #808080;" | '''$ per Security Tier:'''
| |
| | style="text-align: center; width: 150px; background: #808080;" | $40,000
| |
| |-
| |
| | style="text-align: center; width: 150px; background: #808080;" | '''$ per Storage Tier:'''
| |
| | style="text-align: center; width: 150px; background: #808080;" | $50,000 per 3 units
| |
| |} </li>
| |
|
| |
| <li style="display: inline-table;">
| |
| {| style="border: 1px solid black; border-spacing: 0; margin-right: 5px; color: black;"
| |
| |+ style="color: #c1c1b8;" | '''Ifrit'''
| |
| |+ [[File:ifrit.jpg|center|307px|caption]]
| |
| |-
| |
| | style="text-align: center; width: 150px; background: #808080;" | '''Vendor(s):'''
| |
| | style="font-size:75%; text-align: center; width: 150px; background: #808080;" | Rebel Outpost, War point Shop
| |
| |-
| |
| | style="text-align: center; width: 150px; background: #808080;" | '''Base Price:'''
| |
| | style="text-align: center; width: 150px; background: #808080;" | $650,000 / 45wps
| |
| |-
| |
| | style="text-align: center; width: 150px; background: #808080;" | '''Base Virtual Storage:'''
| |
| | style="text-align: center; width: 150px; background: #808080;" | 60
| |
| |-
| |
| | style="text-align: center; width: 150px; background: #808080;" | '''Max Virtual Storage:'''
| |
| | style="text-align: center; width: 150px; background: #808080;" | 72
| |
| |-
| |
| | style="text-align: center; width: 150px; background: #808080;" | '''Vehicle Weight:'''
| |
| | style="text-align: center; width: 150px; background: #808080;" | 8,392kg
| |
| |-
| |
| | style="text-align: center; width: 150px; background: #808080;" | '''$ per Insurance Tier:'''
| |
| | style="text-align: center; width: 150px; background: #808080;" | $260,000
| |
| |-
| |
| | style="text-align: center; width: 150px; background: #808080;" | '''$ per Turbo Tier:'''
| |
| | style="text-align: center; width: 150px; background: #808080;" | $32,500
| |
| |-
| |
| | style="text-align: center; width: 150px; background: #808080;" | '''$ per Security Tier:'''
| |
| | style="text-align: center; width: 150px; background: #808080;" | $65,000
| |
| |-
| |
| | style="text-align: center; width: 150px; background: #808080;" | '''$ per Storage Tier:'''
| |
| | style="text-align: center; width: 150px; background: #808080;" | $81,250 per 3 units
| |
| |} </li>
| |
|
| |
| <li style="display: inline-table;">
| |
| {| style="border: 1px solid black; border-spacing: 0; margin-right: 5px; color: black;"
| |
| |+ style="color: #c1c1b8;" | '''Armed Jeep'''
| |
| |+ [[File:armedjeep.jpg|center|307px|caption]]
| |
| |-
| |
| | style="text-align: center; width: 150px; background: #808080;" | '''Vendor(s):'''
| |
| | style="font-size:75%; text-align: center; width: 150px; background: #808080;" | Rebel Outpost, War point Shop
| |
| |-
| |
| | style="text-align: center; width: 150px; background: #808080;" | '''Base Price:'''
| |
| | style="text-align: center; width: 150px; background: #808080;" | $200,000 / 15wps
| |
| |-
| |
| | style="text-align: center; width: 150px; background: #808080;" | '''Base Virtual Storage:'''
| |
| | style="text-align: center; width: 150px; background: #808080;" | 80
| |
| |-
| |
| | style="text-align: center; width: 150px; background: #808080;" | '''Max Virtual Storage:'''
| |
| | style="text-align: center; width: 150px; background: #808080;" | 96
| |
| |-
| |
| | style="text-align: center; width: 150px; background: #808080;" | '''Vehicle Weight:'''
| |
| | style="text-align: center; width: 150px; background: #808080;" | 3,997kg
| |
| |-
| |
| | style="text-align: center; width: 150px; background: #808080;" | '''$ per Insurance Tier:'''
| |
| | style="text-align: center; width: 150px; background: #808080;" | $80,000
| |
| |-
| |
| | style="text-align: center; width: 150px; background: #808080;" | '''$ per Turbo Tier:'''
| |
| | style="text-align: center; width: 150px; background: #808080;" | $10,000
| |
| |-
| |
| | style="text-align: center; width: 150px; background: #808080;" | '''$ per Security Tier:'''
| |
| | style="text-align: center; width: 150px; background: #808080;" | $20,000
| |
| |-
| |
| | style="text-align: center; width: 150px; background: #808080;" | '''$ per Storage Tier:'''
| |
| | style="text-align: center; width: 150px; background: #808080;" | $25,000 per 4 units
| |
| |} </li>
| |
|
| |
| <li style="display: inline-table;">
| |
| {| style="border: 1px solid black; border-spacing: 0; margin-right: 5px; color: black;"
| |
| |+ style="color: #c1c1b8;" | '''.50 cal Offroad'''
| |
| |+ [[File:offroadarmed.png|center|307px|caption]]
| |
| |-
| |
| | style="text-align: center; width: 150px; background: #808080;" | '''Vendor(s):'''
| |
| | style="font-size:75%; text-align: center; width: 150px; background: #808080;" | Rebel Outpost, War point Shop
| |
| |-
| |
| | style="text-align: center; width: 150px; background: #808080;" | '''Base Price:'''
| |
| | style="text-align: center; width: 150px; background: #808080;" | $750,000 / 50wps
| |
| |-
| |
| | style="text-align: center; width: 150px; background: #808080;" | '''Base Virtual Storage:'''
| |
| | style="text-align: center; width: 150px; background: #808080;" | 80
| |
| |-
| |
| | style="text-align: center; width: 150px; background: #808080;" | '''Max Virtual Storage:'''
| |
| | style="text-align: center; width: 150px; background: #808080;" | 96
| |
| |-
| |
| | style="text-align: center; width: 150px; background: #808080;" | '''Vehicle Weight:'''
| |
| | style="text-align: center; width: 150px; background: #808080;" | 1,805kg
| |
| |-
| |
| | style="text-align: center; width: 150px; background: #808080;" | '''$ per Insurance Tier:'''
| |
| | style="text-align: center; width: 150px; background: #808080;" | $300,000
| |
| |-
| |
| | style="text-align: center; width: 150px; background: #808080;" | '''$ per Turbo Tier:'''
| |
| | style="text-align: center; width: 150px; background: #808080;" | $37,500
| |
| |-
| |
| | style="text-align: center; width: 150px; background: #808080;" | '''$ per Security Tier:'''
| |
| | style="text-align: center; width: 150px; background: #808080;" | $75,000
| |
| |-
| |
| | style="text-align: center; width: 150px; background: #808080;" | '''$ per Storage Tier:'''
| |
| | style="text-align: center; width: 150px; background: #808080;" | $93,750 per 4 units
| |
| |} </li>
| |
|
| |
| <li style="display: inline-table;">
| |
| {| style="border: 1px solid black; border-spacing: 0; margin-right: 5px; color: black;"
| |
| |+ style="color: #c1c1b8;" | '''.50 cal Offroad (Plus)'''
| |
| |+ [[File:armedoffroadplus.jpg|center|307px|caption]]
| |
| |-
| |
| | style="text-align: center; width: 150px; background: #808080;" | '''Vendor(s):'''
| |
| | style="font-size:75%; text-align: center; width: 150px; background: #808080;" | Rebel Outpost, War point Shop
| |
| |-
| |
| | style="text-align: center; width: 150px; background: #808080;" | '''Base Price:'''
| |
| | style="text-align: center; width: 150px; background: #808080;" | $850,000 / 60wps
| |
| |-
| |
| | style="text-align: center; width: 150px; background: #808080;" | '''Base Virtual Storage:'''
| |
| | style="text-align: center; width: 150px; background: #808080;" | 80
| |
| |-
| |
| | style="text-align: center; width: 150px; background: #808080;" | '''Max Virtual Storage:'''
| |
| | style="text-align: center; width: 150px; background: #808080;" | 96
| |
| |-
| |
| | style="text-align: center; width: 150px; background: #808080;" | '''Vehicle Weight:'''
| |
| | style="text-align: center; width: 150px; background: #808080;" | 1,805kg
| |
| |-
| |
| | style="text-align: center; width: 150px; background: #808080;" | '''$ per Insurance Tier:'''
| |
| | style="text-align: center; width: 150px; background: #808080;" | $340,000
| |
| |-
| |
| | style="text-align: center; width: 150px; background: #808080;" | '''$ per Turbo Tier:'''
| |
| | style="text-align: center; width: 150px; background: #808080;" | $42,500
| |
| |-
| |
| | style="text-align: center; width: 150px; background: #808080;" | '''$ per Security Tier:'''
| |
| | style="text-align: center; width: 150px; background: #808080;" | $85,000
| |
| |-
| |
| | style="text-align: center; width: 150px; background: #808080;" | '''$ per Storage Tier:'''
| |
| | style="text-align: center; width: 150px; background: #808080;" | $106,250 per 4 units
| |
| |} </li>
| |
|
| |
| <li style="display: inline-table;">
| |
| {| style="border: 1px solid black; border-spacing: 0; margin-right: 5px; color: black;"
| |
| |+ style="color: #c1c1b8;" | '''Armed Qilin'''
| |
| |+ [[File:quilinarmed2.png|center|307px|caption]]
| |
| |-
| |
| | style="text-align: center; width: 150px; background: #808080;" | '''Vendor(s):'''
| |
| | style="font-size:75%; text-align: center; width: 150px; background: #808080;" | Rebel Outpost, War point Shop
| |
| |-
| |
| | style="text-align: center; width: 150px; background: #808080;" | '''Base Price:'''
| |
| | style="text-align: center; width: 150px; background: #808080;" | $1,250,000 / 80wps
| |
| |-
| |
| | style="text-align: center; width: 150px; background: #808080;" | '''Base Virtual Storage:'''
| |
| | style="text-align: center; width: 150px; background: #808080;" | 80
| |
| |-
| |
| | style="text-align: center; width: 150px; background: #808080;" | '''Max Virtual Storage:'''
| |
| | style="text-align: center; width: 150px; background: #808080;" | 96
| |
| |-
| |
| | style="text-align: center; width: 150px; background: #808080;" | '''Vehicle Weight:'''
| |
| | style="text-align: center; width: 150px; background: #808080;" | 3,924kg
| |
| |-
| |
| | style="text-align: center; width: 150px; background: #808080;" | '''$ per Insurance Tier:'''
| |
| | style="text-align: center; width: 150px; background: #808080;" | $500,000
| |
| |-
| |
| | style="text-align: center; width: 150px; background: #808080;" | '''$ per Turbo Tier:'''
| |
| | style="text-align: center; width: 150px; background: #808080;" | $62,500
| |
| |-
| |
| | style="text-align: center; width: 150px; background: #808080;" | '''$ per Security Tier:'''
| |
| | style="text-align: center; width: 150px; background: #808080;" | $125,000
| |
| |-
| |
| | style="text-align: center; width: 150px; background: #808080;" | '''$ per Storage Tier:'''
| |
| | style="text-align: center; width: 150px; background: #808080;" | $156,250 per 4 units
| |
| |} </li>
| |
|
| |
| </ul></div>
| |
| </center>
| |
|
| |
| ==='''Air Vehicles'''===
| |
| ----
| |
| *Illegal Vehicles are now displayed in Red in the Garage to display their status.
| |
| <center>
| |
| <div><ul>
| |
| <li style="display: inline-table;">
| |
| {| style="border: 1px solid black; border-spacing: 0; margin-right: 5px; color: black;"
| |
| |+ style="color: #c1c1b8;" | '''Taru Bench'''
| |
| |+ [[File:tarubench.png|center|307px|caption]]
| |
| |-
| |
| | style="text-align: center; width: 150px; background: #808080;" | '''Vendor(s):'''
| |
| | style="font-size:85%; text-align: center; width: 150px; background: #808080;" | Rebel Outpost
| |
| |-
| |
| | style="text-align: center; width: 150px; background: #808080;" | '''Base Price:'''
| |
| | style="text-align: center; width: 150px; background: #808080;" | $700,000
| |
| |-
| |
| | style="text-align: center; width: 150px; background: #808080;" | '''Base Virtual Storage:'''
| |
| | style="text-align: center; width: 150px; background: #808080;" | 100
| |
| |-
| |
| | style="text-align: center; width: 150px; background: #808080;" | '''Max Virtual Storage:'''
| |
| | style="text-align: center; width: 150px; background: #808080;" | 120
| |
| |-
| |
| | style="text-align: center; width: 150px; background: #808080;" | '''Max towing weight:'''
| |
| | style="text-align: center; width: 150px; background: #808080;" | 13,500kg
| |
| |-
| |
| | style="text-align: center; width: 150px; background: #808080;" | '''$ per Insurance Tier:'''
| |
| | style="text-align: center; width: 150px; background: #808080;" | $340,000
| |
| |-
| |
| | style="text-align: center; width: 150px; background: #808080;" | '''$ per Turbo Tier:'''
| |
| | style="text-align: center; width: 150px; background: #808080;" | $42,500
| |
| |-
| |
| | style="text-align: center; width: 150px; background: #808080;" | '''$ per Security Tier:'''
| |
| | style="text-align: center; width: 150px; background: #808080;" | $85,000
| |
| |-
| |
| | style="text-align: center; width: 150px; background: #808080;" | '''$ per Storage Tier:'''
| |
| | style="text-align: center; width: 150px; background: #808080;" | $106,250 per 5 units
| |
| |} </li>
| |
|
| |
| <li style="display: inline-table;">
| |
| {| style="border: 1px solid black; border-spacing: 0; margin-right: 5px; color: black;"
| |
| |+ style="color: #c1c1b8;" | '''Taru'''
| |
| |+ [[File:Basictaru.jpeg|center|307px|caption]]
| |
| |-
| |
| | style="text-align: center; width: 150px; background: #808080;" | '''Vendor(s):'''
| |
| | style="font-size:85%; text-align: center; width: 150px; background: #808080;" | Rebel Outpost
| |
| |-
| |
| | style="text-align: center; width: 150px; background: #808080;" | '''Base Price:'''
| |
| | style="text-align: center; width: 150px; background: #808080;" | $850,000
| |
| |-
| |
| | style="text-align: center; width: 150px; background: #808080;" | '''Base Virtual Storage:'''
| |
| | style="text-align: center; width: 150px; background: #808080;" | 140
| |
| |-
| |
| | style="text-align: center; width: 150px; background: #808080;" | '''Max Virtual Storage:'''
| |
| | style="text-align: center; width: 150px; background: #808080;" | 168
| |
| |-
| |
| | style="text-align: center; width: 150px; background: #808080;" | '''Max towing weight:'''
| |
| | style="text-align: center; width: 150px; background: #808080;" | 13,500kg
| |
| |-
| |
| | style="text-align: center; width: 150px; background: #808080;" | '''$ per Insurance Tier:'''
| |
| | style="text-align: center; width: 150px; background: #808080;" | $280,000
| |
| |-
| |
| | style="text-align: center; width: 150px; background: #808080;" | '''$ per Turbo Tier:'''
| |
| | style="text-align: center; width: 150px; background: #808080;" | $35,000
| |
| |-
| |
| | style="text-align: center; width: 150px; background: #808080;" | '''$ per Security Tier:'''
| |
| | style="text-align: center; width: 150px; background: #808080;" | $70,000
| |
| |-
| |
| | style="text-align: center; width: 150px; background: #808080;" | '''$ per Storage Tier:'''
| |
| | style="text-align: center; width: 150px; background: #808080;" | $87,500 per 7 units
| |
| |} </li>
| |
| </ul></div>
| |
| </center>
| |
|
| |
| =='''Advanced Rebel'''==
| |
| *$5,000,000 to purchase.
| |
| *Gear will be Advanced Rebel exclusive and will require the license to equip.
| |
| *Grants an enhanced weapon shop for Advanced Rebels.
| |
|
| |
|
| |
| <li style="display: inline-table;">
| |
| {| style="border: 1px solid black; border-spacing: 0; margin-right: 5px; color: black;"
| |
| |+ style="color: #c1c1b8;" | '''ASP-Kir-1 (Black)'''
| |
| |+ [[File:asp1kir127.png|border|center|307px|caption]]
| |
| |-
| |
| | style="text-align: center; width: 150px; background: #efefef;" | '''Price:'''
| |
| | style="text-align: center; width: 150px; background: #efefef;" | $775,000
| |
| |-
| |
| | style="text-align: center; width: 150px; background: #efefef;" | '''Caliber:'''
| |
| | style="text-align: center; width: 150px; background: #efefef;" | 12.7x54mm
| |
| |-
| |
| | style="text-align: center; width: 150px; background: #efefef;" | '''Magazine Capacity:'''
| |
| | style="text-align: center; width: 150px; background: #efefef;" | 10
| |
| |-
| |
| | style="text-align: center; width: 150px; background: #efefef;" | '''Magazine Price:'''
| |
| | style="text-align: center; width: 150px; background: #efefef;" | $15,000
| |
| |-
| |
| | style="text-align: center; width: 150px; background: #efefef;" | '''DLC:'''
| |
| | style="text-align: center; width: 150px; background: #efefef;" | Marksmen
| |
| |} </li>
| |
|
| |
| <li style="display: inline-table;">
| |
| {| style="border: 1px solid black; border-spacing: 0; margin-right: 5px; color: black;"
| |
| |+ style="color: #c1c1b8;" | '''Mar-10 (Sand)'''
| |
| |+ [[File:Mar10000sand.png|border|center|307px|caption]]
| |
| |-
| |
| | style="text-align: center; width: 150px; background: #efefef;" | '''Price:'''
| |
| | style="text-align: center; width: 150px; background: #efefef;" | $4,850,000
| |
| |-
| |
| | style="text-align: center; width: 150px; background: #efefef;" | '''Caliber:'''
| |
| | style="text-align: center; width: 150px; background: #efefef;" | .338 Lapua Magnum
| |
| |-
| |
| | style="text-align: center; width: 150px; background: #efefef;" | '''Magazine Capacity:'''
| |
| | style="text-align: center; width: 150px; background: #efefef;" | 10
| |
| |-
| |
| | style="text-align: center; width: 150px; background: #efefef;" | '''Magazine Price:'''
| |
| | style="text-align: center; width: 150px; background: #efefef;" | $37,500
| |
| |-
| |
| | style="text-align: center; width: 150px; background: #efefef;" | '''DLC:'''
| |
| | style="text-align: center; width: 150px; background: #efefef;" | Marksmen
| |
| |} </li>
| |
|
| |
| <li style="display: inline-table;">
| |
| {| style="border: 1px solid black; border-spacing: 0; margin-right: 5px; color: black;"
| |
| |+ style="color: #c1c1b8;" | '''Promet SG'''
| |
| |+ [[File:Prometsg65.png|border|center|307px|caption]]
| |
| |-
| |
| | style="text-align: center; width: 150px; background: #efefef;" | '''Price:'''
| |
| | style="text-align: center; width: 150px; background: #efefef;" | $350,000
| |
| |-
| |
| | style="text-align: center; width: 150px; background: #efefef;" | '''Caliber:'''
| |
| | style="text-align: center; width: 150px; background: #efefef;" | 6.5x39mm NATO/12G Pellets/12G Slug
| |
| |-
| |
| | style="text-align: center; width: 150px; background: #efefef;" | '''Magazine Capacity:'''
| |
| | style="text-align: center; width: 150px; background: #efefef;" | 30/6
| |
| |-
| |
| | style="text-align: center; width: 150px; background: #efefef;" | '''Magazine Price:'''
| |
| | style="text-align: center; width: 150px; background: #efefef;" | $500 / Pellets: $12,500 / Slugs: $35,000
| |
| |-
| |
| | style="text-align: center; width: 150px; background: #efefef;" | '''DLC:'''
| |
| | style="text-align: center; width: 150px; background: #efefef;" | Contact
| |
| |} </li>
| |
|
| |
| *'''Non-Stackable T4 Vest Added:'''
| |
|
| |
| <li style="display: inline-table;">
| |
| {| style="border: 1px solid black; border-spacing: 0; margin-right: 5px; color: black;"
| |
| |+ style="color: #c1c1b8;" | '''CTRG Plate Carrier Rig'''
| |
| |+ [[File:Ctrgv2.png|border|center|307px|caption]]
| |
| |-
| |
| | style="text-align: center; width: 150px; background: #efefef;" | '''Price:'''
| |
| | style="text-align: center; width: 150px; background: #efefef;" | $100,000
| |
| |-
| |
| | style="text-align: center; width: 150px; background: #efefef;" | '''Armor Rating:'''
| |
| | style="text-align: center; width: 150px; background: #efefef;" | IV
| |
| |-
| |
| | style="text-align: center; width: 150px; background: #efefef;" | '''Explosive Resistance:'''
| |
| | style="text-align: center; width: 150px; background: #efefef;" | High
| |
| |-
| |
| | style="text-align: center; width: 150px; background: #efefef;" | '''Virtual Item Capacity:'''
| |
| | style="text-align: center; width: 150px; background: #efefef;" | 18
| |
| |-
| |
| | style="text-align: center; width: 150px; background: #efefef;" | '''DLC:'''
| |
| | style="text-align: center; width: 150px; background: #efefef;" | None
| |
| |} </li>
| |
|
| |
| *Vests are still maintained as “Illegal” and will be able to be seized.
| |
| *Vests come in Snakeskin, Green and Tropic color palettes.
| |
|
| |
|
| |
| *'''Deployable M2 .50 cal turret Y-Inventory Item:'''
| |
|
| |
| <li style="display: inline-table;">
| |
| {| style="border: 1px solid black; border-spacing: 0; margin-right: 5px; color: black;"
| |
| |+ style="color: #c1c1b8;" | '''M2 HMG .50'''
| |
| |+ [[File:50caldeployed.png|border|center|307px|caption]]
| |
| |-
| |
| | style="text-align: center; width: 150px; background: #efefef;" | '''Price:'''
| |
| | style="text-align: center; width: 150px; background: #efefef;" | $3,000,000
| |
| |-
| |
| | style="text-align: center; width: 150px; background: #efefef;" | '''Caliber:'''
| |
| | style="text-align: center; width: 150px; background: #efefef;" | .50 BMG
| |
| |-
| |
| | style="text-align: center; width: 150px; background: #efefef;" | '''Magazine Capacity:'''
| |
| | style="text-align: center; width: 150px; background: #efefef;" | 100
| |
| |-
| |
| | style="text-align: center; width: 150px; background: #efefef;" | '''Refilled with:'''
| |
| | style="text-align: center; width: 150px; background: #efefef;" | Vehicle Ammo
| |
| |-
| |
| | style="text-align: center; width: 150px; background: #efefef;" | '''DLC:'''
| |
| | style="text-align: center; width: 150px; background: #efefef;" | Apex
| |
| |} </li>
| |
|
| |
| *GUI confirmation for setup variant:
| |
| [https://i.gyazo.com/eca86263f5aab0a8c6562412740731c9.jpg Raised]
| |
|
| |
| [https://i.gyazo.com/d253f2d83f3690752c86a6d3e345d9ac.jpg Lowered]
| |
|
| |
| *Turret is indestructible.
| |
|
| |
| *Does not save for restart.
| |
|
| |
| *Will be persistent and unaffected by de-spawn.
| |
|
| |
| *Turret places .5M in front of the player deploying it.
| |
|
| |
| *Turret places in the direction the player is facing.
| |
|
| |
| *30 seconds to setup and breakdown. (Similar to a Pocket Go-Kart)
| |
|
| |
| *Once utilized it will have different ammo stages, weights and values when sold after repacking dependent on ammo count:
| |
|
| |
|
| |
| {| class="wikitable sortable"
| |
| |-
| |
| ! Y-Weight
| |
| ! Ammo Stage
| |
| ! Value Sold
| |
| |-
| |
| | 30 Y-Weight
| |
| | 100%
| |
| | $1,200,000
| |
| |-
| |
| | 28 Y-Weight
| |
| | 80%
| |
| | $1,195,000
| |
| |-
| |
| | 26 Y-Weight
| |
| | 60%
| |
| | $1,190,000
| |
| |-
| |
| | 24 Y-Weight
| |
| | 40%
| |
| | $1,185,000
| |
| |-
| |
| | 22 Y-Weight
| |
| | 20%
| |
| | $1,180,000
| |
| |-
| |
| | 20 Y-Weight
| |
| | 0%
| |
| | $1,175,000
| |
| |}
| |
|
| |
|
| |
| *Can be refilled with a Vehicle ammo to restore it to 100%.
| |
|
| |
|
| *Anything below 100% cannot be listed to the [https://wiki.olympus-entertainment.com/wiki/Auction_House Auction House].
| |
|
| |
|
| | ==='''Rebel Licenses'''=== |
|
| |
|
| | Additional Licenses for Illegal Processing Found in [[License Costs | License Costs]]. |
|
| |
|
| | *'''Advanced Processing''': |
| | **15% Increased Processing Speed. |
| | **5% Increased Drug Sell Price. |
|
| |
|
| '''Rebel Licenses''' | | *'''Adv. Rebel Vehicle Training''': |
| | **Allows retrieval and purchase of additional Armed Vehicles. |
| | **Ex: Qilin (Minigun+), Prowler (HMG), Prowler (NVST). |
| | **Vehicles not in this list and those relevant to the Vehicle Airdrop do not require the license to retrieve. |
|
| |
|
| Additional Licenses for Illegal Processing Found [https://wiki.olympus-entertainment.com/wiki/License_Costs Here].
| | *'''Advanced Rebel Truck Training:''' |
| | **Allows retrieval and purchase of Ammo Trucks. |
| | **These Vehicles Are Illegal can be seized. |
| | **Ammo Trucks have limitations set in place to avoid infinite ammunition. |
| | **Can re-arm roughly 3 Ghosthawks. |
| | **Ammo Trucks cannot be refilled and need to be stored to refill ammunition cargo. |
|
| |
|
| *Advanced Processing: | | *'''Advanced Rebel VTOL Training.''' |
| -Increases base processing speed by 10%.
| | **Allows retrieval and purchase of VTOLs. |
| | | **Xian (Airdrop) does not require this license. |
| *Professional Processing: | |
| -Reduces processing bonus per illegal by 33%.
| |
| | |
| -Ex: Meth (33/66/99/124) -> (22/44/66/81).
| |
| | |
| *Adv. Rebel Vehicle Training: | |
| -Allows retrieval and purchase of additional Armed Vehicles.
| |
| | |
| -Ex: Qilin (Minigun+), Prowler (HMG), Prowler (NVST), Jeep (LMG).
| |
| | |
| -Vehicles not in this list and those relevant to the Vehicle Airdrop do not require the license to retrieve.
| |
|
| |
|
|
| |
|
| Line 2,998: |
Line 848: |
| {| style="border: 1px solid black; border-spacing: 0; margin-right: 5px; color: black;" | | {| style="border: 1px solid black; border-spacing: 0; margin-right: 5px; color: black;" |
| |+ style="color: #c1c1b8;" | '''Armed Prowler''' | | |+ style="color: #c1c1b8;" | '''Armed Prowler''' |
| |+ [[File:prowlerarmed.png|center|307px|caption]] | | |+ [[File:Prowler50cal2023.jpg|center|307px|caption]] |
| |- | | |- |
| | style="text-align: center; width: 150px; background: #808080;" | '''Vendor(s):''' | | | style="text-align: center; width: 150px; background: #808080;" | '''Vendor(s):''' |
| Line 3,041: |
Line 891: |
| {| style="border: 1px solid black; border-spacing: 0; margin-right: 5px; color: black;" | | {| style="border: 1px solid black; border-spacing: 0; margin-right: 5px; color: black;" |
| |+ style="color: #c1c1b8;" | '''Armed Prowler (M2 Variant)''' | | |+ style="color: #c1c1b8;" | '''Armed Prowler (M2 Variant)''' |
| |+ [[File:Prowlerhmg2023.jpeg|center|307px|caption]] | | |+ [[File:Prowler50cal2023.jpg|center|307px|caption]] |
| |- | | |- |
| | style="text-align: center; width: 150px; background: #808080;" | '''Vendor(s):''' | | | style="text-align: center; width: 150px; background: #808080;" | '''Vendor(s):''' |
| Line 3,079: |
Line 929: |
| <li style="display: inline-table;"> | | <li style="display: inline-table;"> |
| {| style="border: 1px solid black; border-spacing: 0; margin-right: 5px; color: black;" | | {| style="border: 1px solid black; border-spacing: 0; margin-right: 5px; color: black;" |
| |+ style="color: #c1c1b8;" | '''Armed Qilin (M134)''' | | |+ style="color: #c1c1b8;" | '''Qilin (Minigun+)''' |
| |+ [[File:Qilinm134.jpeg|center|307px|caption]] | | |+ [[File:Minigunquilin2023.jpg|center|307px|caption]] |
| |- | | |- |
| | style="text-align: center; width: 150px; background: #808080;" | '''Vendor(s):''' | | | style="text-align: center; width: 150px; background: #808080;" | '''Vendor(s):''' |
| Line 3,117: |
Line 967: |
|
| |
|
|
| |
|
| '''Advanced Rebel VTOL Training.''' | | '''VTOLS:''' |
| *Allows retrieval and purchase of VTOLs.
| |
| *Xian (Airdrop) does not require this license.
| |
| | |
| | |
| <li style="display: inline-table;"> | | <li style="display: inline-table;"> |
| {| style="border: 1px solid black; border-spacing: 0; margin-right: 5px; color: black;" | | {| style="border: 1px solid black; border-spacing: 0; margin-right: 5px; color: black;" |
| |+ style="color: #c1c1b8;" | '''Blackfish (Vehicle Transport)''' | | |+ style="color: #c1c1b8;" | '''Blackfish (Vehicle Transport)''' |
| |+ [[File:blackfish.jpg|center|307px|caption]] | | |+ [[File:Blackfish2023.jpg|center|307px|caption]] |
| |- | | |- |
| | style="text-align: center; width: 150px; background: #808080;" | '''Vendor(s):''' | | | style="text-align: center; width: 150px; background: #808080;" | '''Vendor(s):''' |
| Line 3,158: |
Line 1,004: |
| {| style="border: 1px solid black; border-spacing: 0; margin-right: 5px; color: black;" | | {| style="border: 1px solid black; border-spacing: 0; margin-right: 5px; color: black;" |
| |+ style="color: #c1c1b8;" | '''Blackfish (Infantry Transport)''' | | |+ style="color: #c1c1b8;" | '''Blackfish (Infantry Transport)''' |
| |+ [[File:blackfish.jpg|center|307px|caption]] | | |+ [[File:Blackfish2023.jpg|center|307px|caption]] |
| |- | | |- |
| | style="text-align: center; width: 150px; background: #808080;" | '''Vendor(s):''' | | | style="text-align: center; width: 150px; background: #808080;" | '''Vendor(s):''' |
| Line 3,164: |
Line 1,010: |
| |- | | |- |
| | style="text-align: center; width: 150px; background: #808080;" | '''Base Price:''' | | | style="text-align: center; width: 150px; background: #808080;" | '''Base Price:''' |
| | style="text-align: center; width: 150px; background: #808080;" | $1,000,000 / 70WPs | | | style="text-align: center; width: 150px; background: #808080;" | $1,250,000 / 70WPs |
| |- | | |- |
| | style="text-align: center; width: 150px; background: #808080;" | '''Base Virtual Storage:''' | | | style="text-align: center; width: 150px; background: #808080;" | '''Base Virtual Storage:''' |
| Line 3,189: |
Line 1,035: |
|
| |
|
|
| |
|
| '''Advanced Rebel Truck Training:''' | | '''Trucks:''' |
| *Allows retrieval and purchase of Ammo Trucks:
| |
| *These Vehicles Are Illegal can be seized.
| |
| *Ammo Trucks have limitations set in place to avoid infinite ammunition.
| |
| *Can re-arm roughly 3 Ghosthawks.
| |
| *Ammo Trucks cannot be refilled and need to be stored to refill ammunition cargo.
| |
| | |
| | |
| <li style="display: inline-table;"> | | <li style="display: inline-table;"> |
| {| style="border: 1px solid black; border-spacing: 0; margin-right: 5px; color: black;" | | {| style="border: 1px solid black; border-spacing: 0; margin-right: 5px; color: black;" |
| |+ style="color: #c1c1b8;" | '''Tempest Ammo''' | | |+ style="color: #c1c1b8;" | '''Tempest Ammo''' |
| |+ [[File:Tempestammo20230310.jpeg|center|307px|caption]] | | |+ [[File:Tempestammo2023.jpg|center|307px|caption]] |
| |- | | |- |
| | style="text-align: center; width: 150px; background: #808080;" | '''Vendor(s):''' | | | style="text-align: center; width: 150px; background: #808080;" | '''Vendor(s):''' |
| Line 3,236: |
Line 1,075: |
| {| style="border: 1px solid black; border-spacing: 0; margin-right: 5px; color: black;" | | {| style="border: 1px solid black; border-spacing: 0; margin-right: 5px; color: black;" |
| |+ style="color: #c1c1b8;" | '''Zamak Ammo''' | | |+ style="color: #c1c1b8;" | '''Zamak Ammo''' |
| |+ [[File:Zamakammo20230320.jpeg|center|307px|caption]] | | |+ [[File:Zamakammo2023.jpg|center|307px|caption]] |
| |- | | |- |
| | style="text-align: center; width: 150px; background: #808080;" | '''Vendor(s):''' | | | style="text-align: center; width: 150px; background: #808080;" | '''Vendor(s):''' |
| Line 3,279: |
Line 1,118: |
| *Licenses are non-storable Ex: Vigi Arrests. | | *Licenses are non-storable Ex: Vigi Arrests. |
| *Any licenses bought over this will reset ALL ADVANCED REBEL LICENSES. | | *Any licenses bought over this will reset ALL ADVANCED REBEL LICENSES. |
| *Ex: Adv. Rebel and Adv. Rebel VTOL will be removed if you purchase a [https://wiki.olympus-entertainment.com/wiki/Worker%27s_Protection WPL], [https://wiki.olympus-entertainment.com/wiki/Vigilante Vigilante] or [https://wiki.olympus-entertainment.com/wiki/Taxi Taxi License]. | | *Ex: Adv. Rebel and Adv. Rebel VTOL will be removed if you purchase a [[Worker's Protection | WPL]], [[Vigilante | Vigilante]] or [[Taxi | Taxi License]]. |
| | *All processing bonuses from the advanced rebel licenses stack with other processing bonuses from other sources multiplicatively such as: [[Gangs & Groups#Perks | Gang Perks]], [[Gang Base | Gang Base]], Processing bonuses from large runs, etc. For example: If it takes 10 seconds to process a batch and you have 15% faster processing, and 10% from advanced rebel processing license it would be: 10 * 0.85 * 0.9 = 7.65 (Multiplicative). |